| Oracle® HTML DB 2 Day Developer Release 1.6 Part Number B14377-01 |
|
|
PDF · Mobi · ePub |
| Oracle® HTML DB 2 Day Developer Release 1.6 Part Number B14377-01 |
|
|
PDF · Mobi · ePub |
Web services enable applications to interact with one another over the Web in a platform-neutral, language independent environment. In a typical Web services scenario, a business application sends a request to a service at a given URL by using the HTTP protocol. The service receives the request, processes it, and returns a response. You can incorporate calls to external Web services in applications developed in Oracle HTML DB.
Web services in Oracle HTML DB are based on SOAP (the Simple Object Access Protocol). SOAP is a World Wide Web Consortium (W3C) standard protocol for sending and receiving requests and responses across the Internet. SOAP messages can be sent back and forth between a service provider and a service user in SOAP envelopes.
This tutorial illustrates how to call a Web service from within an Oracle HTML DB application.
Topics in this section include:
Note:
The SOAP 1.1 specification is a W3C note. (The W3C XML Protocol Working Group has been formed to create a standard that will supersede SOAP.)For more information on Simple Object Access Protocol (SOAP) 1.1 see:
http://www.w3.org/TR/SOAP/
To utilize Web services in Oracle HTML DB, you create a Web service reference using a wizard. Each Web service reference is based on a Web Services Description Language (WSDL) document that describes the target Web service. When you create a Web service reference, the wizard analyzes the WSDL and collects all the necessary information to create a valid SOAP message.
When you create a Web service reference you need to decide how to locate the WSDL. You can locate a WSDL two ways:
By searching a UDDI registry for either a service name or business name.
A Universal Description, Discovery, and Integration (UDDI) registry is a directory where businesses register their Web services.
By entering the URL to the WSDL document.
In this tutorial you will create Web service references by searching a UDDI registry.
First, create a new application.
To create an application:
From the Application Builder home page, click Create Application.
On Select Creation Method, select From Scratch and click Next.
On Create Application:
For Name, enter Web Services.
From Pages, select 1.
Click Next.
For Tabs, accept the default One Level of Tabs and click Next.
For Page Names, enter Web Services and click Next.
For Page Tab Name, enter Web Services and click Next.
On Theme, select Theme 2 and click Next.
Review your selections and click Create Application.
The Application Builder home page appears.
If your environment requires a proxy server to access the Internet, you must specify a proxy server address on the Application Attributes page before you can create a Web service reference.
To specify a proxy address for an application:
On the Application Builder home page, click Edit Attributes.
Under Application Definition, enter the proxy server in Proxy Server.
Click Apply Changes.
In this exercise you create a form which displays stock quotes based on a stock symbol you provide. You will create a Web service reference by searching the UDDI registry for a business name:
To create a Web service reference by search for a business name:
Navigate to the Application Builder home page.
Click Shared Components.
Under Logic, select Web Service References.
The Web Service References page appears.
Click Create.
When prompted whether to search a UDDI registry to find a WSDL, select Yes and click Next.
For UDDI Location, select IBM UDDI and click Next.
On Search for Services:
For Search Type, select Business Name.
In Name, enter:
%xMethods%
Click Search.
Under Matching Services, select xMethods Delayed Stock Quotes.
Click Next.
A summary page appears describing the selected Web service.
Review your selection and click Next to continue.
The URL to the WSDL document displays in the WSDL Location field.
Click Finish.
Next, you will create a form to display a stock quote based on the stock symbol you provide.
To create a form after creating a Web Service Reference:
On Web Service Reference Added page, select Create Form on Web Service.
On Web Service Reference and Operation:
For Web Service Reference, select XMethods Delayed Stock Quotes.
For Operation, select getQuote.
Click Next.
For Identify Page and Region Attributes accept the defaults and click Next.
In Region Title, enter Get Stock Quote.
Accept the other defaults.
Click Next.
For Items for Input Parameters, accept the defaults and click Next.
For Items for Output Parameters:
For Item Label, enter Stock Price.
Accept the other defaults.
Click Finish.
Click Run Page to view the form.
On the Log in page, enter the User Name and Password for your workspace and click Login.
A form resembling Figure 6-1 appears.
Test the form. In Symbol, enter a stock symbol (such as ORCL) and click Submit.
The associated stock price displays in the Stock Price field.
Select Edit Application from the Developer toolbar to return to the Application Builder home page.
Next, you will create a form that displays market futures. In this exercise you will create a Web service reference by search a UDDI registry for a service name. Then, you will create a form and report.
To create a new Web service by searching for a service name:
Navigate to the Application Builder home page.
Click Shared Components.
The Shared Components page appears.
Under Logic, select Web Service References.
The Web Service References page appears.
Click Create.
When prompted whether to search a UDDI registry to find a WSDL, select Yes and click Next.
For UDDI Location, select XMethods UDDI and click Next.
On Search for Services:
For Search Type, select Service Name.
In Name, enter xignite and click Search.
This is a search engine for market news.
Under Matching Services, select XigniteFutures.
Click Next.
A summary page appears describing the selected Web service.
Review your selection and click Next to continue.
The WSDL Location field displays the URL to the WSDL document.
Click Finish.
The Web service reference, XigniteFutures, is added to the Web Service References Repository.
Next, you need to create a page that contains a form and report.
To create a form and report after creating a Web Service Reference:
On Web Service Reference Added page, select Create Form and Report on Web Service.
On Web Service Reference and Operation:
For Web Service Reference, select XigniteFutures.
For Operation, select ListFuturesByExchange.
Click Next.
On Identify Page and Region Attributes:
Change Form Region Title to List Futures By Exchange.
Accept the other defaults and click Next.
For Items for Input Parameters:
For P2_USERNAME, P2_PASSWORD, P2_TRACER, select No in the Create column.
For P2_EXCHANGE, accept the default Yes in the Create column.
Click Next.
On Base Node:
For Temporary Result Set Name (Collection), accept the default.
Result Tree to Report On, select Future (tns:Future).
Click Next.
For Result Parameters to Display, select all the parameters and click Finish.
Click Run Page to view the form.
If a Log in page appears, enter the User Name and Password for your workspace and click Login.
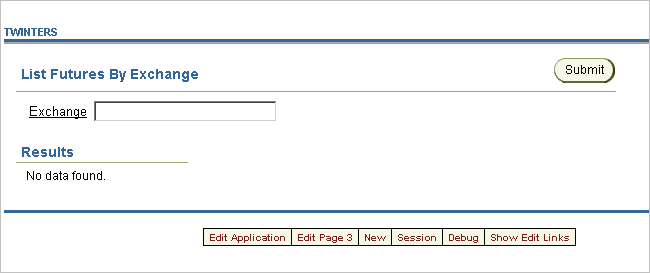
A form and report resembling Figure 6-2 appears. Notice that the List Futures by Exchange Form on the top of the page contains a data entry field and a submit button, but the Results Report does not contain any data.
Figure 6-2 List Futures by Exchange Form and Report without Data

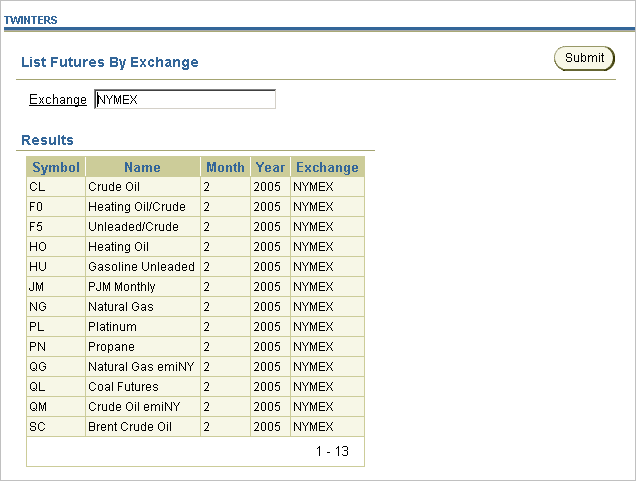
Test the form. In Exchange, enter NYMEX and click Submit.
The report at the bottom of the page should resemble Figure 6-3. The report lists the symbol, name, month, and year of futures from the New York Mercantile Exchange (NYMEX).
Figure 6-3 List Futures by Exchange Form and Report with Data
