| Oracle® Secure Backup Installation Guide Release 10.1 Part Number B14235-05 |
|
|
PDF · Mobi · ePub |
| Oracle® Secure Backup Installation Guide Release 10.1 Part Number B14235-05 |
|
|
PDF · Mobi · ePub |
This chapter explains how to install Oracle Secure Backup on hosts that run the Windows operating system.
This chapter covers the following topics:
Preparing Windows Media Servers for Oracle Secure Backup Installation
Running the Oracle Secure Backup Windows Installer setup.exe
Perform the following actions before you begin:
Decide which roles to assign the hosts in your network, as described in "Planning Your Administrative Domain".
Ensure that each host has a network connection and runs TCP/IP.
If you are installing Oracle Secure Backup on a media server, physically attach the libraries and drives (if any) that you intend to make available for use by Oracle Secure Backup. Reboot the media server if required.
For hosts that are to be used in the media server role, follow the procedures in "Preparing Windows Media Servers for Oracle Secure Backup Installation" to prevent conflicts between Oracle Secure Backup and other software on your system.
Log on to your host as either the Administrator user or as a user that is a member of the Administrators group.
Preparing Windows hosts for Oracle Secure Backup installation requires the following steps:
Note:
These steps are only required for hosts that are configured for the media server role.Before installing Oracle Secure Backup on hosts configured for the media server role, you must disable any existing drivers for tape drives and libraries that you intend to use with Oracle Secure Backup. These drivers conflict with the Oracle Secure Backup device driver used to support these devices.
To disable tape drive and library device drivers on Windows platforms:
From the Control Panel, click System.
Click the Hardware tab.
Click Device Manager to launch the Device Manager window.
If no tape libraries are attached to your system, skip to Step 8.
If a tape library is attached to your system, continue to Step 4.
Select Medium Changers from the navigation tree.
Note:
Medium Changer devices are only displayed in the Device Manager window if a library is attached to the system.Select the icon that represents your library and right-click with your mouse. A menu appears.
Disable the medium changer driver.
On Windows 32-bit, select Disable.
On Windows Itanium and Windows x64, select Uninstall.
Repeat steps 5 and 6 for each medium changer that appears in the expanded list.
Select Tape Drives from the navigation tree to display installed drivers for tape drives.
Note:
If Tape Drives is not in the navigation tree, then your tape drive may be listed in the navigation tree under Other Devices instead.Select the icon that represents your tape drive and right-click with your mouse. A menu appears.
Disable the tape drive driver.
On Windows 32-bit, select Disable.
On Windows Itanium and Windows x64, select Uninstall.
Reboot your host.
Note for Windows Itanium and Windows x64:
If a new tape library is connected to the system after the installation of Oracle Secure Backup software, then perform the following steps:
Uninstall any existing driver for the newly connected medium changers and tape drives.
Run the following commands for installing Oracle Secure Backup driver for tape drives and medium changer devices:
obdrvctl -add ob -device SCSI\Sequential
obdrvctl -add ob -device SCSI\Changer
The Removable Storage service is used to manage removable media, drives, and libraries. On Windows hosts configured for the media server role, this service must be disabled for the Oracle Secure Backup device driver to correctly control media devices.
To disable the Removable Storage service:
From the Windows Control Panel, click Administrative Tools.
Click Services to view the list of services on your host.
Right-click the Removable Storage service and choose Properties.
In the Properties window, if the service is running, then click Stop to stop the service. Set the Startup Type field to Disabled.
Click OK.
When you try to use Removable Storage or a third-party program to manage a media changer device, the device may not work correctly. Also, you may experience one or more of the following symptoms:
You receive an error message.
The device does not come online.
Oracle Secure Backup's device driver is unable to bind to tape drive and library devices when the host bus adapter (HBA) used to connect them to the host is using a STORport Miniport Driver. This problem occurs if you install a Storport-based miniport driver for the fibre channel HBA that you connect the device to. This problem does not occur if you use a SCSIPort-based miniport driver for the HBA device.
Complete the following steps to install Oracle Secure Backup as a client, media server, administrative server or any combination of these roles.
During the installation process, the Oracle Secure Backup Setup Wizard copies all Oracle Secure Backup files to the local host and generates Windows Registry entries.
Note:
If you are installing Oracle Secure Backup in an Oracle Real Application Clusters (RAC) environment, then you must install Oracle Secure Backup on each node in the cluster.Select one of the following install options:
If you are installing Oracle Secure Backup from a CD-ROM, insert the CD-ROM. If AutoPlay is enabled, then the setup.exe program starts automatically and opens the Oracle Secure Backup Setup Wizard.
Note:
If Windows AutoPlay is not enabled, then open the drive containing the installation CD-ROM using Windows Explorer and run thesetup.exe program.If you are installing Oracle Secure Backup from an Oracle Technology Network (OTN) download, then run the setup.exe program from the folder into which the download TAR file contents were extracted, as explained in "Extracting Oracle Secure Backup from OTN Download on Linux or Solaris".
The Oracle Secure Backup Setup Wizard starts and the Welcome dialog box appears.
Click Next to continue.
The Readme Information dialog box displays.
Click Next to continue.
The Customer Information dialog box displays.
Figure 2-2 Customer Information Dialog Box
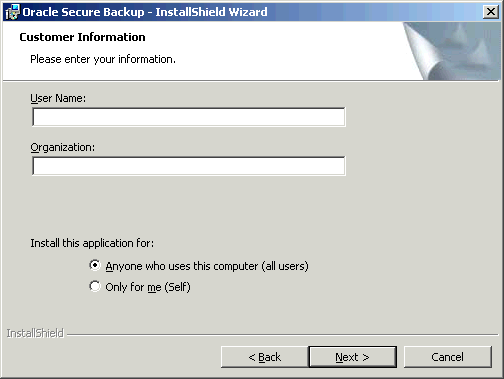
Enter your customer information as follows:
Enter your name in the User Name box and the name of your company in the Organization box.
Select a target user for the application: Anyone who uses this computer (all users) or Only for me (current user).
Click Next to continue.
The Oracle Secure Backup Setup dialog box appears. (See Figure 2-3.)
"Choosing Roles for Hosts in Your Administrative Domain" explains that a single host can assume multiple roles. Roles in Oracle Secure Backup are additive rather than exclusive. You have the following options when choosing roles:
To install the Windows host as client only, skip to Step 9.
Note:
Every installation of Oracle Secure Backup on Windows includes a client installation.To install the Windows host as a media server, proceed to Step 6.
To install the Windows host as an administrative server but not as a media server, skip to Step 7.
To install the Windows host as a media server, click the menu of the Media Server icon. Figure 2-4 shows the menu options.
Figure 2-4 Setup Dialog Box: Media Server Menu
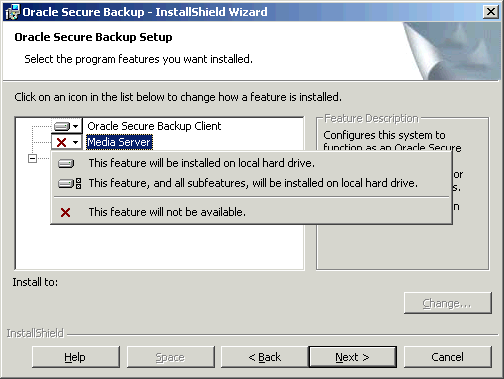
Select This feature will be installed on local hard drive. Selecting this option removes the X from the Media Server icon and includes the Media Server in the installation.
Caution:
When there are no media devices attached to a Windows 2000 host, do not install the Windows host as a media server.If you configure the media server role on a Windows 2000 host with no attached media devices, then the operating system will continuously try to load the Oracle Secure Backup driver. Continuously trying to load the driver uses most of the available CPU cycles on that system, and renders the system unusable.
To configure the Windows host to also be an administrative server, proceed to Step 7. Otherwise, skip to Step 9.
To install the Windows host as an administrative server, click the menu of the administrative server icon. Figure 2-5 shows the menu options.
Figure 2-5 Setup Dialog Box: Administrative Server Menu
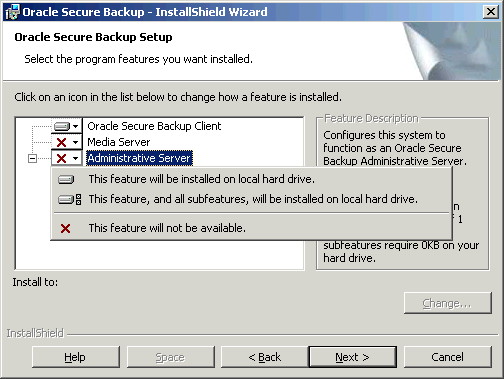
Select This feature will be installed on local hard drive. Selecting this option removes the X from the administrative server icon and includes the administrative server in the installation.
If you plan to perform Oracle database backups and restores with RMAN, then enable the action for Create "oracle" user in the submenu attached to the administrative server icon.
Figure 2-6 Setup Dialog Box: Create "Oracle" User Menu
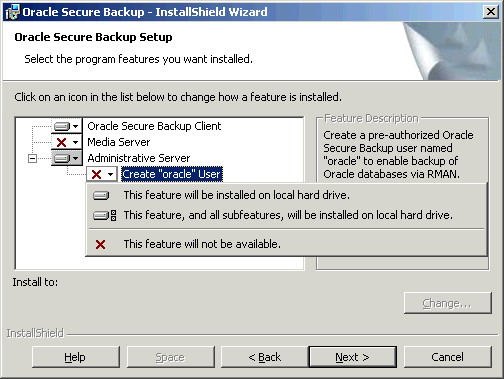
If this choice is enabled, the installer creates an Oracle Secure Backup user called oracle (with the rights of the oracle class) whose purpose is to facilitate backup and restore of Oracle databases with Recovery Manager. If the X is removed from Create "oracle" user, then the oracle user is created.
Note:
You only need to create the oracle user if you plan to use Oracle Secure Backup with RMAN.
If you intend to use Oracle Secure Backup to perform one-time, RMAN-initiated, or unprivileged backups on Windows clients, then you must modify the Oracle Secure Backup admin and oracle users to assign them Windows credentials (a domain, username and password) that are valid at the client with required privileges after you complete the Oracle Secure Backup installation. Otherwise, Oracle Secure Backup is unable to perform the backup operation. This requirement applies regardless of the platform that acts as the administrative server.
Before electing to create an Oracle Secure Backup oracle user, be aware that this choice involves a trade-off between convenience and security.
If you do not plan to use Oracle Secure Backup to back up your Oracle databases, then leave the Create "oracle" user option unselected. This is the default.
In addition to the options described in steps 6 and 7, you can perform the following actions in the Oracle Secure Backup Setup dialog box:
Click Help for detailed descriptions of the installation options.
Click Change to change the destination folder for the installation.
Click Space to display the disk space required for the installation.
Click Next to continue.
If you are configuring this host to act as an administrative server, the Oracle Secure Backup Admin User Password dialog box appears. (See Figure 2-7.)
Figure 2-7 Admin User Password Dialog Box
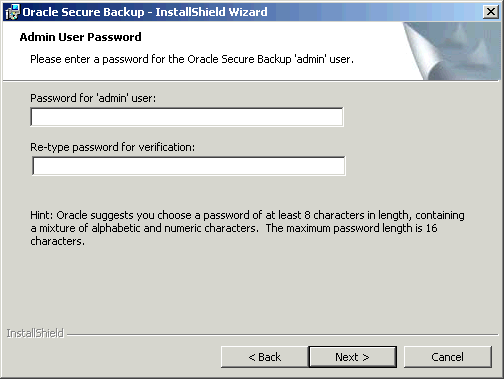
Choose a password for the Oracle Secure Backup administrative user, and enter it in both fields, for confirmation. The maximum password length is 16 characters.
Note:
Oracle suggests that you choose an administrative user password of at least eight characters in length, containing a mixture of alphabetic and numeric characters. The maximum length is 16 characters.The Ready to Install the Program dialog box displays.
Click Install to start copying files.
A progress bar appears. When the files are copied the InstallShield Completed dialog box displays.
Click Finish to continue.
The Oracle Secure Backup Configuration dialog box displays.
Click Next to continue.
The Oracle Secure Backup Service Startup dialog box displays.
Figure 2-8 Oracle Secure Backup Service Startup
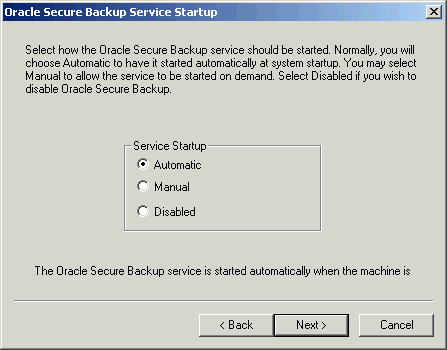
Click one of the possible modes in which to start the Oracle Secure Backup service. Your choices are:
Automatic
The Oracle Secure Backup service starts automatically when you reboot your host.
Manual
The Oracle Secure Backup service must be started manually by a user who is a member of the Administrators group.
Disabled
The Oracle Secure Backup service is disabled.
Click Next to continue.
The Oracle Secure Backup Service Login dialog box appears.
Select one of the following options:
Note:
By default, the Oracle Secure Backup service logs on as the Local System account, which is an administrative account. You can select the This Account option to specify a different account for the Oracle Secure Backup Service.Select System Account if you plan to run the Oracle Secure Backup service daemon (and associated subordinate daemons) with full privileges.
Select This Account if you plan to run the Oracle Secure Backup service daemon (and associated subordinate daemons) with the privilege set associated with an existing Windows user account. You must fill in the Windows user account name and password.
If you choose this option, ensure that the Windows user account you select meets the following criteria:
The account you choose must belong to the Backup Operators group.
No change in password at login is required of the account.
The account must be set so that the password never expires.
The account must have backup and restore rights.
The account must be able to restore files and directories.
The account must be able to log on as a service.
The account must be able to act as part of the operating system.
The account must be able to increase quotas.
The account must be able to replace a process level token.
Click Finish to complete the installation.
If you installed Windows as an administrative server—or combined media server and administrative server—a Command Prompt window runs briefly in the background. When this window terminates, installation is complete.
When you have performed all of the preceding tasks, Oracle Secure Backup installation on this host is complete. Repeat this installation process for each Windows host in your administrative domain.
Note:
Depending upon your installation, you may have to perform subsequent configuration tasks, such as configuring your administrative domain.Chapter 3, "Configuring a Domain and Devices on Windows" describes configuring the administrative domain and devices with obtool on Windows.
You can also perform configuration tasks using the Oracle Secure Backup Web tool or Oracle Enterprise Manager. See Oracle Secure Backup Reference for information about obtool commands, and Oracle Secure Backup Administrator's Guide for information about using obtool.
If your Windows host is protected by a firewall, the firewall must be configured to permit Oracle Secure Backup daemons on the host to communicate with the other hosts in your administrative domain. Oracle Secure Backup includes daemon components that listen on ports 400 and 10000, as well as other dynamically assigned ports.
For example, Windows XP Service Pack 2 and Windows Server 2003 contain a built-in Windows Firewall which, in the default configuration, blocks inbound traffic on ports used by Oracle Secure Backup.
Because the dynamically assigned ports used by Oracle Secure Backup span a broad range of port numbers, your firewall must be configured to allow executables for the Oracle Secure Backup daemons to listen on all ports.
Note:
The Oracle Secure Backup Windows installation provides a sample batch script calledobfirewallconfig.bat in the bin directory under the Oracle Secure Backup home.
This script contains commands that make the required configuration changes for the Windows Firewall on Windows Server 2003 and Windows XP systems having a single network interface. Review the script to determine whether it is suitable for your environment. You can run the script after the installation completes.
For details on configuration of other firewalls, see the documentation provided by the vendor. You can refer to the sample script for the Windows Firewall to determine the names of executables that need permission to listen on ports.