| Oracle® Database 2 Day DBA 10g Release 2 (10.2) Part Number B14196-03 |
|
|
PDF · Mobi · ePub |
| Oracle® Database 2 Day DBA 10g Release 2 (10.2) Part Number B14196-03 |
|
|
PDF · Mobi · ePub |
This chapter discusses the management of schema objects. The chapter contains the following sections:
A schema is a collection of database objects. A schema is owned by a database user and has the same name as that user. Schema objects are logical structures created by users. Objects such as tables or indexes hold data, or can consist of a definition only, such as a view or synonym.
Note:
There is no relationship between a tablespace and a schema. Objects in the same schema can use storage in different tablespaces, and a tablespace can contain data from different schemas.You can create and manipulate schema objects with SQL or with Oracle Enterprise Manager. The underlying SQL is generated for you by Oracle Enterprise Manager.
This section contains the following topics:
See Also:
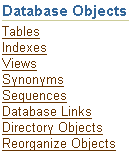
Oracle Database SQL Reference for more detailed information about schema objects, object names, and data typesTo explore and manage the schema objects in your database, open the Database Administration property page (see Figure 5-2, "Database Administration Page") and click one of the links in the Database Objects section. Figure 8-1 shows these links.
Click the links in the Database Objects heading to see the objects in your database. You can also access any schema object from the Search section of any database object home page.
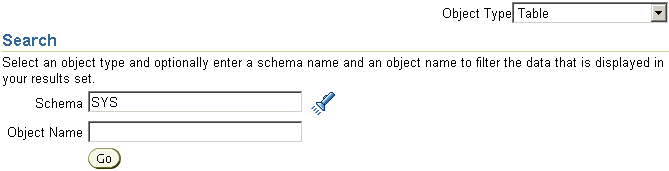
When you select a schema link, a standard Object_Name page appears. As shown in Figure 8-2, you can search for objects by entering values in the Schema and Object Name boxes.
Figure 8-2 Search Section for Database Object Pages
You can also access other schema objects, including those with no direct link under the Database Objects heading. To select a specific database object, select an option from the Object Type list.
Every object in the database belongs to one schema and has a unique name within that schema. When you create an object, you must ensure it is in the schema where you intend to store it. Generally, you place all of the objects that belong to a single application in the same schema.
A database object name must abide by certain rules, including that it be unique within its schema. In addition, object names cannot be longer than 30 bytes and must begin with a letter. If you attempt to create an object with a name that violates any of these rules, then Oracle raises an error.
The following sections discuss database tables and how to create and modify them:
Tables are the basic unit of data storage in an Oracle database. They hold all user-accessible data. Each table has columns and rows. In an employees table, for example, there can be columns called last_name and employee_id. Each row in the table would contain a value for employee name and number.
The most common type of table in an Oracle database is a relational table, structured like the employees table. Two other types of table are supported: object tables and XMLType tables. Any of the three table types can be defined as permanent or temporary. Temporary tables can be made available to multiple users or only to the user who creates the table.
You can build relational tables in either heap or index-organized structures. In the former, the rows are not stored in any particular order. In index-organized tables, the row order is determined by the values in one of more selected columns.
This section concentrates on permanent, heap-organized tables. For information about other table types and when to use them, see the Oracle Database Administrator's Guide, Oracle Database Concepts, and the Oracle Database Performance Tuning Guide. For the syntax required to create and alter tables, see the Oracle Database SQL Reference.
Each column in a table is defined with one or more characteristics as follows:
This required attribute defines the nature of the data to be stored in the column and can indicate the longest value that can be placed in the column.
This optional attribute determines valid values for the column. Some constraints can be defined at the column level or at the table level. In Enterprise Manager, the only constraint defined at the column level on the Create Table property page is the NOT NULL constraint, which requires that a value is included in the column for every row in the table.
This value is automatically stored in the column whenever a new row is inserted without a value being provided for the column.
These column characteristics are described in more detail in the following sections.
When you create a table, you must specify a data type for each of its columns. When you create a procedure or stored function, you must specify a datatype for each of its arguments.
These data types define the domain of values that each column can contain or each argument can have. For example, DATE columns cannot accept the value February 29 (except for a leap year) or the values 2 or SHOE. Each value subsequently placed in a column assumes the column datatype. For example, if you insert 17-JAN-2004 into a date column, then Oracle treats that character string as a date value after verifying that it translates to a valid date.
Table 8-1 lists some common Oracle built-in datatypes.
| Datatype | Description |
|---|---|
|
Variable-length character string having maximum length
|
|
|
Number having precision |
|
|
Valid date range from January 1, 4712 BC to December 31, 9999 AD. |
|
|
A character large object containing single-byte or multibyte characters. Both fixed-width and variable-width character sets are supported, both using the database character set. Maximum size is (4 gigabytes - 1) * (database block size). |
See Also:
Oracle Database SQL Reference for a complete list of Oracle's built-in datatypes.In most tables, you should only need columns of NUMBER, VARCHAR2, and DATE datatypes.
When defining numeric data, you can use the precision option to set the maximum number of digits in the number, and the scale option to define how many of the digits are to the right of the decimal point. For example, a field to hold monetary values might be defined as NUMBER(12,2), providing ten digits for the primary unit of currency (dollars, pounds, marks, and so on) and two digits for the secondary unit (cents, pennies, pfennigs, and so on).
To define a VARCHAR2 field for character data, you must include the size value. Set the size to the maximum number of bytes or characters to be stored in the column. A column to hold postal codes for different countries, for example, might be restricted to 12 bytes by defining it as VARCHAR2(12).
DATE columns are automatically formatted by Oracle to include a date and time component.
The NOT NULL constraint on a column requires that the column must contain a value whenever a row is inserted or updated. Unlike other constraints described in "Table-Level Constraints", which may be defined as part of the column definition or part of the table definition, the NOT NULL constraint must be defined as part of the column definition.
Use a NOT NULL constraint when the data is required for the integrity of the database. For example, if all employees must belong to a specific department, then the column that contains the department identifier should be defined with a NOT NULL constraint. On the other hand, do not define a column as NOT NULL if the data may be unknown or may not exist when rows are added or changed, for example, the second, optional line in a mailing address.
A primary key constraint automatically adds a NOT NULL constraint to the column or columns included in the primary key.
In an Oracle database, you can apply rules to preserve the integrity of your data. For example, in a table containing employee data, the employee name column cannot accept NULL as a value. Similarly, in this table you cannot have two employees with the same ID.
Oracle Database enables you to apply data integrity rules called constraints to tables at the column level or, with the exception of the NOT NULL constraint, at the table level. Any attempt to insert or update a row that violates a constraint results in an error and the statement is rolled back. Likewise, any attempt to apply a new constraint to a populated table also results in an error if any existing row violates the new constraint.
The types of constraints you can apply at the table level are as follows:
Primary Key—Requires that a column (or combination of columns) be the unique identifier of the row. A primary key column does not allow NULL values.
Unique Key—Requires that every value in a column be unique. That is, no two rows can have duplicate values in a specified column or combination of columns. The set of columns is said to be the unique key.
Check—Requires that a column (or combination of columns) satisfy a condition for every row in the table. A check constraint must be a boolean expression that is evaluated using the column value about to be inserted or updated to the row.
Foreign—Requires that all column values in the child table exist in the parent table. The table that includes the foreign key is called the dependent or child table. The table that is referenced is called the parent table. An example of a foreign key constraint is when the department column of the employees table must contain a department ID that exists in the parent department table.
Constraints can be created and, in most cases, modified with different statuses. The options include enabled or disabled, which determine if the constraint is checked when rows are added or modified, and deferred or immediate, which cause constraint validation to occur at the end of a transaction or at the end of a statement, respectively.
See Also:
Oracle Database Concepts for more information on constraints.When you create a table in a locally managed tablespace and use automatic segment space management, you should allow Oracle to build the table using its own storage algorithms. If you need to store a table in a dictionary-managed tablespace, then you can set the storage characteristics for the table.
The preconfigured database you installed does not contain dictionary-managed tablespaces. Therefore, these options are not discussed here but are described in the Oracle Database Administrator's Guide and Oracle Database Concepts manual if you need to use them.
When creating a table with the Create Table page, you can click the Show SQL button to display the SQL statement that has been constructed. This option shows the statement even if it is incomplete, so you need to complete your input to see the SQL statement when using this option.
You can also create a new table with the same the structure and contents as an existing table. This technique can be useful to build a test table that resembles a production table. To do this, select SQL in the Define Using list and complete the statement that is begun for you in the CREATE TABLE AS box. Your query can include all columns and rows from the original table, or you can use the SQL SELECT statement to identify which rows you want, rename columns with column aliases, or exclude certain columns.
Your new table may include a column defined with an abstract data type (ADT). ADTs are created with the CREATE TYPE statement and are described in detail in the Oracle Database SQL Reference.
If you are creating a table containing one or more LOB columns, then you may define different storage options for the LOB components of the table. In most cases, you should use the default settings. If you want to override them, click Set Default LOB Attributes and complete the entries in the Set Default LOB Attributes page. Additionally, you can set LOB attributes for a single column by selecting the column name and clicking Advanced Attributes.
You may also create tables with multiple partitions. Each partition is a separate database object with many of the characteristics of an individual table, although each partition contains the same column definitions as its parent table. Partitioning a very large table can simplify the management of the table, because each partition can be configured independently of the other partitions. Also, some operations against a partitioned table may be more efficient than against the table if it were not partitioned. This is because the partitions may be spread across more disk drives than a non-partitioned table and because the optimizer may be able to avoid processing the contents of every partition when processing certain SQL statements.
For some applications, particularly data warehousing, with large tables that are frequently queried but very rarely updated, you may create compressed tables. These require less disk storage than uncompressed tables (which are the default). To create a compressed table, you will need to write your own CREATE TABLE statement because the option is not available in Enterprise Manager.
See Also:
Oracle Database Concepts and Oracle Database Administrator's Guide for design and management considerations of different table types and Oracle Database SQL Reference for the syntax to create tablesYou can use Enterprise Manager to view all of the tables in a specified schema. You can also view the table definitions.
To view tables:
In the Administration page, click Tables.
The Tables property page appears.
In the Schema box, enter the name of a schema. For example, enter SYS. Alternatively, click the flashlight icon adjacent to the Schema box to search for a schema.
Leave Object Name blank to search for all tables in a schema. Alternatively, enter an object name or click the flashlight icon to search for one.
Click Go.
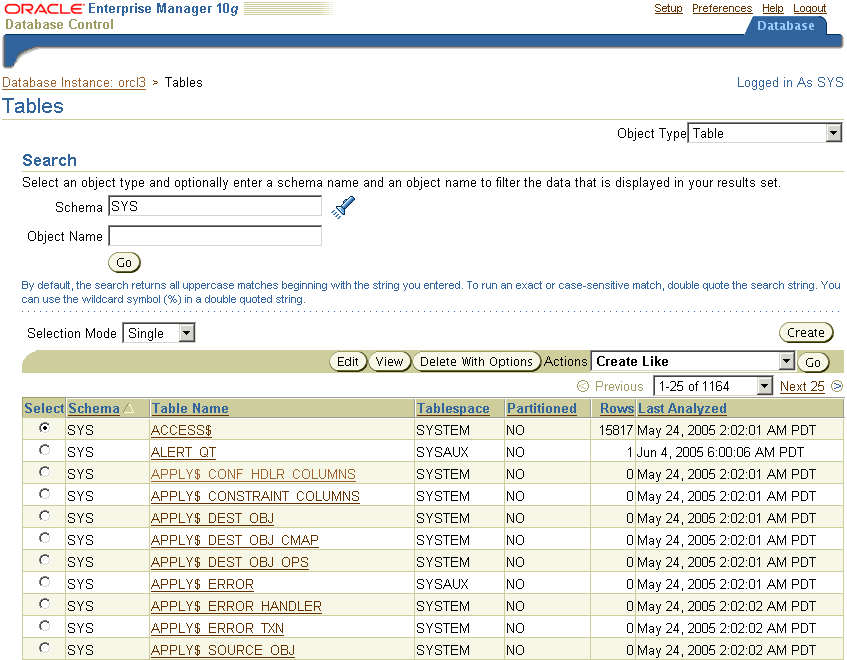
The tables in the specified schema are displayed. Some of the tables in the SYS schema are shown in Figure 8-3.
In the results list, select a table. Click View or click the link in the Table Name column to view a table definition.
The View Table: table_name page appears.
Besides viewing table names and table definitions, you can view the data stored in the table as well as the SQL statement used to display the data. You can also change the SQL statement to alter the result set.
To view table data:
Search for a table as explained in "Viewing Tables". For example, search for the tables in the hr schema.
In the results list, select the table whose data you want to view. For example, select EMPLOYEES.
In the Actions list, select View Data.
Click Go.
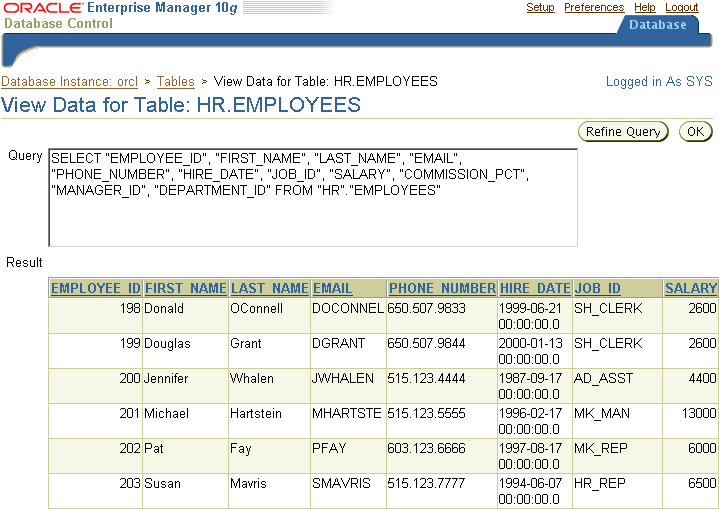
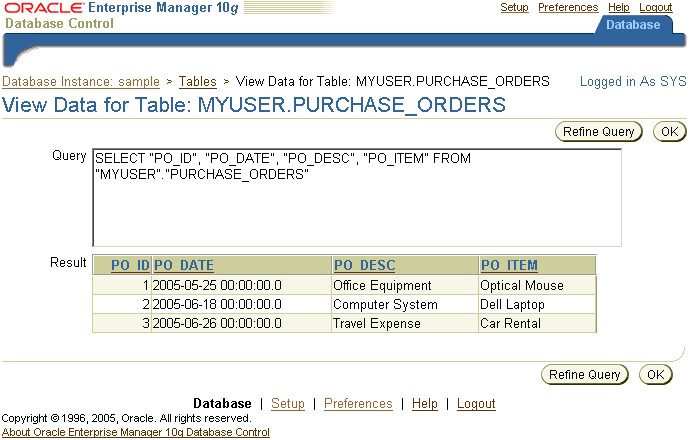
The View Data for Table: table_name page appears. Part of the page for hr.employees is shown in Figure 8-4. The Query box displays the SQL query that was executed in order to view the data for the table. The Result section shows the data in the table.
Click a column name to sort the data in a column.
Click Refine Query to change the query.
The Refine Query for Table: table_name page appears. This page enables you to select the columns to display. It also enables you to specify a WHERE clause for the SQL statement to limit the results.
You can also write your own SQL query using a SELECT statement to see the contents of a table. You can execute SQL statements by starting an iSQL*Plus session by clicking iSQL*Plus in the Related Links section of any of the Database property pages. A detailed description of the SELECT statement and its options is contained in the Oracle Database SQL Reference.
You can use Enterprise Manager to create tables. You can do so as a database administrator or user with the CONNECT role.
During table creation with Enterprise Manager, you can estimate the size of the table. This action enables you to determine whether you have sufficient room in your database or on the available disks to store the table. If you do not have room, then you can still create the table but not populate it until you have obtained the necessary storage.
To estimate the table size:
In the Database Objects section of the Administration page, click Tables.
The Tables page appears.
Click Create.
The Create Table: Table Organization page appears.
Select Standard, Heap Organized and click Continue.
The Create Table page appears.
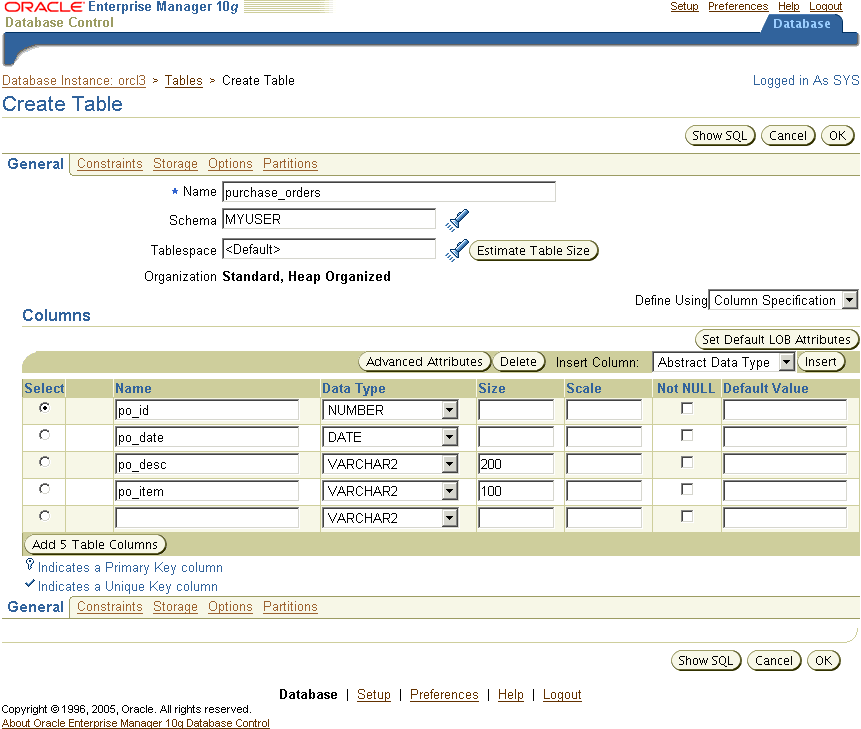
Enter the table and schema names as well as your column names and datatypes, then click Estimate Table Size.
The Estimate Table Size page appears.
In Projected Row Count, enter the projected number of rows in the table and click Estimate Table Size
Enterprise Manager returns its estimate in MB.
In the following example, you create a table called purchase_orders in the MYUSER schema that you created in Chapter 7, "Administering Users and Security". The table will have columns po_number, po_description, po_date, and po_item.
To create a table in the MYUSER schema:
In the Database Objects section of the Administration page, click Tables.
The Tables page appears.
Click Create.
The Create Table: Table Organization page appears.
Select Standard, Heap Organized.
Click Continue.
The Create Table page appears. See Figure 8-5, "Create Table Page".
In the Name box, enter purchase_orders as the table name. In the Schema box, enter MYUSER. In the Tablespace box, accept Default.
In the Columns section, enter the following columns with the datatypes:
po_id as NUMBER
po_date as DATE
po_desc as VARCHAR2(200)
po_item as VARCHAR2(100)
You can leave Scale, Not NULL, and Default Value blank.
|
Note: If you want to the create table with partitions, you can do so at this step by clicking Partitions. |
Click OK.
An update message appears indicating that the table has been successfully created.
See Also:
"About Tables" for more information.You can use Enterprise Manager to add and delete columns or add constraints. The following sections show how to add a column, and how to add and drop a table constraint.
In this example, you modify the purchase_orders table by adding a new column called po_item2.
To add the po_item2 column:
On the Tables page, enter MYUSER in the Schema box and click Go.
The result list shows the PURCHASE_ORDERS table that you created previously.
Select the PURCHASE_ORDERS table and click Edit.
The Edit Table: MYUSER.PURCHASE_ORDERS page appears.
In the first available Name box that is blank, enter po_item2 as the new column name. In the Data Type list, select VARCHAR2. In the Size box, enter 100. You can leave Scale, Not NULL, and Default Value blank.
Click Apply.
An Update Message appears indicating that the table has been modified successfully.
See Also:
"About Tables" for more information.This example shows you how to drop a column, in this case, the po_item2 column that was added to the PURCHASE_ORDERS table in "Adding a Column".
To delete the po_item2 column:
On the Tables page, enter MYUSER in the Schema box and click Go.
The result list should shows the PURCHASE_ORDERS table that you created previously.
Select the PURCHASE_ORDERS table and click Edit.
The Edit Table: MYUSER.PURCHASE_ORDERS page appears.
In the Columns section, select the column you want to delete. In this case, select po_item2.
Click Delete.
The row that contained the information for the deleted column, po_item2, becomes blank to indicate that the table has been successfully modified.
You can add constraints to a table with Enterprise Manager. In the current example, assume that you want to enforce the rules that purchase orders are always entered with an ID and that the purchase order ID (po_id) is the primary key of the table. You will add the NOT NULL and primary key constraints to this column.
|
Note: You can also add constraints during table creation. |
To add these constraints to the purchase_orders table:
On the Tables page, enter MYUSER in the Schema box and click Go.
The result list shows the PURCHASE_ORDERS table that you created previously.
Select the PURCHASE_ORDERS table and click Edit.
The Edit Table: MYUSER.PURCHASE_ORDERS page appears.
Select the po_id column and check Not NULL to apply the NOT NULL constraint to the column.
Click Apply
A confirmation message appears.
Click Constraints.
The Constraints property page appears.
Select PRIMARY from the drop-down menu and click Add. This action applies the primary key constraint.
The Add Primary Constraint page appears.
In the Available Columns list, select PO_ID and move it to the Selected Columns list. To keep the default settings for the constraints, do not change the check boxes in the Attributes area of the page.
Click Continue
The new constraint appears on the Constraints page.
Click Apply.
A confirmation message appears. You can view the new constraints by navigating to the View Table page.
See Also:
"Table-Level Constraints" for more information.You can change the status of an existing constraint, for example, from an enabled to a disabled state. This example uses the primary key constraint created in the previous section, "Creating a New Table Constraint".
To disable a constraint:
On the Tables page, enter MYUSER in the Schema box and click Go.
The result list should shows the PURCHASE_ORDERS table that you created previously.
Select the PURCHASE_ORDERS table and click Edit.
The Edit Table: MYUSER.PURCHASE_ORDERS page appears.
Click Constraints.
The Constraints property page appears.
Select the row containing the PRIMARY constraint from the Constraints table and click Edit.
The Edit PRIMARY Constraint page appears.
In the Attributes section, check Disabled.
Click Continue.
Click Apply.
A confirmation message appears. The Disabled column shows that the primary key constraint has been disabled.
You can drop constraints from a table with Enterprise Manager. Although you do not have to disable a constraint before dropping it, you can determine whether the constraint can be dropped by attempting to disable it first. If a constraint in a parent table enforces a foreign key constraint in a child table, and if the child table contains dependent rows, then the constraint cannot always be disabled or dropped.
Continuing the current example, you drop the primary key constraint that you created in the section, "Creating a New Table Constraint".
To drop a constraint:
On the Tables page, enter MYUSER in the Schema box and click Go.
The result list should shows the PURCHASE_ORDERS table that you created previously.
Select the PURCHASE_ORDERS table and click Edit.
The Edit Table: MYUSER.PURCHASE_ORDERS page appears.
Click Constraints.
The Constraints property page appears.
Select the row containing the PRIMARY constraint from the Constraints table and click Delete.
Click Apply.
A confirmation message appears.
You can use Enterprise Manager to load data into tables in batch. Batch loading is useful when you have a lot of data. You can load data from the file system. You can also export data into files.
For loading data with Enterprise Manager, you can use a comma-delimited data file. Enterprise Manager can also create your control file automatically. This SQL*Loader control file tells Oracle how the data is to be loaded. It is different from a database control file.
The following example loads data into the purchase_orders table we created with MYUSER in "Creating a Table: Example". For simplicity, this example loads only three rows. Your control and data files can be different, but the idea is the same for this method of loading.
This example requires you to create a data file named load4.dat on the file system of the database host or on your client host. The contents of the file should be as follows:
1, 25-MAY-2005, Office Equipment, Optical Mouse
2, 18-JUN-2005, Computer System, Dell Laptop
3, 26-JUN-2005, Travel Expense, Car Rental
To load the data file into the myuser.purchase_orders table:
From the Move Row Data section of the Maintenance page, click Load Data from User Files.
The Load Data: Generate Or Use Existing Control File page appears.
Select Automatically Generate Control File. Also enter the Host Credentials (username and password) for the host machine. Click Continue.
The Load Data: Data Files page appears.
Select Data File is Located on Database Server Machine and enter the path to your data file. Alternatively, if you created the data file on your client host, select Data File is Located on Your Browser Machine and enter the file path. Click Next.
The Load Data: Table and File Format page appears. This page displays the contents of your data file.
In Table Name, specify the destination table for your data. Enter myuser.purchase_orders and click Next.
The Load Data: File Format Attributes page appears.
Accept all defaults. In this example, we use the comma character as the delimiter. Click Next.
The Load Data: Load Method page appears.
Accept the default Conventional Path as the loading method. If you have a lot of data, you can select Direct Path. Click Next.
The Load Data: Options page appears.
In the Optional Files section, leave Generate log file where logging information is to be stored checked. You can accept the default file name and path or enter a different one. Note that this page gives you the option of limiting the number of rows loaded. Because we are only loading three rows in this example, we leave this box unchecked. Click Next.
The Load Data: Schedule page appears.
Enter values for Job Name and Description. Select Immediately to run the job now. Click Next.
The Load Data: Review page appears. This page lets you review your file names and loading methods. You can also view your loading control file. If you want to change something, you can click the Back button.
Click Submit Job to start the loading.
The Job Activity page appears, confirming that your job was created successfully.
Search for your job name to view its status.
The Job Activity page should display your job information and show that your job succeeded. You can get more information by clicking the link under Status.
You can confirm the loaded data by navigating to the Tables page, searching for the myuser.purchase_orders table, and choosing View Data as the action. See Figure 8-6, "View Data: MYUSER.PURCHASE_ORDERS".
Figure 8-6 View Data: MYUSER.PURCHASE_ORDERS
See Also:
"About Tables" for more information.If you no longer need a table or its contents, then you can drop the table using Enterprise Manager. Be certain that you really do not need the data in the table before you drop it. It may be difficult and time-consuming to retrieve the records, if they can be retrieved, after you execute the drop statement.
To test this procedure, follow the procedure in "Creating Tables" to create a table named test in the MYUSER schema. Create the test table with one column called col of type VARCHAR2(1).
To drop a table:
On the Tables page, enter MYUSER in the Schema box and click Go.
The result list should show the test table that you just created.
Select the TEST table and click Delete With Options.
The Delete With Options page appears.
Select Delete the table definition, all its data, and dependent objects (DROP).
Check Delete all referential integrity constraints (CASCADE CONTRAINTS).
Click Yes.
The Edit table page displays a confirmation message when the table is successfully deleted.
The following sections describe how to create and manage indexes:
Indexes are optional structures associated with tables. You can create them to improve query performance. Just as the index in this book helps you to quickly locate specific information, an Oracle index provides a quick access path to table data.
You can create indexes on one or more columns of a table. After an index is created, it is automatically maintained and used by Oracle. Changes to a table's data or structure, such as adding new rows, updating rows, or deleting rows, are automatically incorporated into all relevant indexes with complete transparency to the user.
Some indexes are created implicitly through constraints that are placed on a table. For example, a column with the constraint that its values be unique causes Oracle to create a unique key index.
When you click the Indexes link in the Database Objects section of the Administration page, an Indexes page appears. This page is similar in content and functionality to the Tables page shown in Figure 8-3.
Before you add additional indexes, you should examine the performance of your database. You can then compare performance after the new indexes are added.
Indexes are generally of value to queries and to SQL statements that need to operate on a single, existing row or a small number of existing rows. However, too many indexes can increase the processing overhead for statements that add, modify, or delete rows.
To determine if your application can improve performance with more indexes, you can run the SQL Access Advisor in Enterprise Manager. See Using the SQL Access Advisor in Chapter 10, "Monitoring and Tuning the Database".
Indexes can be categorized in a number of ways. The primary options are listed in the following sections.
A standard, B-tree index contains an entry for each value in the index key along with an address to the row where the value is stored. A B-tree index is the default and most common type of index in an Oracle database.
A bitmap index uses strings of bits to encapsulate values and potential row addresses. It is more compact than a B-tree and can perform some types of retrieval more efficiently. For general use, however, a bitmap index requires more overhead during row operations on the table and should be used primarily for data warehouse environments as described in the Oracle Database Data Warehousing Guide.
The default search through an index is from lowest to highest value, where character data is sorted by ASCII values, numeric data from smallest to largest number, and date from the earliest to the latest value. This default behavior is performed in indexes created as ascending indexes. You can cause index searches to reverse the search order by creating the related index with the descending option.
Typically, an index entry is based on the value or values found in the table's column or columns. This is a column index. Alternatively, you can create a function-based index in which the indexed value is derived from the table data. For example, to find character data that can be in mixed case, you could use a function-based index to look for the values as if they were all in uppercase characters.
You can create an index on just one column, which is called a single column index, or on multiple columns, which is called a concatenated index. Concatenated indexes are useful when all of the columns are likely to be included in the WHERE clause of frequently executed SQL statements.
For concatenated indexes, you should define the columns used in the index carefully so that the column with the fewest duplicate values is named first, the column with next fewest duplicate values is second, and so on. Columns with many duplicate values or many rows with NULL values should not be included or should be the last-named columns in the index definition.
As with tables, you can create your indexes with or without partitions. In most situations, it is useful to partition an index when the associated table is also partitioned and the index uses the same partitioning scheme as the table, known as a local index. You need not partition an index like the underlying table. You may even create a non-partitioned, or global, index on a partitioned table.
See Also:
Oracle Database Concepts and Oracle Database Administrator's Guide for design and management considerations of different index types and Oracle Database SQL Reference for the syntax to create tablesTo find out which indexes exist in your database, use the search options on the Indexes page.
To view indexes:
In the Administration page, click Indexes.
The Indexes page appears.
In the Search By list, select Index Name to search for indexes by name.
Alternatively, you can select Table Name to search for the name of the table on which the index is built.
In the Schema box, enter the name of a schema. For example, enter SYS. Alternatively, click the flashlight icon adjacent to the Schema box to search for a schema.
Leave Object Name blank to search for all indexes in a schema. Alternatively, enter an object name or click the flashlight icon to search for one.
Click Go.
The indexes in the specified schema are displayed.
In the results list, select a table and then click View or the link in the Index column to view a table definition.
The View Index: index_name page appears. In the General area, you can find basic information about the index, such as its status and the column or columns on which it is built. Other areas include information about the space consumed by the index and the options used in its definition.
You can create indexes with Enterprise Manager. To create an index, you specify one or more columns to be indexed and the type of index you want to create.
The following example creates a standard B-tree index on the SUPPLIER_ID column in the SH.PRODUCTS table, which is part of the sample schema.
To create an index:
In the Database Objects section of the Administration page, click Tables.
The Tables page appears.
Enter sh in the Schema box and click Go.
The result list shows the tables in the sh schema.
Select the PRODUCTS table and select Create Index from the Actions list. Click Go.
The Create Index page appears.
Enter the following information:
In the Name box, enter PRODUCTS_SUPPLIER_IDX.
For Tablespace, accept the default.
For Index Type, select Standard - B-tree.
In the Table Columns list, select the SUPPLIER_ID column by entering 1 in the Order column.
For Sorting Order, accept the default selection of ASC.
Click OK to create the index.
The Indexes page appears with a confirmation message. The new index is listed under Results.
See Also:
"About Indexes" for more information.If you no longer need an index, you can drop it by using Enterprise Manager.
In this example, you drop the PRODUCTS_SUPPLIER_IDX index that you created previously.
To drop an index:
In the Administration page, click Indexes.
The Indexes page appears.
In the Search By list, select Index Name to search for indexes by name. In Schema, enter sh. In Object Name, enter PRODUCTS_SUPPLIER_IDX.
Click Go.
The results page should display the PRODUCTS_SUPPLIER_IDX index.
Select the PRODUCTS_SUPPLIER_IDX index and click Delete.
A Confirmation page appears.
Click Yes to delete the index.
The Edit table page displays a confirmation message if the index is successfully deleted.
Note:
You cannot drop an index that is currently used to enforce a constraint. You must disable or drop the constraint and then, if the index is not dropped as a result of that action, drop the index.The following sections discuss views:
Views are customized presentations of data in one or more tables or other views. You can think of them as stored queries. Views do not actually contain data, but instead derive their data from the tables upon which they are based. These tables are referred to as the base tables of the view.
Like tables, views can be queried, updated, inserted into, and deleted from, with some restrictions. All operations performed on a view actually affect the base tables of the view. Views provide an additional level of security by restricting access to a predetermined set of rows and columns of a table. They also hide data complexity and store complex queries.
Many important views are in the SYS schema. The data dictionary views are called static because they change only when a change is made to the data dictionary, for example, when a new table is created or a user is granted new privileges.
Many data dictionary tables have three corresponding views:
A DBA_ view displays all relevant information in the entire database. DBA_ views are intended only for administrators.
An ALL_ view displays all the information accessible to the current user, including information from the current user's schema as well as information from objects in other schemas, if the current user has access to those objects through privileges or roles.
A USER_ view displays all the information from the schema of the current user. No special privileges are required to query these views.
The columns of the ALL_, DBA_, and USER_ views corresponding to a single data dictionary table are usually nearly identical.
The views that monitor ongoing database activity are called dynamic performance views. The names of dynamic performance views, available only to administrators, start with the characters V$ and are often referred to as the V$ views.
Complete descriptions of the views in the SYS schema are contained in the Oracle Database Reference.
You can use Enterprise Manager to display the views in a specified schema. You can also display the view definitions.
To display views:
In the Administration page, click Views.
The Views property page appears.
In the Schema box, enter the name of a schema. For example, enter SYS. Alternatively, click the flashlight icon adjacent to the Schema box to search for a schema.
Leave Object Name blank to search for all views in a schema. Alternatively, enter an object name or click the flashlight icon to search for one.
Click Go.
The views in the SYS schema are displayed. These views enable you to look at data dictionary information or ongoing database activity. The views in the SYS schema are also the source of information for many of the Oracle Enterprise Manager pages.
In the results list, select a view and then click View or click the link in the View Name column to display a view definition.
The View: view_name page appears.
The following example creates a view derived from the hr.employees table, which is part of the sample schema. The view filters all direct reports for the manager King, whose employee_id is 100. In an application scenario, this view adds an additional level of security to the hr.employees table while providing a suitable presentation of relevant information for manager King.
To create a view:
In the Administration page, click Views.
The Views property page appears.
Click Create.
The Create View page appears.
Enter the following information:
In Name, enter KING_VIEW.
In Schema, enter HR.
In Query Text, enter the following SQL statement:
SELECT employee_id, first_name, last_name, email, phone_number, hire_date,
       job_id, salary, commission_pct, manager_id, department_id FROM   hr.employees
WHERE  manager_id = 100
Click OK.
The Views page appears with a confirmation message. The new view is listed in the results section.
Select KING_VIEW and then select View Data from the Actions list.
Click Go.
The View Data for View: HR.KING_VIEW page appears. The selected data in the view appears in the Result section.
If you no longer need a view, then you can drop it using Enterprise Manager.
In this example, you drop the HR.SKING_VIEW view that you created previously.
To drop a view:
In the Administration page, click Views.
The Views page appears.
In the Schema box, enter hr. In Object Name, enter SKING_VIEW.
Click Go.
The results page should display the SKING_VIEW view.
Select SKING_VIEW and click Delete.
A Confirmation page appears.
Click Yes to delete the view.
The Views page displays a confirmation message if the view is successfully deleted.
Oracle offers the capability to store programs in the database. This functionality enables commonly required code to be written and tested once and then accessed by any application that requires the code. Database-resident program units also ensure that the same processing is applied to the data when the code is invoked, making the development of applications easier and providing consistency between developers.
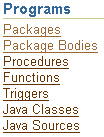
You can write database-resident programs in PL/SQL or Java. You can use Enterprise Manager to manage source types such as PL/SQL packages, procedures, triggers, functions, and Java sources and classes. The actions include creating, compiling, creating synonyms for, granting privileges on, and showing dependencies for these source types. You can perform these actions by clicking the links in the Programs section of the Administration page, as shown in Figure 8-7.
This book describes the main types of PL/SQL program units. The following sections cover:
Note that creating and managing program units is the primary responsibility of an application developer. However, as a DBA you might be called upon to assist in managing these objects, since they can become invalidated through schema changes.
See Also:
Oracle Database PL/SQL User's Guide and Reference to learn about PL/SQL code and program units.A package is a structure that contains definitions, blocks of PL/SQL code, or both in a single unit. The contents of the package are invoked by naming the package and the element within it by means of a dot notation. For example, to execute the procedure called STORE_SQE in the CTX_QUERY package owned by the CTXSYS user, you would invoke it with the statement CTXSYS.CTX_QUERY.STORE_SQE(arg1,arg2) where arg1 and arg2 are the values for the two procedure arguments. To hide the complexity of packaged element names, you might want to use synonyms, described later in "Working with Other Schema Objects".
To see which packages exist in your database, use the search options on the Packages page.
To view packages:
In the Programs sections of the Administration page, click Packages.
The Packages page appears.
In the Schema box, enter the name of a schema. For example, enter SYS. Alternatively, click the flashlight icon adjacent to the Schema box to search for a schema.
Leave Object Name blank to search for all packages in the specified schema. Alternatively, enter an object name or click the flashlight icon to search for one.
Click Go.
The packages in the specified schema are displayed.
In the results list, select a package and then click View or the link in the Package Name column to view a package definition. For example, click the link for DBMS_ALERT.
The View Package: package_name page appears. This page contains the package name, schema, status, methods, and source. The source contains the code for a package and may contain the following elements:
Authentication information—Determines which security schema is used when the package contents are executed
Procedure definitions—Specify the name and list of arguments for one or more procedures.
Function definitions—Specify the name, list of arguments, and return data type for one or more functions.
Variable definitions—Specify variables that are globally available to the user of the package.
Other public elements—Define such structures as types, constants, and exceptions that are needed by package users.
As with the other database objects, you can use Enterprise Manager to create packages. This section explains how to create a package definition.
To create a package definition:
In the Programs sections of the Administration page, click Packages.
The Packages page appears.
Click Create.
The Create Package page appears.
In the Name, Schema, and Source boxes, enter the desired data. For example, enter the following information:
In Name, enter test_package.
In Schema, enter hr.
In Source, enter a package definition. For more information on package definitions, see Oracle Database PL/SQL User's Guide and Reference.
Click OK.
An Update Message confirms the creation of the package definition.
As with the other database objects, you can use Enterprise Manager to edit packages. This example edits the test_package package that you created in the previous section.
To edit packages:
In the Programs sections of the Administration page, click Packages.
The Packages page appears.
Enter search criteria in the Schema and Object Name boxes and click Go. For example, search for packages in the hr schema.
The packages in the specified schema are displayed.
In the results list, select a package and then click Edit. For example, select TEST_PACKAGE.
The Edit Package: package_name page appears. You can perform the following actions:
Modify the package definition by typing new contents in the Methods and Source box and clicking Apply.
Compile the package by clicking Compile, an action that may be required if the package status has become invalid for some reason.
Modify the package body (see next section) by clicking Modify Package Body.
Note:
You can also navigate to the Edit Package property page from the Edit Package Body property page, described in the next section, by clicking Edit Package.Under exceptional circumstances, such as when advised by Oracle support or an application developer, you might be required to drop a package. As with the other database objects, you can use Enterprise Manager to do so. This example drops the test_package package.
To drop packages:
In the Programs sections of the Administration page, click Packages.
The Packages page appears.
Enter search criteria in the Schema and Object Name boxes and click Go. For example, search for packages in the hr schema.
The packages in the specified schema are displayed.
In the results list, select a package and then click Delete. For example, select TEST_PACKAGE.
A Confirmation page appears.
Click Yes to delete the package
The Update Message confirms the deletion.
Package bodies contain the PL/SQL code for the procedures and functions defined in the definitions of the packages to which they belong. The same navigation paths and options for adding (creating), editing (modifying), compiling, and deleting package bodies are available in Enterprise Manager as for packages, as described in the previous section. These paths enable direct navigation between the Edit Package Body and the Edit Package property pages as mentioned in the previous section.
In some cases, the developer of the package may have wrapped one or more of the individual procedures or functions. Wrapping converts the code into non-readable strings which makes it difficult for other developers to misuse the application or for competitors to see the algorithms. Wrapped code cannot be edited. The Source box in the Edit Package Body page will contain a message such as Source code could not be displayed, because it is wrapped and will not be available for modification.
To find out which package bodies exist in your database, use the search options on the Package Bodies page.
To view package bodies:
In the Programs sections of the Administration page, click Package Bodies.
The Packages page appears.
In the Schema box, enter the name of a schema. For example, enter SYS.
Alternatively, click the flashlight icon adjacent to the Schema box to search for a schema.
Leave Object Name blank to search for all packages in the specified schema.
Alternatively, enter an object name or click the flashlight icon to search for one.
Click Go.
The packages in the specified schema are displayed.
In the results list, select a package and then click View or the link in the Package Body Name column to view a package body. For example, click the link for CONNECTIONINTERFACE.
The View Package Body: package_name page appears. This page contains the package name, schema, status, and source. The source contains the code for a package. Note that the Source box for the CONNECTIONINTERFACE package indicates that the package is wrapped.
Procedures and functions that are created outside of a package are called standalone subprograms. To execute a standalone subprogram, you only need to include its schema name and object name; there is no package name. Even so, you may want to create synonyms for subprograms that are used regularly.
A PL/SQL procedure is a subprogram that performs a specific action. You specify the name of the procedure, its parameters, its local variables, and the BEGIN-END block that contains its code and handles any exceptions. A function is a subprogram that computes a value. Functions and procedures are structured alike, except that functions return a value.
You can use Enterprise Manager to create, modify, compile, and delete standalone subprograms just like packaged subprograms except that they do not have a parent package (and, consequently, no navigation path in Enterprise Manager from or to the package property pages). In the Programs section of the Administration page, click the links for Procedures and Functions to navigate to the relevant property pages.
A database trigger is a stored subprogram associated with a database table, view, or event. For instance, you can have Oracle fire a trigger automatically before or after an INSERT, UPDATE, or DELETE statement that affects a table.
See Also:
Oracle Database Application Developer's Guide - Fundamentals and Oracle Database PL/SQL User's Guide and Reference for more information about the uses for and creation of triggersYou can manage triggers through Enterprise Manager. They have their own property page which you can open by clicking Triggers in the Programs section of the Administration page. From the Triggers property page, you can create new triggers or view, edit, and delete existing triggers.
The Create Triggers and Edit Triggers property pages look very similar to the corresponding pages for packages, package bodies, and standalone subprograms. Note the following differences:
The Replace If Exists checkbox enables you to replace an existing trigger; the Enable trigger enables you to immediately enable a trigger after it is created or edited.
The box containing the PL/SQL code is labeled Trigger Body instead of Source.
The creation, editing, and compilation of triggers is similar to that of database PL/SQL units. Because triggers run automatically as a result of the triggering DML on the table, there is no way to run them directly.
You can manage other schema objects with Enterprise Manager including the following:
A synonym is an alias for any schema object such as a table or view. Synonyms provide an easy way to hide the underlying database structure from an application or a user. For example, you can create a synonym named personnel as an alias for the employees table in the hr schema. For example, assume that you create the following query:
SELECT   employee_id, salary
FROM     hr.employees
ORDER BY salary
With the synonym in place, you can rewrite the query more simply as:
SELECT   employee_id, salary
FROM     personnel
ORDER BY salary
An additional benefit of synonyms is that you can use the same synonym in a development database as in the production database, even if the schema names are different. This technique allows the application code to run unmodified in both environments. For example, the second version of the preceding query would work in a development database where the employees table was in the dev1 schema if the personnel synonym were defined.
Because a synonym is simply an alias, it requires no storage other than its definition in the data dictionary.
A sequence is a database object from which multiple users can generate unique integers. Using a sequence generator to provide the value for a primary key in a table is an easy way to guarantee that the key value is unique.
A database link is a schema object that instructs Oracle to connect to a remote database to access an object there. Database links are used in distributed database environments, which are described in the Oracle Database Administrator's Guide.
Oracle by Example (OBE) has a series on the Oracle Database 2 Day DBA book. This OBE steps you through the tasks in this chapter and includes annotated screen shots.
To view the Schemas OBE, point your browser to the following location:
http://www.oracle.com/webfolder/technetwork/tutorials/obe/db/10g/r2/2day_dba/schema/schema.htm
|
Copyright © 2004, 2012, Oracle and/or its affiliates. All rights reserved. Legal Notices |
|