| Oracle® Database 2 Day + Application Express Developer's Guide Release 3.2 E11946-02 |
|
|
PDF · Mobi · ePub |
| Oracle® Database 2 Day + Application Express Developer's Guide Release 3.2 E11946-02 |
|
|
PDF · Mobi · ePub |
This section describes basic information about deploying your Oracle Application Express application. It also shows you how to create end users and to determine the URL of your application.
This section contains the following topics:
After building your application in your development environment, you need deploy it so that end users can begin using it. Deploying involves the following steps:
Collect your supporting object definitions (CREATE object statements, sample data, images, files, and so on). Review the Database Dependencies report to determine which supporting objects to move. See "Viewing Application Reports" in Oracle Application Express Application Builder User's Guide.
Define your supporting objects. This includes the object definitions you collected in the previous step and other supporting objects, such as messages and prerequisites.
Export the application with its supporting objects.
Import and install the exported files.
Using Oracle Application Express greatly simplifies the deployment process. It enables you to migrate the application definition, associated files, and all supporting objects in just a few steps.
See also:
"Deploying an Application" in Oracle Application Express Application Builder User's Guide.After moving your application to a production environment, you must now create user accounts within Oracle Application Express for all your end users.
To create end user accounts:
Navigate to the Workspace home page.
From the Administration links list on the right, click Manage Application Express Users.
Under the Tasks list on the right, click the Create End User link.
The Create User page appears.
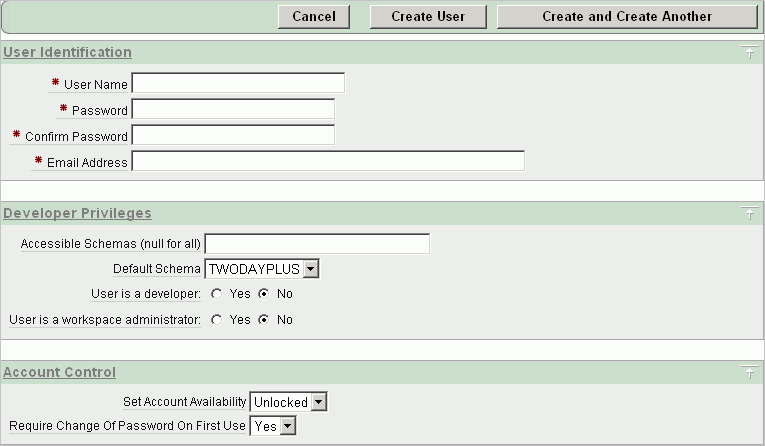
Under Account Control:
Set Account Availability - Select Unlocked.
Require Change of Password On First Use - Select No if you do not want to force this user to change his or her password at first log in.
Under User Identification, enter the appropriate information:
User Name - Enter a user name for this end user.
Password and Confirm Password - Enter a case-sensitive password for this account.
Email Address - Enter the valid email address for this end user.
Accessible Schemas (null for all) - Leave this blank to allow the end user to access all applications in the workspace, or enter a colon-delimited list of schemas to restrict the end user's access.
If a user does not have access to the schema that an application is built on, the user cannot access the application.
Default Schema - Accept the default value, that is, the schema you set up for this guide.
User is a developer - Accept the default, No.
User is a workspace administrator - Accept the default, No.
Selecting No limits the user to only accessing and using the application, not modifying the application itself.
Under User Groups, you can select a user group.
You can use groups to restrict access to various parts of an application. Groups are primarily useful when using Application Express Authentication.
Under Additional Attributes, you can enter additional user information.
Click Create User or Create and Create Another.
See also:
"Managing Application Express Users" in Oracle Application Express Administration GuideAfter deploying your application, you must now publish its URL so end users know how to access it.
To determine the URL:
Log in to Oracle Application Express on the production environment.
Select the application.
On the Application home page, position the mouse over the Run Application icon.
Note the URL that displays in the status bar at the bottom of the page.
For example:
http://apex.oracle.com/pls/apex/f?p=11563:1:3397731373043366363
Where:
apex.oracle.com is the URL of the server.
pls is the indicator to use the mod_plsql.
apex is the database access descriptor (DAD) name. The DAD describes how Oracle HTTP Server connects to the database server so that it can fulfill an HTTP request. The default value is apex.
f?p= is a prefix used by Oracle Application Express.
11563 is the application being called.
1 is the page within the application to be displayed.
3397731373043366363 is the session number, which is unique for every user's access to the application. Do not include session numbers as a part of the URL communicated to end users.
To run this example application, you would go to this URL:
http://apex.oracle.com/pls/apex/f?p=11563:1
See also:
"Deploying an Application" in Oracle Application Express Application Builder User's Guide
|
Copyright © 2003, 2013, Oracle and/or its affiliates. All rights reserved. Legal Notices |
|