| Oracle® Application Express Application Builder User's Guide Release 3.2 E11947-03 |
|
|
PDF · Mobi · ePub |
| Oracle® Application Express Application Builder User's Guide Release 3.2 E11947-03 |
|
|
PDF · Mobi · ePub |
You can greatly simplify the steps needed to deploy an application by creating a packaged application on the Supporting Objects page.
See Also:
"How to Move an Application to Another Development Instance" and "Exporting an Application and Related Files"This section contains the following topics:
Adding Installation Scripts for an Image, Cascading Style Sheet, or Static File
Deleting Supporting Objects Scripts, Messages, and Installation Options
From a user's perspective, importing and installing an application is a complicated process. First, you create the target database objects and seed data. Second, you import and install the application definition and all related files, including images, themes, and any other required static files.
Creating a packaged application using the Supporting Objects utility greatly simplifies this process. Instead of performing numerous steps to create the database objects and then import and install the application and all supporting files, you can define the supporting objects so that the application and supporting files can be migrated in a few easy steps.
After users import and install the application definition, a wizard guides them through a few simple configuration steps. Then, the wizard asks whether to install the supporting application objects. Users have the option of installing the supporting application objects then or doing it later.
From a developer's perspective, this feature has a number of advantages:
Ensures that the supporting objects are created in the correct order.
Provides users with an automated process for deploying an application quickly using very few steps.
Gives users the option to install supporting application objects when they import and install the application definition or at a later time. See "Installing Supporting Objects".
Enables users and developers with a convenient method for removing the application definition, supporting files, and all database objects. See "Deinstalling Supporting Objects".
Enables users and developers with an easy way to upgrade a previously released packaged application. See "Upgrading a Packaged Application".
Plus, you can also take advantage of the Deinstall and Install features to quickly edit the underlying database objects that support an application. For example, you can deinstall and remove all database objects, edit the underlying database object creation scripts, and reinstall to create the redefined application objects.
To create a packaged application, you must create installation scripts that define your application's supporting objects (including database objects, images, and seed data) and any preinstallation validations. You define these objects and the installation and deinstallation scripts and the messages that display when the user installs or deinstalls on the Supporting Objects page.
This section contains the following topics:
You create a packaged application on the Supporting Objects page.
To access the Supporting Objects Page application:
On the Workspace home page, click the Application Builder icon.
Select the application.
The Application home page appears.
Click the Supporting Objects icon.
The Supporting Objects page appears.
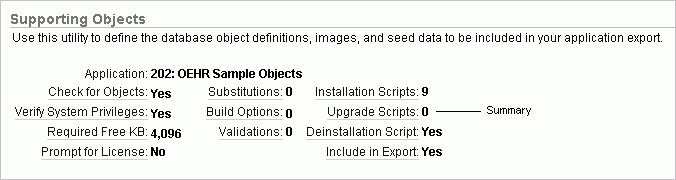
The top of the Supporting Objects page displays the application name and indicates current selections for the following: Check for Objects, Verify System Privileges, Required Free KB, Prompt for License, Substitutions, Build Options, Validations, Installation Scripts, Upgrade Scripts, Deinstallation Script, and Include in Export.
The rest of the page is divided into four categories.
Use the links under Installation to define the following types of information:
Prerequisites. Defines built-in checks required before installing the application, including required free disk space, required system privileges, and schema object restrictions.
Application substitution strings. Lists static substitution strings defined for the application. You can define static substitution strings for phrases or labels that occur in many places within an application. See "Substitutions".
When packaging an application, you can include prompts for substitution strings which users can specify when they install the packaged application.
Build Options. Lists build options defined for this application. You can use build options to conditionally display specific functionality within an application. See "Using Build Options to Control Configuration" and "Exporting Build Options or Build Option Status".
When packaging an application, you can include prompts for specific build options which display when the application is installed.
Pre-installation Validations. Lists validations defined for the packaged application. Similar to normal page validations, these validations prevent a user from installing database objects if the user-defined conditions are not satisfied. To create a new validation, click Create and follow the on-screen instructions.
Installation Scripts. Enables a you to define multiple installation scripts that install supporting objects for the application. To create a new script, click Create and follow the on-screen instructions. To edit an existing script, click the Edit icon.
Use the links under Message to define message to display when the user installs or deinstalls the application. Supported HTML tags include <b>, <i>, <u>, <p>, <br>, <hr>, <ul>, <ol>, <li>, and <pre>. Available message types include:
Welcome
License
Application Substitutions
Build Options
Validations
Confirmation
Post Installation
Upgrade
Deinstallation
Note that when these messages display, only a limited set of HTML tags are recognized in order to prevent a cross site-scripting (XSS) attack. See "Understanding Cross-Site Scripting Protection".
Click Upgrade scripts to define scripts to upgrade database objects, images, and seed data when upgrading an existing application. See "Upgrading a Packaged Application".
You can create installation scripts for images, cascading style sheets, and static files you have previously uploaded for your application or workspace on the Installation Scripts page. Oracle Application Express uses the name of the file you select as the name for each new script. It also adds corresponding API calls to the end of the deinstallation script (or creates one if one does not already exist), which removes the selected files when the application's supporting objects are deinstalled.
To create installation scripts for an image, cascading style sheet, or static file:
Navigate to the Supporting Objects page:
On the Workspace home page, click the Application Builder icon.
Select the application.
The Application home page appears.
Click Supporting Objects.
The Supporting Objects page appears.
Under Installation, click Installation scripts.
The Installation Scripts page appears.
Click Create.
At the bottom of the page, click Create Script to Install Files.
A list of available cascading style sheets, images, and static files appears.
Select the files to include with your packaged application and click Create Script.
You can control access to an application, individual pages, or page components by creating an access control list.
To add an access control list of a packaged application:
Create an access control list. See "Controlling Access to Applications, Pages, and Page Components".
Navigate to the Supporting Objects page:
On the Workspace home page, click the Application Builder icon.
Select the application.
The Application home page appears.
Click Supporting Objects.
The Supporting Objects page appears.
Under Installation, click Installation scripts.
The Installation Scripts page appears.
Click Create.
At the bottom of the page, click Create Scripts for Access Control Tables.
If Access Control tables are defined, the Create Script page displays the tables to be included.
Click Create Script.
After you edit your supporting objects and create the appropriate scripts, you can run your installation scripts by clicking Install Supporting Objects on the Tasks list.
End users can also use this feature if they elect to not install the packaged application (or supporting objects) after they import and install the application definition.
To install supporting objects:
On the Workspace home page, click the Application Builder icon.
Select the application.
Click Supporting Objects.
The Supporting Objects page appears.
Click the Install Supporting Objects on the Tasks list.
To view details about the installation script before running it, click Preview Installation Script.
The Preview Scripts page appears listing summary information, prerequisites, and the actual scripts to be run.
To exit the Preview Scripts page and continue, click Close.
From Install Supporting Objects, click Yes and click Next.
Follow the on-screen instructions.
You can delete the metadata that defines supporting object scripts, messages, and installation options associated with a packaged application by clicking Remove Supporting Object Installation on the Tasks list on the Supporting Objects page.
To delete the metadata that defines supporting object scripts, messages, and installation options:
On the Workspace home page, click the Application Builder icon.
Select an application.
Click Supporting Objects.
The Supporting Objects page appears.
On the Tasks list on the right side of the page, click Remove Supporting Object Installation.
Follow the on-screen instructions.
You can define scripts to upgrade a previously published application on the Upgrade page.
This section contains the following topics:
You can use the Upgrade page to define scripts to upgrade database objects, images, and seed data when upgrading an existing application.
To create an upgrade script:
On the Workspace home page, click the Application Builder icon.
Select an application.
Click Supporting Objects.
The Supporting Objects page appears.
Under Upgrade, click Upgrade Scripts.
To create a script, click Create.
Tip:
To enable users to upgrade from various earlier versions of this application, you can add conditions to the upgrade scripts by going to the Script Properties page.Use the Detect Existing Supporting Objects section to determine if the appropriate objects are installed or need to be upgraded.
In Query to Detect Existing Supporting Objects, enter a query in the field provided that returns at least one row if the supporting objects exist.
This query determines whether the user who installs the packaged application is prompted to run the installation scripts or the upgrade scripts.
Follow the on-screen instructions.
After you create your upgrade script, you can test it by clicking Upgrade Supporting Objects on Tasks list on the Supporting Object page.
End users can also use this feature to upgrade an existing packaged application.
To upgrade a packaged application:
Import a new version of application to be upgraded (if applicable). See "Importing an Application or Page".
On the Workspace home page, click the Application Builder icon.
Select the application.
Click Supporting Objects.
The Supporting Objects page appears.
From the Tasks list, click Upgrade Supporting Objects.
Follow the on-screen instructions.
Once you create or install a packaged application, you can deinstall it by either:
Clicking the Deinstall Supporting Objects on the Supporting Objects page
Clicking Delete this Application on the Application home page
When you deinstall an application, you have the option of removing the current application definition and running the deinstallation script defined in the Supporting Objects.
See Also:
"Creating a Packaged Application".To deinstall a packaged application:
On the Workspace home page, click the Application Builder icon.
Select the application.
Click Supporting Objects.
The Supporting Objects page appears.
Click Deinstall Supporting Objects.
Select a deinstallation option:
Remove Application Definition removes the current application definition.
Deinstall Database Objects runs the deinstallation script defined in the deployment attributes for this application.
Follow the on-screen instructions.
You can view a log of recent installation and deinstallation by clicking View Install Summary on the Tasks list on the Supporting Objects page. Note that this log only displays results from the most recent installation or deinstallation that occurred during the current Application Express session.
To view the Install Summary:
On the Workspace home page, click the Application Builder icon.
Select the application.
Click Supporting Objects.
The Supporting Objects page appears.
On the Tasks list on the right side of the page, click View Install Summary.
A Summary page appears.
|
Copyright © 2003, 2013, Oracle and/or its affiliates. All rights reserved. Legal Notices |
|