| Oracle® R Enterprise Installation and Administration Guide Release 1.3.1 for Windows, Linux, Solaris, and AIX E36763-17 |
|
|
PDF · Mobi · ePub |
| Oracle® R Enterprise Installation and Administration Guide Release 1.3.1 for Windows, Linux, Solaris, and AIX E36763-17 |
|
|
PDF · Mobi · ePub |
This appendix presents the steps in a typical installation of Oracle R Enterprise on a Linux server and a Windows client. This appendix contains these topics:
About the server computer:
The server is running Oracle Linux 5.
The server has access to the internet and to Oracle Public Yum.
Oracle Database Enterprise Edition 12.1 is installed on the server.
Environment variables:
The Linux user ID of the installer:
About the client computer:
To install Oracle R Enterprise on the server computer, first verify that Oracle Database is installed and that the environment is configured as specified in Section A.1. Next, complete these steps in the specified order:
To install Oracle R Distribution on the server from Oracle Public Yum, follow these steps:
Log in as root and change to /etc/yum.repos.d, the location of the yum repository configuration file:
# cd /etc/yum.repos.d
The name of the yum repository configuration file for Oracle Linux 5 is public-yum-el5.repo. List the contents of /etc/yum.repos.d to determine if the configuration file is already present. If the file is not present, then execute the following command to download the file from Oracle Public Yum:
# wget http://public-yum.oracle.com/public-yum-el5.repo
Open public-yum-el5.repo in a text editor and specify enabled=1 for latest and addons:
[el5_latest]
enabled=1

[el5_addons]
enabled=1
Install Oracle R Distribution 2.15.3 by executing this command:
# yum install R-2.15.3
Oracle R Enterprise Server includes the RQSYS schema in Oracle Database and Oracle R Enterprise packages and shared libraries. Follow these steps to download and install Oracle R Enterprise Server:
To download Oracle R Enterprise Server:
Create an installation directory for the Oracle R Enterprise server components. The directory can have any name. For example:
/home/myhome/myoreserver
Navigate to the Oracle R Enterprise Downloads page on the Oracle Technology Network:
Accept the license agreement.
Under Oracle R Enterprise Downloads (v1.3.1), select Oracle R Enterprise Server Install for Oracle Database on Linux 64 bit (92M).
Download and upzip the file in the installation directory that you created in Step 1:
% cd /home/myhome/myoreserver
% unzip ore-server-linux-x86-64-1.3.1.zip
When you unzip the file, the server subdirectory is created. The contents of the installation directory are listed as follows:
% ls
ore-server-linux-x86-64-1.3.1.zip
server/
To install Oracle R Enterprise Server:
Change to the server subdirectory:
% cd server
Run the installation script:
% ./install.sh
The installation script prompts you to enter the names of permanent and temporary tablespaces for the RQSYS schema. The default tablespaces are SYSAUX and TEMP. To accept the defaults, press ENTER.
The Oracle R Enterprise client supporting packages are open source R packages that support Oracle R Enterprise. The client supporting packages must be installed on both the client and on the server.
To download the Oracle R Enterprise client supporting packages:
Navigate to the Oracle R Enterprise Downloads page:
Accept the license agreement.
Under Oracle R Enterprise Downloads (v1.3.1), select Oracle R Enterprise Client Supporting Packages for Linux 64-bit Platform (1.2M).
Download and unzip the file in the installation directory that you created in Section A.2.2:
% cd /home/myhome/myoreserver
% unzip ore-supporting-linux-x86-64-1.3.1.zip
When you unzip the file, the supporting subdirectory is created. The contents of the installation are listed as follows:
% ls
ore-server-linux-x86-64-1.3.1.zip
ore-supporting-linux-x86-64-1.3.1.zip
server/
supporting/
The supporting subdirectory is populated with the following files:
DBI_0.2-5.zip
ROracle_1.1-9.zip
png_0.1-4.zip
To install the Oracle R Enterprise client supporting packages:
Change to the supporting subdirectory and list the contents:
% cd supporting
% ls
DBI_0.2-5_R_x86_64-unknown-linux-gnu.tar.gz
ROracle_1.1-9_R_x86_64-unknown-linux-gnu.tar.gz
png_0.1-4_R_x86_64-unknown-linux-gnu.tar.gz
Install the packages:
% ORE CMD INSTALL ROracle_1.1-9_R_x86_64-unknown-linux-gnu.tar.gz
% ORE CMD INSTALL DBI_0.2-5_R_x86_64-unknown-linux-gnu.tar.gz
% ORE CMD INSTALL png_0.1-4_R_x86_64-unknown-linux-gnu.tar.gz
The packages are installed in $ORACLE_HOME/R/library.
Follow these steps to create a database user for Oracle R Enterprise:
Change to the Oracle R Enterprise server subdirectory:
% cd /home/myhome/myoreserver/server/
Run the demo_user script:
% ./demo_user.sh
The script prompts you to enter the names of permanent and temporary tablespaces for the user schema. The default tablespaces are USERS and TEMP. To accept the defaults, press ENTER.
The script prompts you to enter a name and password for the user. The default name is rquser. To accept the default name, press ENTER.
When the script completes, start SQL*Plus as sysdba and grant the user privileges that are required by Oracle R Enterprise. For the user rquser:
% sqlplus /  AS SYSDBA
SQL> GRANT CREATE TABLE TO RQUSER;
SQL> GRANT CREATE PROCEDURE TO RQUSER;
SQL> GRANT CREATE VIEW TO RQUSER;
SQL> GRANT CREATE MINING MODEL TO RQUSER;
SQL> GRANT RQADMIN to RQUSER;
SQL> EXIT;
To install Oracle R Enterprise on the client computer, first verify that the Windows environment meets the requirements specified in Section A.1. Next, complete these steps:
Oracle R Distribution is not supported on Windows. Follow these steps to install open source R on the client:
Navigate to the R home page:
Under Download, Packages, choose CRAN.
Select a CRAN Mirror.
Choose Download R for Windows.
Under Subdirectories, choose base.
Under Other builds, choose Previous releases.
Download R-2.15.3. The following executable file is downloaded:
R-2.15.3-win.exe
In Windows Explorer, double-click the executable file to start the Windows Installer for R.
Follow the instructions in the Installer.
Note:
The Installer offers to install both 32-bit and 64-bit R. You must install 64-bit R for Oracle R Enterprise. If you choose to install both 32-bit and 64-bit R, then take care to only use 64-bit R for Oracle R Enterprise.Oracle R Enterprise requires Oracle Database Client. Instead of installing the full Database Client, which must be installed in an Oracle home directory, you can install Oracle Instant Client.
To download and install Oracle Instant Client, follow these steps:
Create an installation directory for the Oracle R Enterprise client components. The directory can have any name. For example:
c:\myoreclient
Navigate to the Oracle Database Instant Client page on the Oracle Technology Network:
http://www.oracle.com/technetwork/database/features/instant-client/
Select See Instant Client Downloads.
On the Instant Client Downloads page, select Instant Client for Microsoft Windows (x64).
Accept the license agreement.
Under Version 12.1.0.1.0, select Instant Client Package - Basic or Instant Client Package - Basic Lite for Oracle Database 12.1.
Save the file in the installation directory that you created in Step 1. For example, if you choose the basic package, the following file is downloaded:
c:\myoreclient\instantclient-basic-windows.x64-12.1.0.1.0.zip
Unzip the file.
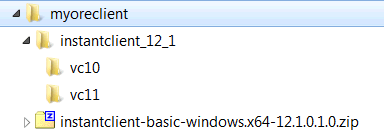
When you unzip the file, the instantclient_12_1 subdirectory is created. The contents of the installation directory are shown as follows:
Return to the Instant Client download page:
http://www.oracle.com/technetwork/topics/winx64soft-089540.html
Accept the license agreement and select Instant Client Package - SDK. Save the file in the directory that you created in Step 1.
c:\myoreclient\instantclient-sdk-windows.x64-12.1.0.1.0.zip
Unzip the file.
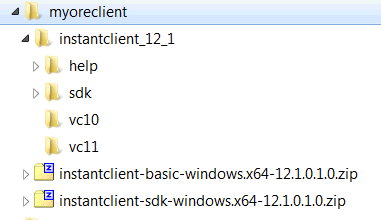
When you unzip the file, the sdk subdirectory is created. The contents of the installation directory are shown as follows:
Add the full path of the Instant Client to the environment variables OCI_LIB64 and PATH. The following steps set the variables to the path used in this example, c:\myoreclient\instantclient_12_1:
In Windows Control Panel, choose System.
Click Advanced systems settings.
On the Advanced tab, click Environment Variables.
Under System variables, create OCI_LIB64 if it does not already exist. Set the value of OCI_LIB64 to c:\oreclient\instantclient_12_1.
Under System variables, edit PATH to include c:\oreclient\instantclient_12_1.
Note:
The graphical user interface for creating environment variables may vary slightly, depending on your version of Windows.Follow these steps to download and install the Oracle R Enterprise client packages:
To download the Oracle R Enterprise client packages:
Navigate to the Oracle R Enterprise Downloads page on the Oracle Technology Network:
Accept the License Agreement.
Select Oracle R Enterprise Client Packages for Windows Platform. Save the file in the installation directory that you created in Section A.3.2.
c:\myoreclient\ore-client-win-x86_64-1.3.1.zip
Unzip the file.
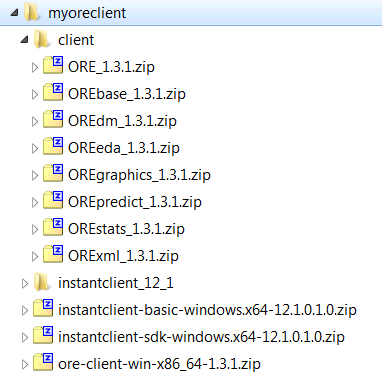
When you unzip the file, the client subdirectory is created. The contents of the installation directory are shown as follows:
To install the Oracle R Enterprise client packages from the R Console:
Start R from the Windows Start menu. If you have installed both 32 and 64-bit R, be sure to choose 64-bit R.
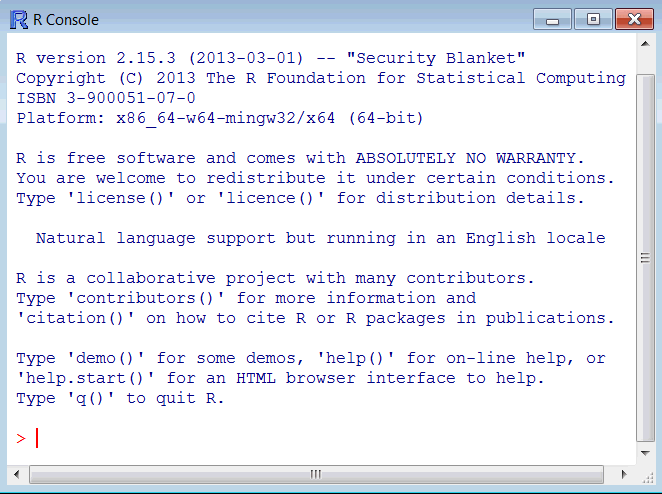
The R Console window is displayed, as shown in Example A-1
Install the packages as follows:
R> install.packages("c:/myoreclient/client/ORE_1.3.1.zip", repos=NULL)
R> install.packages("c:/myoreclient/client/OREbase_1.3.1.zip", repos=NULL)
R> install.packages("c:/myoreclient/client/OREdm_1.3.1.zip", repos=NULL)
R> install.packages("c:/myoreclient/client/OREeda_1.3.1.zip", repos=NULL)
R> install.packages("c:/myoreclient/client/OREgraphics_1.3.1.zip", repos=NULL)
R> install.packages("c:/myoreclient/client/OREpredict_1.3.1.zip", repos=NULL)
R> install.packages("c:/myoreclient/client/OREstats_1.3.1.zip", repos=NULL)
R> install.packages("c:/myoreclient/client/ORExml_1.3.1.zip", repos=NULL)
Each successful package installation produces this message in the R console:
package 'package_name' successfully unpacked and MD5 sums checked
Follow these steps to download and install the Oracle R Enterprise client supporting packages:
To download the Oracle R Enterprise client supporting packages:
Navigate to the Oracle R Enterprise Downloads page on the Oracle Technology Network:
Accept the License Agreement.
Select Oracle R Enterprise Client Supporting Packages for Windows Platform. Save the file in the installation directory that you created in Section A.3.2.
c:\myoreclient\ore-supporting-win-x86_64-1.3.1.zip
Unzip the file.
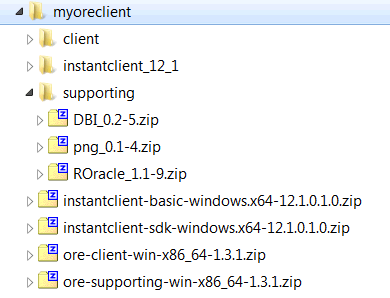
When you unzip the file, the supporting subdirectory is created. The contents of the installation directory are shown as follows:
To install the client supporting packages from the R Console:
Start R from the Windows Start menu. If you have installed both 32 and 64-bit R, be sure to choose 64-bit R.
The R Console window is displayed, as shown in Example A-1.
Install the packages as follows:
R> install.packages("c:/myoreclient/supporting/ROracle_1.1-9.zip", repos=NULL)
R> install.packages("c:/myoreclient/supporting/DBI_0.2-5.zip", repos=NULL)
R> install.packages("c:/myoreclient/supporting/png_0.1-4.zip", repos=NULL)
Each successful package installation produces this message in the R console:
package 'package_name' successfully unpacked and MD5 sums checked
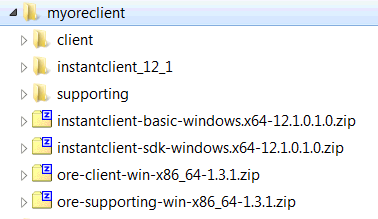
Figure A-1 shows the structure of the client installation directory after all the client components have been installed.
Figure A-1 Oracle R Enterprise Client Installation Directory
To verify that the basic functionality of Oracle R Enterprise is working, establish a connection to Oracle R Enterprise Server, execute several basic commands, and run some of the Oracle R Enterprise demo programs.
Note:
To start and use Oracle R Enterprise, your user ID must have the privileges required for Oracle R Enterprise installation. See Section 4.2.3, "User Requirements" for details.Example A-1 Connecting to Oracle R Enterprise Server
To connect the Oracle R Enterprise Client to Oracle R Enterprise Server:
Select R x64 2.15.3 from the Windows Start menu.
The R Console is displayed.
Type this command to start Oracle R Enterprise:
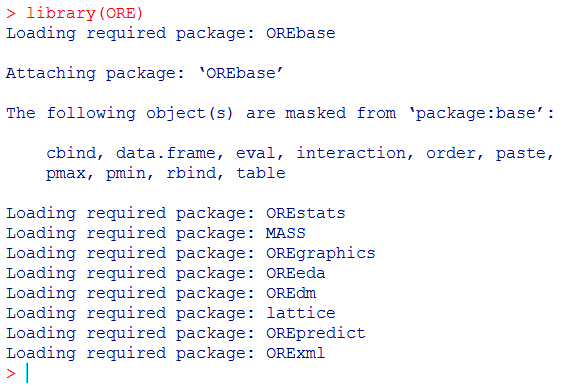
R> library(ORE)
Type this command to connect to the Oracle R Enterprise server. The following example connects user rquser to the database orcl on the server host serv1 using port 1521:
R> ore.connect(user="rquser", sid="orcl", host="serv1", password="rquserpsw",
               port=1521, all=TRUE)
Loading required package: ROracle
Loading required package: DBI
Execute ore.is.connected to validate the connection. If the connection is successful, the command returns TRUE:
R> ore.is.connected()
[1] TRUE
Example A-2 Listing the Database Tables Accessible to RQUSER
The ore.ls command lists the data sets that are available to the current user. For example, if TABLE1 and TABLE2 exist in the rquser schema:
R> ore.ls()
[1] "TABLE1" "TABLE2"
Example A-3 Pushing an R Data Frame to a Database Table
The ore.push command pushes an R data frame to a database table or a database table to an R data frame. For example:
R> cars <- ore.push(cars)
Example A-4 Executing an Embedded R Function
The ore.doEval command schedules execution of the specified function in the database-embedded R engine and returns the results.
R> ore.doEval(function() { 123 })
[1] 123
Example A-5 Listing the Oracle R Enterprise Demo Scripts
The Oracle R Enterprise demo scripts are located in $ORACLE_HOME/R/library/ORE/demo. The demo command provides a list of available demos:
R>  demo(package="ORE")

Demos in package 'ORE':

aggregate                    Aggregation
analysis                     Basic analysis & data processing operations
basic                        Basic connectivity to database
binning                      Binning logic
columnfns                    Column functions
cor                          Correlation matrix
crosstab                     Frequency cross tabulations
datastore                    DataStore operations
datetime                     Date/Time operations
derived                      Handling of derived columns
distributions                Distribution, density, and quantile functions
do_eval                      Embedded R processing
freqanalysis                 Frequency cross tabulations
glm                          Generalized Linear Models
graphics                     Demonstrates visual analysis
group_apply                  Embedded R processing by group
hypothesis                   Hyphothesis testing functions
matrix                       Matrix related operations
nulls                        Handling of NULL in SQL vs. NA in R
odm_ai                       Oracle Data Mining: attribute importance
odm_dt                       Oracle Data Mining: decision trees
odm_glm                      Oracle Data Mining: generalized linear models
odm_kmeans                   Oracle Data Mining: enhanced k-means clustering
odm_nb                       Oracle Data Mining: naive Bayes classification
odm_svm                      Oracle Data Mining: support vector machines
push_pull                    RDBMS <-> R data transfer
rank                         Attributed-based ranking of observations
reg                          Ordinary least squares linear regression
row_apply                    Embedded R processing by row chunks
sampling                     Random row sampling and partitioning of an ore.frame
sql_like                     Mapping of R to SQL commands
stepwise                     Stepwise OLS linear regression
summary                      Summary functionality
table_apply                  Embedded R processing of entire table
You can further verify the success of the installation by running some of the Oracle R Enterprise demo scripts. If a script runs to completion without errors, then the demo is successful.
Example A-6 Executing the aggregate Demo
This example shows the aggregate demo with partial output.
> demo("aggregate", package="ORE")

        demo(aggregate)
        ---- ~~~~~~~~~

Type  <Return>   to start :

> #
> #     O R A C L E  R  E N T E R P R I S E  S A M P L E   L I B R A R Y
> #
> #     Name: aggregate.R
> #     Description: Demonstrates aggregations
> #     See also summary.R
> #
> #
> #
>
> ## Set page width
> options(width = 80)

> # Push the built-in iris data frame to the database
> IRIS_TABLE <- ore.push(iris)

> # Display the class of IRIS_TABLE
> class(IRIS_TABLE)
[1] "ore.frame"
attr(,"package")
[1] "OREbase"

> # Select count(Petal.Length) group by species
> x = aggregate(IRIS_TABLE$Petal.Length,
+               by = list(species = IRIS_TABLE$Species),
+               FUN = length)

> class(x)
[1] "ore.frame"
attr(,"package")
[1] "OREbase"
.
.
.
.
Example A-7 Executing the row_apply Demo
This example shows the row_apply demo with partial output.
> demo("row_apply", package="ORE")

        demo(row_apply)
        ---- ~~~~~~~~~

Type  <Return>   to start :

> #
> #     O R A C L E  R  E N T E R P R I S E  S A M P L E   L I B R A R Y
> #
> #     Name: row_apply.R
> #     Description: Execute R code on each row
> #
> #
>
> ## Set page width
> options(width = 80)

> # Push the built-in iris data frame to the database
> IRIS_TABLE <- ore.push(iris)

> # Display the class of IRIS_TABLE
> class(IRIS_TABLE)
[1] "ore.frame"
attr(,"package")
[1] "OREbase"

> # Apply given R function to each row
> ore.rowApply(IRIS_TABLE,
+              function(dat) {
+                  # Any R code goes here. Operates on one row of IRIS_TABLE at
+                  # a time
+                  cbind(dat, dat$Petal.Length)
+              })
$`1`
  Sepal.Length Sepal.Width Petal.Length Petal.Width   Species dat$Petal.Length
1          6.4         2.8          5.6         2.1 virginica              5.6

$`2`
  Sepal.Length Sepal.Width Petal.Length Petal.Width   Species dat$Petal.Length
1          7.2           3          5.8         1.6 virginica              5.8

$`3`
  Sepal.Length Sepal.Width Petal.Length Petal.Width   Species dat$Petal.Length
1          7.4         2.8          6.1         1.9 virginica              6.1

$`4`
  Sepal.Length Sepal.Width Petal.Length Petal.Width   Species dat$Petal.Length
1          7.9         3.8          6.4           2 virginica              6.4

$`5`
  Sepal.Length Sepal.Width Petal.Length Petal.Width   Species dat$Petal.Length
1          6.4         2.8          5.6         2.2 virginica              5.6

$`6`
.
.
.
.
Example A-8 Executing the cor Demo
This example shows the cor demo with partial output.
> demo ("cor")

        demo(cor)
        ---- ~~~

Type  <Return>   to start :

> #
> #     O R A C L E  R  E N T E R P R I S E  S A M P L E   L I B R A R Y
> #
> #     Name: cor.R
> #     Description: Correlation matrix
> #
> #
> #
>
> ## Set page width
> options(width = 80)

> # Push the built-in iris data frame to the database
> IRIS_TABLE <- ore.push(iris)

> # Display the class of IRIS_TABLE
> class(IRIS_TABLE)
[1] "ore.frame"
attr(,"package")
[1] "OREbase"

> # Remove non numeric columns
> iris_numeric = IRIS_TABLE[, c("Sepal.Length", "Sepal.Width",
+                               "Petal.Length", "Petal.Width")]

> # Pearson's correlation matrix
> cor(iris_numeric, use = "all.obs")
             Sepal.Length Sepal.Width Petal.Length Petal.Width
Sepal.Length    1.0000000  -0.1175698    0.8717538   0.8179411
Sepal.Width    -0.1175698   1.0000000   -0.4284401  -0.3661259
Petal.Length    0.8717538  -0.4284401    1.0000000   0.9628654
Petal.Width     0.8179411  -0.3661259    0.9628654   1.0000000
.
.
.
.

Warning messages:
1: ORE object has no unique key - using random order
2: ORE object has no unique key - using random order
3: ORE object has no unique key - using random order
4: ORE object has no unique key - using random order
Example A-9 Executing the stepwise Demo
This example shows the stepwise demo with partial output.
> demo("stepwise")

        demo(stepwise)
        ---- ~~~~~~~~

Type  <Return>   to start :

> #
> #     O R A C L E  R  E N T E R P R I S E  S A M P L E   L I B R A R Y
> #
> #     Name: stepwise.R
> #     Description: STEPWISE Multivariate Regression
> #
> #
> #
>
> ## Set page width
> options(width = 80)

> # Push the built-in iris data frame to the database
> IRIS_TABLE <- ore.push(iris)

> # Display the class of IRIS_TABLE
> class(IRIS_TABLE)
[1] "ore.frame"
attr(,"package")
[1] "OREbase"

> # Let us first project out the non numeric columns
> IRIS_TABLE = IRIS_TABLE[, c("Sepal.Length", "Sepal.Width",
+                             "Petal.Length", "Petal.Width")]

> # Predict Sepal.Length based on the other 3 numeric columns
> # Do it stepwise
> model = ore.lm(Sepal.Length ~ ., data = IRIS_TABLE)

> model

Call:
ore.lm(formula = Sepal.Length ~ ., data = IRIS_TABLE)

Coefficients:
 (Intercept)   Sepal.Width  Petal.Length   Petal.Width
      1.8560        0.6508        0.7091       -0.5565
.
.
.