Oracle Connect for IMS, VSAM, and Adabas Gateways provides the following types of security:
Security for Oracle Connect for IMS, VSAM, and Adabas Gateways is managed through Oracle Studio for IMS, VSAM, and Adabas Gateways.
14.1 Managing Design Time Security
Design time security involves following tasks:
14.1.1 Setting Up the Password Caching Policy in Oracle Studio for IMS, VSAM, and Adabas Gateways
Oracle Studio for IMS, VSAM, and Adabas Gateways can cache passwords that are used for accessing servers and databases. The following security levels are supported:
-
Oracle Studio for IMS, VSAM, and Adabas Gateways does not cache passwords. When Oracle Studio for IMS, VSAM, and Adabas Gateways needs a password to access a server or database, it prompts the user to enter the password. This is the safest level, but it is less convenient.
-
Oracle Studio for IMS, VSAM, and Adabas Gateways caches passwords persistently but protects them through a master password. At this security level, Oracle Studio for IMS, VSAM, and Adabas Gateways prompts for the master password at startup.
-
Oracle Studio for IMS, VSAM, and Adabas Gateways caches passwords persistently but hides them through a fixed internal master password. This security level is convenient but not safe because the cached password can be retrieved any time. This level is not recommended.
To set the password caching policy of Oracle Studio for IMS, VSAM, and Adabas Gateways
-
In Oracle Studio for IMS, VSAM, and Adabas Gateways, point to Windows, then select Preferences.
-
Select the Studio node.
-
On the Security tab, do the following:
-
For the highest security level, clear the Remember passwords check box.
-
For a lower security level, do the following:
Click Change master password. The Change master password dialog box opens.
Enter a master password and confirm it. Then click OK.
Select the Remember passwords check box.
Note:
If you set a master password, Oracle Studio for IMS, VSAM, and Adabas Gateways will prompt you for the password the next time you open the application. If you set the master password to an empty password, Oracle Studio for IMS, VSAM, and Adabas Gateways will use the internal default password.
-
Click OK to save your settings.
14.1.2 Setting Up Administration Access to a Machine
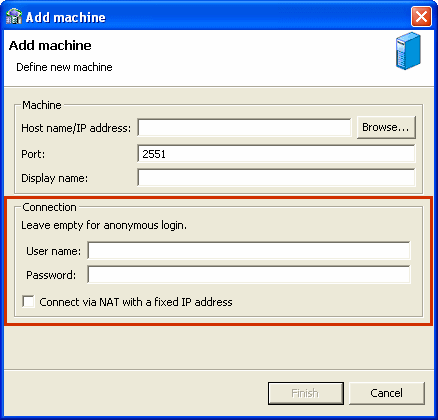
To administer an Oracle Connect for IMS, VSAM, and Adabas Gateways system, you must add it to Oracle Studio for IMS, VSAM, and Adabas Gateways. Administrative access requires that you provide Oracle Studio for IMS, VSAM, and Adabas Gateways with an Oracle Connect for IMS, VSAM, and Adabas Gateways administrator account and password.
The Oracle Connect for IMS, VSAM, and Adabas Gateways administrator account is the account that you specified during the installation of Oracle Connect for IMS, VSAM, and Adabas Gateways on this system or when running NAV_UTIL ADD_ADMIN.
You specify the administrator account and password in the Add machine screen, in the Connection area, as shown in Figure 14-1.
14.1.3 Assigning Design Roles
After you have defined a system in Oracle Studio for IMS, VSAM, and Adabas Gateways, you can grant viewing and editing rights to users and groups according to their roles in the design process.
The following roles are available:
-
Administrator: Allowed to edit all of the definitions in Oracle Studio for IMS, VSAM, and Adabas Gateways.
-
Designer: Allowed to edit binding definitions and view daemon definitions in Oracle Studio for IMS, VSAM, and Adabas Gateways.
-
User: Allowed to view the definitions in Oracle Studio for IMS, VSAM, and Adabas Gateways.
Perform the following steps to assign design roles to users and groups.
-
In the Configuration view, right-click the system and select Administration Authorization.
-
In the Administration Authorization screen, click Add User or Add Group to assign authorization to specific users or a specific group of users. The name cannot contain blanks.
Note:
Administration Authorization is set from the top down. This means that if you specify users or groups at a higher level, you do not need to specify the same users or groups on a lower level.
14.1.4 Assigning Authorization Rights to a Workspace
After you have defined a system in Oracle Studio for IMS, VSAM, and Adabas Gateways, you can authorize the viewing and editing rights for specific workspaces.
Perform the following steps to assign authorization rights to a workspace.
-
In the Design perspective, in the Configuration view, right-click the system and select Set Authorization.
-
Specify the user name and password for the user with authorization rights for this workspace.
14.1.5 Setting Up a Master Password for a User Profile
The definition of a user profile stores the user names and passwords that are required to access databases and remote systems. To protect this information, you can assign a master password to a user profile. If you do not assign a password, anyone can use the information stored in the definition.
Note:
The password assigned to a user profile definition must be identical to the password of the user account of the server's operating system. Likewise, if the password of the user account of the server's operating system changes, you must also change the password of the user profile definition.
Perform the following steps to set a master password for a user profile.
-
In the Design perspective, in the Configuration view, expand the system that contains the user profile definition.
-
Expand the Users node.
-
Right-click the relevant user and select Change User Password.
-
Enter the relevant information and click OK.
14.2 Managing Runtime Security
The following security aspects are implemented at runtime:
-
Daemon and Workspace Administration: Granting the authorization needed to manage a running daemon.
-
Access Authorization: Granting the authorization needed to connect and use a server workspace.
-
Network Communication Encryption: Encrypting the data sent over the network between the client and the server.
-
Impersonation: Making the server process take on the security identity of the client so that data access permissions and restrictions apply based on the client's identity (rather than on the server's security level).
-
User Profiles: Enabling a single sign-on to server systems and data sources.
The management of runtime security can involve the following tasks:
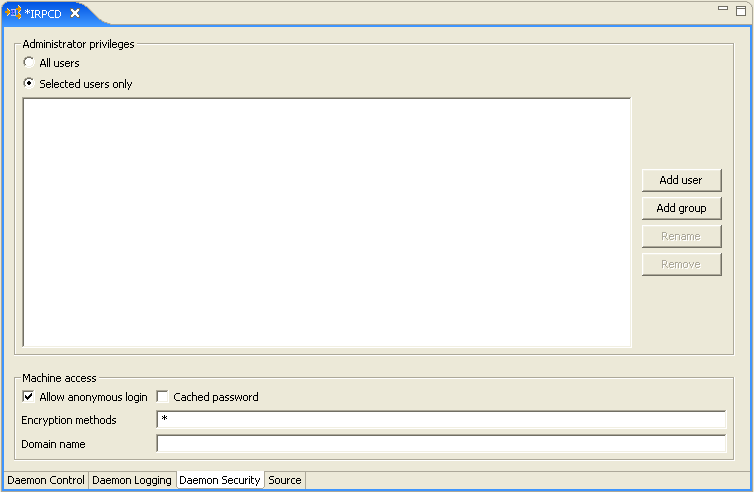
14.2.1 Granting Daemon Administration Rights to Users
You can grant a user run-time administration rights to the daemon. An administrator has the right to perform actions such as starting and shutting down a daemon, recycling servers of all workspaces, and updating the configuration of an active daemon.
Perform the following steps to grant daemon administration rights to a user.
-
In the Design perspective, in the Configuration view, expand the relevant system.
-
Expand the Daemons node.
-
Right-click the daemon and select Edit Daemon.
-
In the daemon editor, on the Daemon Security tab, in the Administrator privileges area, click Selected user only, as shown in Figure 14-2.
-
Click Add Group or Add User to grant administration rights to a group or user.
Note:
On z/OS platforms, to define a group of users, preface the name of the group in the configuration with '@'. The group name is validated by a security system such as RACF.
The Source tab shows the result in XML. For example:
-
To prevent anonymous access and limit administration rights to a user called sysadmin:
<security anonymousClientAllowed="false" administrator="sysadmin" />
-
To allow anonymous access to a server and to grant all users administration right:
<security anonymousClientAllowed="true" administrator="*" />
Note:
On z/OS platforms, to prevent anonymous access and limit administration rights to a user called sysadmin and to a group called sys, change the settings as follows:
<security anonymousClientAllowed="false"
          administrator="sysadmin,@sys" />
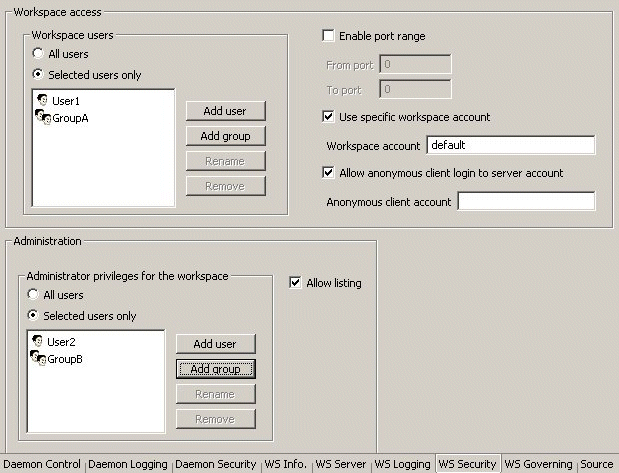
14.2.2 Granting Workspace Administration Rights to Users
You can grant a user runtime workspace administrative rights for a specific workspace. These rights allow a user to enable, disable, and recycle workspace server.
Perform the following steps to grant administrative rights to a workspace.
-
In the Design perspective, in the Configuration view, expand the relevant system.
-
Expand the Daemons node.
-
Expand the node of the relevant daemon.
-
Right-click the workspace and select Edit Workspace.
-
In the workspace editor, on the WS Security tab, in the Administration area, click Selected user only, as shown in Figure 14-3.
-
Click Add Group or Add User to grant administration rights to a group or user.
Note:
To define a group of users on z/OS platforms, preface the name of the group in the configuration with '@'. The group name is validated by a security system such as RACF.
The Source tab shows the result in XML. For example:
-
Users must enter the correct user name and password to use a workspace. All authenticated users have workspace administration rights. This is defined as follows:
<workspace name="Navigator"
   description="An Oracle Server"
   startupScript="ATSRVR50.XY"
   serverMode="reusable" reuseLimit="0"
   anonymousClientAllowed="false"
   administrator="*" />
</workspace>
-
Users must enter the correct user name and password to use a workspace. Only the user SYSADMIN has administrator rights. This is defined as follows:
<workspace name="Navigator"
   description="An Oracle Server"
   startupScript="ATSRVR50.XY"
   serverMode="reusable" reuseLimit="0"
   anonymousClientAllowed="false"
   administrator="SYSADMIN" />
</workspace>
Notes:
-
The value for startupScript in these examples is system-dependent. For example, for z/OS the startup script may be: startupScript="ATTSRVR.AB"
-
On z/OS platforms, to limit administration rights to a user called SYSADMIN and a group called DEV, the following line is required: administrator="SYSADMIN,@DEV"
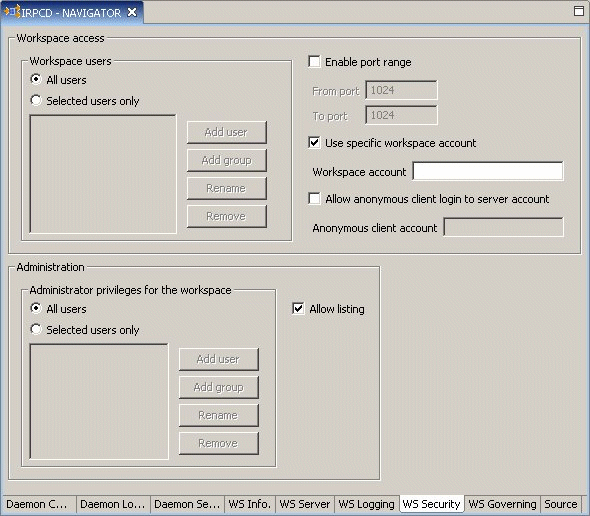
14.2.3 Granting Workspace Access Rights to a User
Clients log in to the daemon and request that a server be allocated to a particular workspace. When the client logs in, it provides its login credentials, that is the user name and password. The request for a specific workspace server is granted only if the logged-on user was granted access to the workspace.
By adding a user to the list of workspace users, you grant them access to the workspace servers only. If a database on the server requires additional authentication, you need to create a user profile definition with the name of this user.
Perform the following steps to grant workspace access to a user.
-
In the Design perspective, in the Configuration view, expand the relevant system.
-
Expand the Daemons node.
-
Right-click the daemon and select Edit Daemon.
-
In the daemon editor, on the WS Security tab, in the Workspace Access area, click Selected user only, as shown in Figure 14-4.
-
Click Add User to grant a user access to the workspace.
Note:
On z/OS platforms, to define a group of users instead of a single user (so that the group name is validated by a security system), preface the name of the group in the configuration with '@'.
-
Save your settings.
14.2.4 Accessing a Server through a Firewall
Oracle Connect for IMS, VSAM, and Adabas Gateways lets you access a server through a firewall. The following table describes the available options.
14.2.4.1 Specifying a Port Range for Workspace Servers
Specifying a port range for a workspace causes all servers that are started for that workspace to listen on ports within the specified range. When a new server starts, it scans the port range in random order trying to bind to a port. It then uses the first port that it manages to bind to.
Multiple workspaces can share the same port range. However, you must make sure to define a range that is large enough to allow for all servers to start. In addition, because it takes time for used ports to become available again after the server that used them has terminated, it is recommended to specify a port range that is slightly larger than the number of servers required to accommodate for transition periods.
Perform the following steps to specify a range of ports.
-
In the Design perspective, in the Configuration view, expand the relevant system.
-
Expand the Daemons node.
-
Right-click the daemon and select Edit Daemon.
-
In the daemon editor, on the WS Security tab, in the Workspace Access area, select Enable port range and enter the starting and ending port numbers in the From port and To port boxes.
For an example of the WS Security tab, see Figure 14-4.
-
Save your settings.
14.2.4.2 Accessing a Server Using Fixed NAT
When an Oracle Database Gateway needs to access the Oracle Connect for IMS, VSAM, and Adabas Gateways server through a Fixed NAT firewall, make sure to set the HS_FDS_CONNECT_INFO parameter in the init.ora file as in the following example:
HS_FDS_CONNECT_INFO="address='mvs.acme.com' port='2551'" firewallProtocol='fixednat'
This setting does not require any changes to the daemon configuration.
See Also:
For details on setting gateway parameters, see
Oracle Database Heterogeneous Connectivity User's Guide.
14.2.5 Encrypting Network Communications
Because Oracle Database Gateway for IMS, VSAM, and Adabas runs on UNIX or Windows and the networking layer that connects to the data sources runs on IBM z/OS, network communications should be encrypted. The networking layer of Oracle Database Gateway for IMS, VSAM, and Adabas uses an RPC-like protocol with message primitives that are similar in concept to the Microsoft OLEDB API.
14.2.5.1 Transport Encryption
For transport encryption, Oracle Connect for IMS, VSAM, and Adabas Gateways uses shared symmetric-key encryption with a 128-bit RC4 encryption scheme, as follows:
-
Upon connection, the gateway sends the name of the shared key to use to the server.
-
The server computes a random 128-bit session key, encrypts it by using a named and shared symmetric key, and sends the encrypted session key back to the client.
-
The Oracle Connect for IMS, VSAM, and Adabas Gateways server keeps multiple keys in a key store so that different gateway instances can use different encryption keys.
If the gateway is configured for transport encryption, further communication with the Oracle Connect for IMS, VSAM, and Adabas Gateways server occurs using the established session key. If transport encryption is not configured, the session key is used only for the process of authentication; then communication drops back to plain mode.
14.2.5.2 Setting an Encryption Protocol on the Gateway Side
To enable transport encryption, the gateway must provide both the shared key name (passed to the server) and its value (computed by the server). This is done by supplying these values in the CREATE DATABASE LINK statement and then defining the same key on the server by using Oracle Studio for IMS, VSAM, and Adabas Gateways (see Specifying the Encryption Key on the Server Machine).
To provide the name of the encryption key and the key value as part of the CREATE DATABASE LINK, append the encryption key name to the user name and the key value to the password by using the pound character (#), as follows:
CREATE DATABASE LINK [link_name]
CONNECT TO "[user_name]#[key_name]"
IDENTIFIED BY "[password]#[key_value]"
For example:
CREATE DATABASE LINK sales
CONNECT TO "sales1#saleskey"
IDENTIFIED BY "Sales1#123456"
If no shared key is defined, for example in closed, trusted networks, a fixed, built-in key is used. However, it is recommended to always encrypt network communications.
See Also:
Oracle Database Administrator's Guide and
Oracle Database Heterogeneous Connectivity User's Guide for more information about using database links.
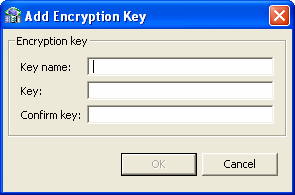
14.2.5.3 Specifying the Encryption Key on the Server Machine
Any communication from the gateway to the server system is encrypted. The server system must be configured to decipher the encrypted information using an encryption key.
To set the encryption key on the server system
-
Select the server system in the Oracle Studio for IMS, VSAM, and Adabas Gateways Design perspective Configuration view.
-
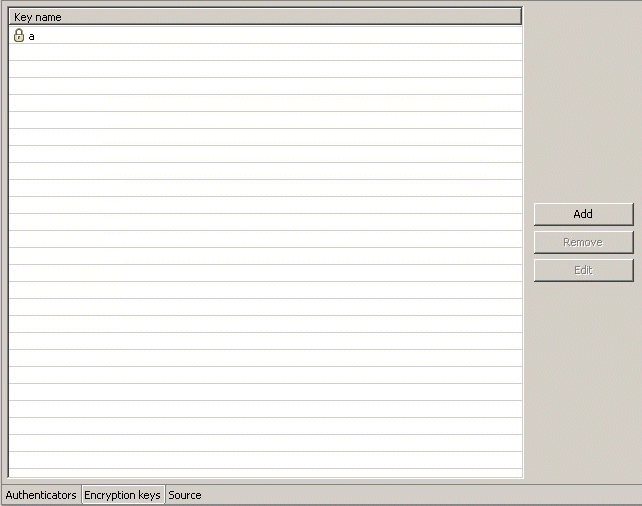
Right-click the user profile and select Edit User. The User editor is displayed.In the User editor, select the Encryption Key tab.
Figure 14-5 shows the Encryption Key tab.
-
Click Add. The Add Encryption Key screen is displayed, as shown in Figure 14-6.
-
Configure the encryption key parameters as follows:
-
Key name: Enter the name associated with the encryption password and which the daemon on this system looks up.
-
Key: Enter the encryption key.
-
Confirm key: Re-enter the encryption key.
-
Click OK.
-
In the tree, expand the Daemons node.
-
Right-click the daemon managing the connection and select Edit Daemon.Select the Daemon Security tab.
-
In the Machine access area, enter RC4 in the Encryption methods field.
Figure 14-7 shows the Daemon Security tab.
14.2.6 Setting Up Impersonation
Impersonation is the ability of a server to execute in a security context that is different from the context of the process that owns the server.
The primary reason for impersonation is to cause access checks to be performed against the client's identity. Using the client's identity for access checks can cause access to be either restricted or expanded, depending on what the client has permission to do.
For example, suppose a file server has files containing confidential information and that each of these files is protected by a security system. To prevent a client from obtaining unauthorized access to information in these files, the server can impersonate the client before accessing the files.
To set up impersonation
-
On z/OS platforms, APF-authorize all the steplibs in the server script. For example:
setprog... ada622-volume adavol
       CICS.CICS.SDFHEXCI - p390dx
       navroot.load - 111111
       navroot.loadaut - 111111
where navroot is the high-level qualifier where Oracle Connect for IMS, VSAM, and Adabas Gateways is installed.
-
On all platforms, on the WS Security tab of the daemon editor, leave the Workspace account field empty, as shown in Figure 14-8.
-
On the Client platform, define a user profile for the server system with the required username and password for the remote system in the user profile.
-
Add a new user authenticator with the resource type defined as remote system, as follows:
Open Oracle Studio for IMS, VSAM, and Adabas Gateways.
In the Configuration view, right-click the user profile and select Edit User.
In the User editor, select the client system and click Add.
In the Add Authenticator screen, set the Resource type to Remote machine.
Specify the resource name and, if required, authentication information; then click OK.