| Oracle® Database 2 Day DBA 11g Release 2 (11.2) E10897-10 |
|
|
PDF · Mobi · ePub |
| Oracle® Database 2 Day DBA 11g Release 2 (11.2) E10897-10 |
|
|
PDF · Mobi · ePub |
This chapter provides background information about the Oracle instance and instructions for managing the instance.
This chapter contains the following sections:
An Oracle database system consists of an Oracle database and an Oracle instance.
A database consists of a set of disk files that store user data and metadata. Metadata, or "data about the data," consists of structural, configuration, and control information about the database.
An Oracle instance (also known as a database instance) contains the set of Oracle Database background processes that operate on the stored data and the shared allocated memory that those processes use to do their work.
Each instance has an instance ID, also known as a system ID (SID). Because there can be multiple Oracle databases on a host computer, each with its own set of data files, you must identify the instance to which you want to connect. For a local connection, you identify the instance by setting operating system environment variables ORACLE_SID and ORACLE_HOME. For a remote connection, you identify the instance by specifying a network address and a database service name.
An Oracle instance must be started to read and write information to the database. The Oracle instance creates the database upon receipt of instructions from the Oracle Database Configuration Assistant (DBCA) utility or the CREATE DATABASE SQL statement.
When the Oracle instance is not available, your data is safe in the database, but it cannot be accessed by any user or application.
The properties of an Oracle instance are specified using instance initialization parameters. When the instance is started, an initialization parameter file is read, and the instance is configured accordingly.
This section presents some concepts of an Oracle instance and its management. It contains the following topics:
See Also:
Oracle Database Concepts for an overview of the Oracle database instance
Managing an Oracle instance includes configuring parameters that affect the basic operation of the Oracle instance. These parameters are called initialization parameters. The Oracle instance reads initialization parameters from a file at startup.
During installation, when you select a preconfigured database workload available in DBCA, the initialization parameters are optimized for typical use in the environment that you specified. As the number of database users increases and the workload increases, you might have to alter some initialization parameters. You can make these changes using the Initialization Parameter page in Database Control, or by using an advisor provided by Oracle Database, such as the Memory Advisor. See "Optimizing Memory Usage with the Memory Advisors" for more information.
After being read from a file, initialization parameters are retained in memory, where the values for many of them can be changed dynamically. There are two types of parameter files. The type of file used to start the instance determines if dynamic initialization parameter changes persist across database shutdown and startup. The parameter file types are:
Server parameter file
The server parameter file is the preferred form of initialization parameter file, and is a binary file that can be written to and read by the database. It must not be edited manually. It is stored on the host computer on which Oracle Database is running. Changes are made when you use Database Control to modify one or more initialization parameters, or when Oracle Database itself makes changes for self-tuning purposes. Any changes to it persist across database shutdown and startup operations.
Note:
When changing an initialization parameter in the server parameter file, you can also specify that the in-memory value be changed, so that your change is reflected immediately in the current instance. If you do not change the in-memory value, then the change does not take effect until you shut down and restart the database.Text initialization parameter file
A text initialization parameter file is a text file that can be read by the Oracle instance, but it is not written to by the instance. You can change a text initialization parameter file with a text editor, but changes do not take effect until you restart the Oracle instance. When you start the instance with this type of file, you can still change many initialization parameters dynamically with Database Control, but only for the current instance. Unless you also edit the text initialization parameter file and make the same change, the change is lost when you restart the database instance.
You can use SQL statements to create the following:
A server parameter file from a text initialization file
A server parameter file from the current (in-memory) values of all initialization parameters
A text initialization parameter file from a server parameter file
When you create the database with DBCA, a server parameter file is created. This file is then used each time the database is started.
See Also:
Oracle Database Administrator's Guide for information about the default name and location of the server parameter file, and for commands to create a server parameter file or text initialization parameter file
Oracle Database Concepts for an overview of parameter files
The background processes of the Oracle instance manage memory structures, asynchronously perform I/O to write data to a file on a disk, and perform general maintenance tasks. The background processes consolidate functions that would otherwise be handled by multiple Oracle Database programs running for each user process. They monitor other Oracle Database processes to provide increased parallelism for better performance and reliability.
The background processes that are present depend on the features that are being used in the database. Some fundamental background processes are described in Table 5-1.
Table 5-1 Oracle Database Background Processes
| Background Process | Description |
|---|---|
|
The database writer writes modified blocks from the database buffer cache to the files on a disk. Oracle Database allows a maximum of 36 database writer processes. |
|
|
The log writer process writes redo log entries to disk. Redo log entries are generated in the redo log buffer of the System Global Area (SGA) and the log writer process writes the redo log entries sequentially into an online redo log file. |
|
|
At specific times, all modified database buffers in the SGA are written to the data files by a database writer process (DBWn). This event is called a checkpoint. The checkpoint process signals DBWn, updates the data files and control files of the database, and records the time of this update. |
|
|
The system monitor performs instance recovery when a failed instance is restarted. |
|
|
The process monitor performs a recovery when a user process fails. It cleans up the cache and frees resources that the failed process was using. |
|
|
Archiver processes copy the online redo log files to archival storage when the log files are full or a log switch occurs. The database must be in archive log mode to run archive processes. For more information, see Chapter 9, "Performing Backup and Recovery". |
|
|
This process performs various management-related background tasks, for example:
|
|
|
Job Queue Processes (CJQ0 and Jnnn) |
Job queue processes run user jobs, often in batch mode. A job is a user-defined task scheduled to run one or more times. |
See Also:
Oracle Database Reference for a complete list of Oracle Database background processes
Oracle Database Concepts for an overview of background processes
In addition to background processes, Oracle Database creates server processes that handle the connection requests of user or client processes. A user connection is composed of the following distinct pieces:
A client program acting on behalf of the user, such as Oracle Enterprise Manager (Enterprise Manager), SQL*Plus, or an application
A server process that handles the connection to the database on behalf of the client program, and that performs much of the work for the client program, such as parsing and running SQL statements, and retrieving and returning results to the client program
Server processes can be either dedicated or shared. When server processes are dedicated, Oracle Database is running in dedicated server mode. When server processes are shared, Oracle Database is running in shared server mode. In dedicated server mode, each client process has its own server process. Although a dedicated server process is good for long-running queries and administrative tasks, an idle process or too many dedicated processes can result in an inefficient use of resources.
Using shared server mode eliminates the need for a dedicated server process for each user connection, requires less memory for each user connection, and enables more users to access the database. Shared server mode is more efficient at supporting multiple client programs making frequent short-running queries.
The sizes of the instance memory structures affect database performance and are controlled by initialization parameters.
Upon installation, you can let the database manage memory for you automatically, or you can choose to manually configure the instance memory structures. If you choose manual memory management, then Oracle Database provides advisors to help you determine appropriate values for memory parameters. For both manual and automatic memory management, Oracle Database sends alerts that identify memory sizing problems that require your attention.
The following sections describe the two important memory areas that you can monitor and size:
See Also:
Oracle Database Concepts for more information about Oracle Database memory architecture
The System Global Area (SGA) is a shared memory area that contains data and control information for the instance. Multiple users can share data within this memory area and avoid repeated, time-consuming access from a physical disk.
Table 5-2 lists the components of the SGA.
| Component | Description |
|---|---|
|
Database buffer cache |
Before data stored in the database can be queried or modified, it must be read from a disk and stored in the buffer cache. All user processes connected to the database share access to the buffer cache. For optimal performance, the buffer cache should be large enough to avoid frequent disk I/O operations. |
|
Shared pool |
The shared pool caches information that is shared among users:
|
|
Redo log buffer |
This buffer improves performance by caching redo information until it can be written to the physical online redo log files stored on disk. Redo information and online redo log files are discussed in "About Online Redo Log Files". |
|
Large pool |
This optional area is used to buffer large I/O requests for various server processes. |
|
Java pool |
The Java pool is an area of memory that is used for all session-specific Java code and data within the Java Virtual Machine (JVM). |
|
Streams pool |
The Streams pool is an area of memory that is used by the Oracle Streams feature. For more information about Oracle Streams, see Oracle Streams Concepts and Administration. |
|
Result cache |
The result cache buffers query results. If a query is run for which the results are stored in the result cache, then the database returns the query results from the result cache instead of rerunning the query. This SGA component speeds the execution of frequently run queries. |
A Program Global Area (PGA) is a memory area used by a single Oracle Database server process. When you connect to an Oracle database instance, you create a session that uses a server process for communication between the client and database instance. Each server process has its own PGA.
The PGA is used to process SQL statements and to hold logon and other session information. A large part of the PGA is dedicated to SQL work areas, which are working memory areas for sorts and other SQL operations.
The amount of PGA memory used and the contents of the PGA depend on whether the instance is running in dedicated server or shared server mode.
The total memory used by all individual PGAs is known as the total instance PGA memory, and the collection of individual PGAs is referred to as the total instance PGA, or just instance PGA. With Database Control, you set the size of the instance PGA, not individual PGAs.
After installation, the Oracle instance is started, and the database is open for access by users with database accounts. At some point, you may want to shut down and restart the instance. This section describes the startup and shutdown processes.
The phrases "starting up and shutting down the Oracle instance" are often used interchangeably with "starting up and shutting down the database."
This section contains the following topics:
To start or shut down the Oracle instance, you must connect to the instance with a special connection privilege. There are two of these privileges: SYSDBA for fully empowered database administrators and SYSOPER for users who start and shut down the database, but have no privileges to access user objects.
When you create an Oracle database, there are two primary administrative user accounts that are automatically created: SYS and SYSTEM. Both of these users have full database administration privileges, but initially, only user SYS or SYSTEM can connect with the SYSOPER privilege. Therefore, until you grant the SYSOPER privilege to other users, you must connect to the Oracle instance as user SYS or SYSTEM to start and shut down the instance. When connecting (logging in) as user SYS, you must always specify that you are connecting AS SYSDBA.
See Also:
"About Administrative Accounts and Privileges" for more information about the SYS and SYSTEM users, and the SYSDBA privilege
When you start the Oracle instance, you typically start it such that the state of the database is OPEN and ready for user connections. However, there are situations in which you may want to start the instance with the database in the MOUNTED state, but not open. An instance can also be started without the database either mounted or open. Thus, there are three stages to starting an instance:
You start the instance using one of the following methods:
Using Oracle Enterprise Manager. See "Shutting Down and Starting Up the Oracle Instance".
Using the SQL*Plus STARTUP command. See Oracle Database Administrator's Guide.
On Microsoft Windows, using the Services program in Control Panel to start the Oracle Database services. See "Shutting Down and Starting Up Using the Windows Services Program".
The instance reads the initialization parameter file, allocates SGA memory, and starts the background processes.
If you mount the database, then the Oracle instance opens the control file for the database, but does not open the data files. The database is now considered to be in the MOUNT state. This state enables you to perform certain administrative functions that cannot be performed when other users are accessing the database. An example of such a function is enabling or disabling the archiving of online redo log files. See "About Archived Redo Log Files" for information about online redo log file archiving.
If you open the database, then, after reading the parameter file and control file, the online redo log files and data files for the database are also opened. The state of the database is now OPEN and user access to the data is available.
The default startup mode for the database (OPEN) completes the three stages in sequence. Unless you explicitly specify otherwise, the instance is started, the database is mounted, and then the database is opened.
Instance shutdown is the reverse of instance startup. When you shut down the Oracle instance, the default mode is a NORMAL shutdown, which means users are not allowed to create new connections to the database, but the shutdown process waits for all currently connected users to exit their sessions. After all the users have disconnected, then the committed transactions are written to disk, the database files are closed, and the instance is stopped. However, there are situations in which you may not want to wait for users to disconnect on their own (IMMEDIATE mode), or you want to let the current transactions for each user complete before they are disconnected (TRANSACTIONAL mode). In emergency situations you can even shut down the database without waiting for the committed transactions to be written to disk (ABORT mode).
Shutting down an instance goes through the following stages:
After all the users have exited from their sessions, or been disconnected, Oracle Database writes data in the SGA to the data files and online redo log files. A checkpoint is performed on the data files and their headers are marked current as of the time of the instance shutdown. The data files and online redo log files are then closed and the state of the database is changed to CLOSED. The control file remains open to the instance.
The Oracle instance dismounts the database and updates relevant entries in the control file to record a clean shutdown. The control file is closed. The database is now closed and dismounted. The instance is in the NOMOUNT state.
The Oracle instance stops the background processes and deallocates the shared memory used by the SGA.
If a SHUTDOWN ABORT or abnormal termination occurs, then the instance of an open database closes and shuts down the database instantaneously. Oracle Database does not write data in the buffers of the SGA to the data files and redo log files. The subsequent reopening of the database requires instance recovery, which Oracle Database performs automatically.
This section provides instructions about two methods you can use to start or shut down the Oracle instance:
Shutting Down and Starting Up Using Oracle Enterprise Manager Database Control
Shutting Down and Starting Up Using the Windows Services Program
See Also:
You can shut down and start the Oracle instance from the Database Home page of Oracle Enterprise Manager Database Control (Database Control).
To shut down and start the Oracle instance using Database Control:
Go to the Database Home page.
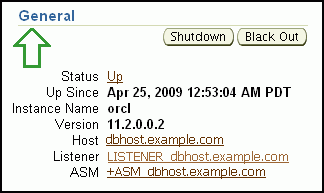
In the General section of the Database Home page, click Shutdown.
The Startup/Shutdown Credentials page appears.
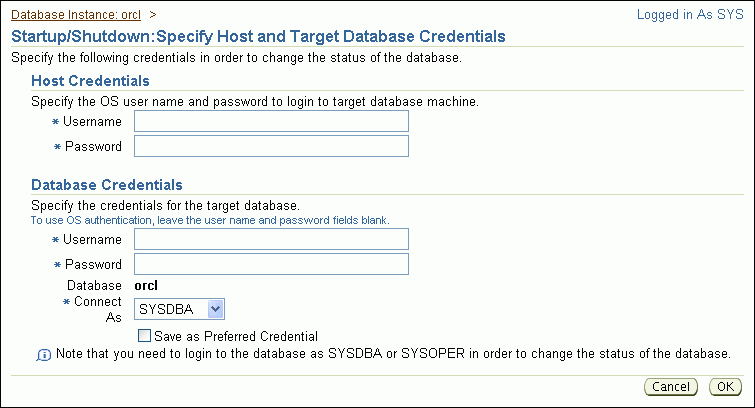
Enter credentials as follows:
Enter the host computer credentials of the user who installed Oracle Database, or of any user who is authorized to use SQL*Plus.
Enter the database credentials consisting of the user name SYS and the password that you assigned to SYS during the installation.
In the Connect As list, choose the value SYSOPER.
(Optional) Select the Save as Preferred Credential option if you want these credentials to be automatically filled in for you the next time that this page appears.
Click OK.
A confirmation page appears.
Click Yes to start the SHUTDOWN IMMEDIATE operation on the database.
The Startup/Shutdown: Activity Information page appears, informing you that the database is being shut down.
After a short period (approximately 2 minutes), click Refresh to be returned to the Database Home page.
The Database Home page indicates that the database instance status is Down.
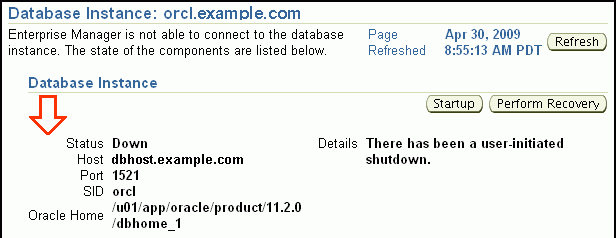
Click Startup to start the database.
The Startup/Shutdown Credential page appears again.
Enter the credentials, and then click OK.
A confirmation page appears.
Click Yes.
The Startup page appears, indicating that the database is being started up. When startup is complete, the Login page appears.
Log in to the database (and to Database Control).
The Database Home page appears indicating that the database instance status is Up.
On Microsoft Windows, you can also start and shut down your Oracle database using the Services program in Control Panel. You must start or stop the following services:
OracleServiceSID, which is your Oracle instance.
OracleORACLE_HOMETNSListener, which is your listener. The listener is required for clients to connect to your database.
OracleDBConsoleSID, which enables clients to connect to Database Control.
In the preceding service names, SID refers to the system identifier for the instance and ORACLE_HOME refers to the Oracle home name.
To start or stop Oracle Database services:
Do one of the following:
On Windows XP and Windows Server 2003, click Start, and then select Control Panel.
On Windows 2000 Server, click Start, select Settings, and then select Control Panel.
The Control Panel window opens.
Double-click the Administrative Tools icon, and then double-click the Services icon.
The Services window opens, displaying all Windows services that are available on your system.
Locate the Oracle Database services listed at the beginning of this section. For example, if your SID is orcl, then locate the following services:
OracleServiceORCL
OracleOraDb11g_home1TNSListener
OracleDBConsoleorcl
Start or stop all three services, using the following steps for each service:
Select the service name.
In the Action menu, click Start or Stop.
This section provides instructions about viewing the initialization parameter settings for your database and modifying these parameters. You can modify the initialization parameters for the database in one of three ways:
Until the instance is shut down: The new values for the initialization parameters are applied to the currently running instance, but, when the database is restarted, the initialization parameter values revert to their previous settings.
From now until the initialization parameter is changed again: The changes are applied to the currently running instance and are also stored in the server parameter file. The changes made to the initialization parameters persist when the database is restarted.
When the database is restarted: The new values for the initialization parameters are recorded in server parameter file, but are not applied to the currently running instance. The changes take effect only when the database is restarted.
Note:
These three scenarios correspond to using theSCOPE=MEMORY, SCOPE=BOTH, and SCOPE=SPFILE clauses of the ALTER SYSTEM SQL statement, respectively, when you use the ALTER SYSTEM statement to change initialization parameters.To view or modify initialization parameters:
At the top of the Database Home page, click Server to view the Server subpage.
Under Database Configuration, click Initialization Parameters.
Oracle Enterprise Manager Database Control (Database Control) displays the Initialization Parameters page.
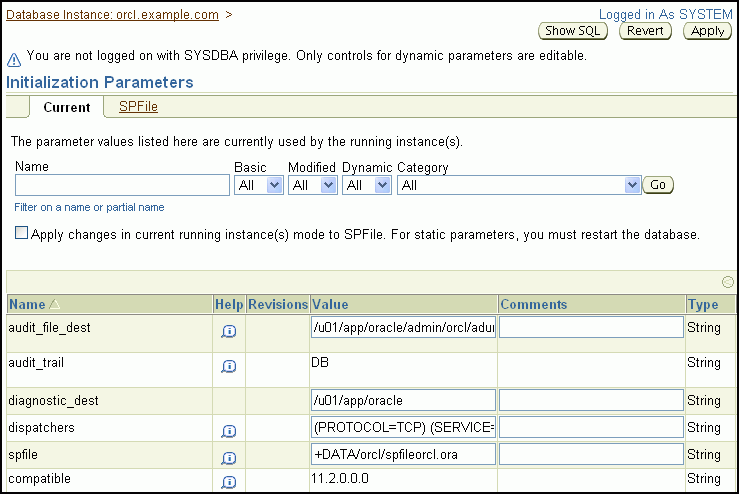
The Initialization Parameters page has two subpages:
Current—This subpage (the default) displays all initialization parameter values that are currently active (in memory) for the Oracle instance.
SPFile—This subpage displays initialization parameter settings in the server parameter file. This subpage is present only when the current instance started up with a server parameter file. The file location is displayed at the top of the subpage.
See the online Help for the Initialization Parameters page for field descriptions.
(Optional) On either subpage, reduce the number of initialization parameters displayed by doing one or both of the following, and then clicking Go:
In the Name field, enter text.
Select from one or more of the lists next to the Name field.
For example, to view only initialization parameters that have the text DEST anywhere in the parameter name, enter dest in the Name field, and then click Go.
To modify one or more initialization parameters for the currently running instance only, with the modifications being lost when the instance is restarted, complete the following steps:
On the Current subpage, in the Value column, enter new values for the initialization parameters.
Note:
If the Value column cannot be written to for a particular initialization parameter, then it means that this parameter is not dynamic—that is, it cannot be changed for the current instance.Ensure that Apply changes in current running instance(s) mode to SPFile is not selected.
(Optional) In the Comments column, enter text explaining the reasons for the changes.
Click Apply.
A confirmation message appears.
To modify initialization parameters for the currently running instance, and also record the modifications in the server parameter file that will persist when the database is restarted, complete the following steps:
On the Current subpage, in the Value column, enter new values for the initialization parameters.
Select Apply changes in current running instance(s) mode to SPFile.
(Optional) In the Comments column, enter text explaining the reasons for the changes.
Click Apply.
A confirmation message appears.
To modify initialization parameters in the server parameter file only, such that the current instance is not affected and changes take effect only when the database is next restarted, complete the following steps:
Click SPFile to view the SPFile subpage.
(Optional) Reduce the number of entries in the initialization parameter list as described in Step 3.
In the Value column, enter new values for the initialization parameters.
(Optional) In the Comments column, enter text explaining the reasons for the changes.
Click Apply.
A confirmation message appears.
Note:
Changes to initialization parameters are recorded in the alert log asALTER SYSTEM statements. See Oracle Database Administrator's Guide for information about the alert log.See Also:
This section provides background information about managing memory for the Oracle instance, and includes instructions about how to adjust the memory allocation for the Oracle instance. It contains the following topics:
See Also:
Memory management involves maintaining optimal sizes for the Oracle instance memory structures as demands on the database change. The memory that must be managed is the System Global Area (SGA) memory and the instance Program Global Area (PGA) memory. The instance PGA memory is the collection of memory allocations for all individual PGAs.
Beginning with Oracle Database 11g release 1 (11.1), you can let the database manage the SGA memory and instance PGA memory completely. You designate only the total memory size to be used by the instance, and Oracle Database dynamically exchanges memory between the SGA and the instance PGA as needed to meet processing demands. This capability is referred to as automatic memory management. In this memory management mode, the database also dynamically tunes the sizes of the individual SGA components and the sizes of the individual PGAs.
To have more direct control over the sizes of the SGA and instance PGA, use the Memory Advisors page of Database Control to disable automatic memory management and enable automatic shared memory management.
With automatic shared memory management, you set target and maximum sizes for the SGA. Oracle Database then tunes the total size of the SGA to your designated target, and dynamically tunes the sizes of all SGA components.
When you enable automatic shared memory management, you also implicitly enable automatic PGA memory management. With automatic PGA memory management, you set a target size for the instance PGA. The database then tunes the size of the instance PGA to your target, and dynamically tunes the sizes of individual PGAs.
If you want complete control of individual SGA component sizes, then use the Memory Advisors page of Database Control to disable both automatic memory management and automatic shared memory management. This is called manual shared memory management. In this mode, you set the sizes of several individual SGA components, thereby determining the overall SGA size. You then manually tune these individual SGA components on an ongoing basis.
Manual shared memory management mode is intended for experienced DBAs only. Note that in this mode, automatic PGA memory management remains enabled.
Note:
Although it is possible to disable automatic PGA memory management, it is not recommended, and cannot be done using the Memory Advisors page of Database Control.Table 5-3 summarizes the various memory management modes that you can set using the Memory Advisors page of Database Control.
Table 5-3 Oracle Database Memory Management Modes
| Memory Management Mode | You Set | Oracle Database Automatically Tunes |
|---|---|---|
|
Automatic memory management |
|
|
|
Automatic shared memory management and automatic PGA memory management (Automatic memory management disabled) |
|
|
|
Manual shared memory management and automatic PGA memory management (Automatic memory management and automatic shared memory management disabled) |
|
|
Note:
Automatic Memory Management is not available on all platforms. See Oracle Database Administrator's Guide for more information about supported platforms.If you choose the basic installation option when you install the database, then automatic memory management is enabled. If you choose advanced installation, then DBCA enables you to select from the three memory management modes. Oracle recommends that you enable automatic memory management.
Whichever memory management mode you choose, you may have occasion to adjust memory settings as demands on the database or on its host computer change. Reasons why you adjust memory settings include the following:
You receive a memory-related alert or error message.
You receive a memory-related recommendation from Automatic Database Diagnostic Monitor (ADDM).
You want to change the amount of memory allocated to accommodate future growth in memory demand.
You can use a memory advisor to help you adjust memory sizes. See "Modifying Memory Settings – Automatic Shared Memory Management" for an example of using a memory advisor.
If you did not enable automatic memory management when you installed and configured your database, then Oracle recommends that you do so after installation, unless you are an experienced DBA with specific reasons to manually tune memory sizes. With automatic memory management, the Oracle instance dynamically tunes all memory components to optimize performance as the workload changes.
To enable automatic memory management:
Go to the Database Home page, logging in as user SYS.
See "Accessing the Database Home Page".
Note:
You must log in as userSYS to change the maximum memory size, which is a static initialization parameter.At the top of the page, click Server.
The Server subpage appears.
In the Database Configuration section, click Memory Advisors.
The Memory Advisors page appears with the SGA subtab (in the middle of the page) displayed by default.
If the Maximum SGA Size field contains a positive number that is greater than or equal to the desired total amount of memory to allocate to the database, then skip to Step 10.
In the Maximum SGA Size (MB) field, enter the maximum permissible size for database memory.
Use the sum of the current sizes of the SGA and instance PGA as a guideline, and optionally add some room for growth.
Click Apply.
A confirmation page appears, indicating that you must restart the database.
Click Yes and follow the guided instructions to restart the database.
After you have initiated the database restart, wait a few minutes and then click Refresh.
The Database Home page appears.
Return to the Memory Advisors page.
You might need to log out and log back in to Enterprise Manager to get this page to display correctly after the database restart.
Next to Automatic Memory Management Disabled, click Enable.
The Enable Automatic Memory Management page appears.
In the field titled Total Memory Size for Automatic Memory Management, enter the desired amount of memory to allocate to the database, and then click OK.
A confirmation message appears.
See Also:
Modifying memory settings for automatic memory management involves using the Memory Advisors page of Database Control to change the total memory size setting. The procedure for changing this setting differs depending on whether or not your desired new setting exceeds the current setting for maximum memory size. In either case, the steps involved require that you must first have enabled Automatic Memory Management. See "Enabling Automatic Memory Management".
To modify total memory size (new value does not exceed maximum memory size):
Go to the Database Home page.
At the top of the page, click Server.
In the Database Configuration section, click Memory Advisors.
The Memory Advisors page appears.
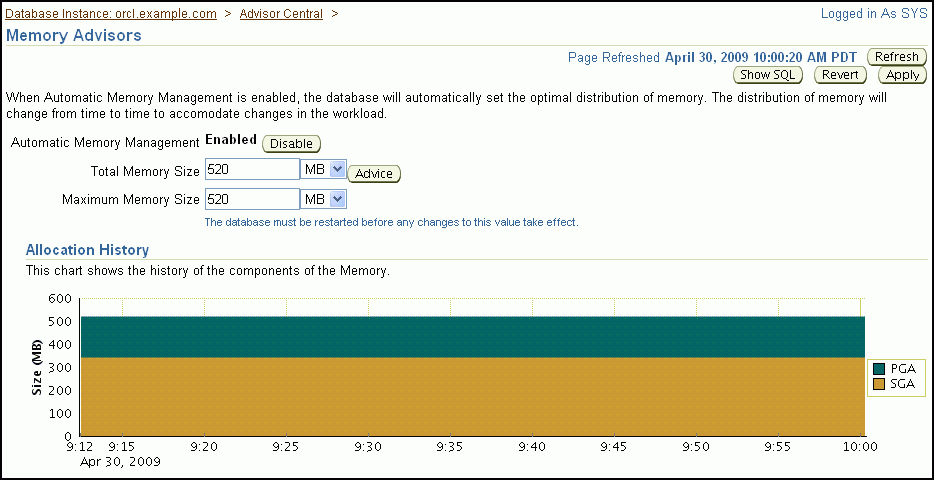
Do one of the following:
In the Total Memory Size field, enter a new value that is less than or equal to the value in the current Maximum Memory Size field.
Click Advice to use the Memory Advisor to help you choose a new size.
The Memory Size Advice page appears.
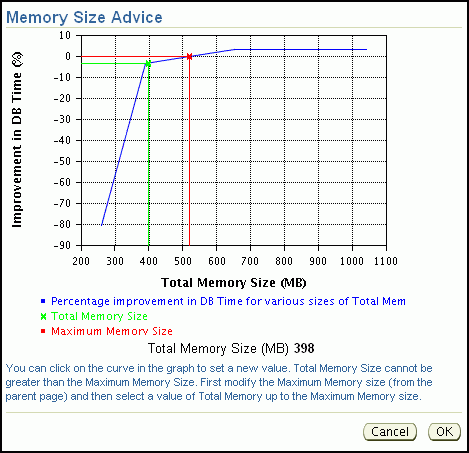
If you chose to use the Memory Advisor, then click a point on the curve to change the total memory size. Otherwise, go to Step 7.
The new total memory size is displayed below the graph.
Continue clicking the curve until the desired value is displayed, then click OK.
You are returned to the Memory Advisors page.
A confirmation message appears.
To modify total memory size (new value exceeds maximum memory size):
Go to the Database Home page, and log in as user SYS with the SYSDBA privilege.
See "Accessing the Database Home Page".
Note:
You must log in as userSYS to change the maximum memory size, which is a static initialization parameter.At the top of the page, click Server.
In the Database Configuration section, click Memory Advisors.
The Memory Advisors page appears.
In the Maximum Memory Size (MB) field, enter a new value for the maximum total memory to allocate to the database.
This value must be greater than or equal to the desired new value for total memory size.
Click Apply.
A confirmation page appears, indicating that you must restart the database.
Click Yes and follow the guided instructions to restart the database.
After you have initiated the database restart, wait a few minutes, then click Refresh.
The Database Home page appears.
Return to the Memory Advisors page.
Do one of the following:
In the Total Memory Size field, enter a new value that is less than or equal to the value in the current Maximum Memory Size field.
Click Advice to use the Memory Advisor to help you choose a new size.
The Memory Size Advice page appears.
If you chose to use the Memory Advisor, then click a point on the curve to change the total memory size. Otherwise, go to Step 12.
The new size is displayed below the graph.
Continue clicking the curve until the desired value is displayed, then click OK.
You are returned to the Memory Advisors page.
Click Apply.
A confirmation message appears.
See Also:
Oracle Database Performance Tuning Guide for more information about memory parameters and their tuning
Modifying memory settings for automatic shared memory management involves using the Memory Advisors page of Database Control to change the total SGA size. This section assumes that automatic memory management is disabled, that automatic shared memory management is enabled, and that the desired new value for the total SGA size does not exceed the current value for maximum SGA size.
Note:
If you want a new total SGA size that exceeds the current value for maximum SGA size, then you must first log in as userSYS, change the maximum SGA size, and restart the database. See "To modify total memory size (new value exceeds maximum memory size):" for a similar procedure.To modify the total SGA memory size:
Go to the Database Home page.
At the top of the page, click Server to view the Server subpage.
In the Database Configuration section, click Memory Advisors.
The Memory Advisors page appears. Scroll down to the SGA subpage.
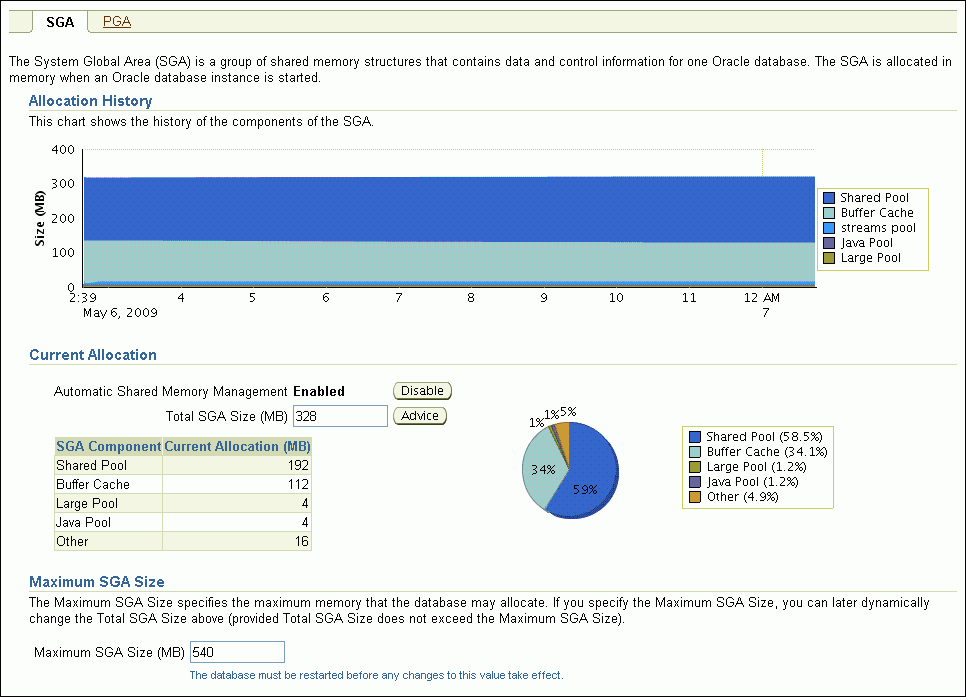
In the Current Allocation section, do one of the following:
In the Total SGA Size (MB) field, enter a new total size for the SGA.
Click Advice to use the SGA Advisor to help you choose a new SGA size.
The SGA Size Advice window opens.
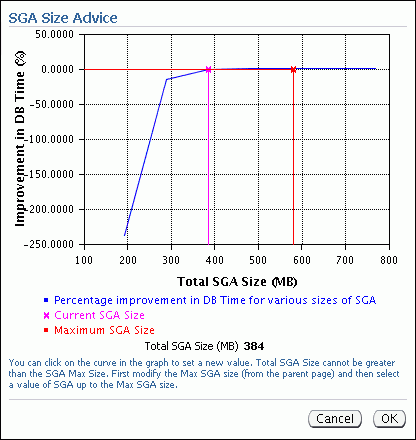
Click a point on the curve to change the total SGA size. The new SGA size is displayed below the graph. Continue clicking the curve until the desired value is displayed, and then click OK.
This example graph shows that at the current time, increasing the total SGA size is not expected to provide any gain in performance.
Note:
The settings on this page can be modified only if Automatic Memory Management is disabled.If you chose to use the SGA Size Advisor, then click a point on the curve to change the total memory size. Otherwise, go to Step 7.
The new size is displayed below the graph.
Continue clicking the curve until the desired value is displayed, then click OK.
You are returned to the Memory Advisors page.
Click Apply.
A confirmation message appears.
See Also:
Oracle Database Performance Tuning Guide for more information about memory parameters and their tuning
Modifying memory settings for automatic PGA memory management involves using the Memory Advisors page of Database Control to modify the instance PGA size. This section assumes that automatic memory management is disabled, and that automatic PGA memory management is enabled.
Note:
When you disable automatic memory management, automatic PGA memory management is enabled by default.To modify the instance PGA size:
Go to the Database Home page.
At the top of the page, click Server to view the Server subpage.
In the Database Configuration section, click Memory Advisors.
The Memory Advisors page appears, with the SGA subpage shown.
Click PGA to view the PGA subpage.

Do one of the following:
In the Aggregate PGA Target field, enter a new size for the instance PGA.
Click Advice to use the PGA Advisor to help you choose a new instance PGA size.
See Oracle Database Performance Tuning Guide for information about sizing the instance PGA.
When you have specified the new instance PGA size, click Apply.
A confirmation message appears.
See Also:
Oracle Database Performance Tuning Guide for more information about memory parameters and their tuning
Oracle By Example (OBE) has a series on the Oracle Database 2 Day DBA guide. This OBE steps you through the tasks in this chapter, and includes annotated screenshots.
To view the Instances OBE, in your browser, enter the following URL:
http://www.oracle.com/webfolder/technetwork/tutorials/obe/db/11g/r2/2day_dba/instance/instance.htm