| Oracle® Database Administrator's Guide 11g Release 2 (11.2) E25494-04 |
|
|
PDF · Mobi · ePub |
| Oracle® Database Administrator's Guide 11g Release 2 (11.2) E25494-04 |
|
|
PDF · Mobi · ePub |
The types of users and their roles and responsibilities depend on the database site. A small site can have one database administrator who administers the database for application developers and users. A very large site can find it necessary to divide the duties of a database administrator among several people and among several areas of specialization.
Each database requires at least one database administrator (DBA). An Oracle Database system can be large and can have many users. Therefore, database administration is sometimes not a one-person job, but a job for a group of DBAs who share responsibility.
A database administrator's responsibilities can include the following tasks:
Installing and upgrading the Oracle Database server and application tools
Allocating system storage and planning future storage requirements for the database system
Creating primary database storage structures (tablespaces) after application developers have designed an application
Creating primary objects (tables, views, indexes) once application developers have designed an application
Modifying the database structure, as necessary, from information given by application developers
Enrolling users and maintaining system security
Ensuring compliance with Oracle license agreements
Controlling and monitoring user access to the database
Monitoring and optimizing the performance of the database
Planning for backup and recovery of database information
Maintaining archived data on tape
Backing up and restoring the database
Contacting Oracle for technical support
In some cases, a site assigns one or more security officers to a database. A security officer enrolls users, controls and monitors user access to the database, and maintains system security. As a DBA, you might not be responsible for these duties if your site has a separate security officer. See Oracle Database Security Guide for information about the duties of security officers.
Some sites have one or more network administrators. A network administrator, for example, administers Oracle networking products, such as Oracle Net Services. See Oracle Database Net Services Administrator's Guide for information about the duties of network administrators.
See Also:
Part V, "Distributed Database Management", for information on network administration in a distributed environmentApplication developers design and implement database applications. Their responsibilities include the following tasks:
Designing and developing the database application
Designing the database structure for an application
Estimating storage requirements for an application
Specifying modifications of the database structure for an application
Relaying this information to a database administrator
Tuning the application during development
Establishing security measures for an application during development
Application developers can perform some of these tasks in collaboration with DBAs. See Oracle Database Advanced Application Developer's Guide for information about application development tasks.
An Oracle Database site can assign one or more application administrators to administer a particular application. Each application can have its own administrator.
Database users interact with the database through applications or utilities. A typical user's responsibilities include the following tasks:
Entering, modifying, and deleting data, where permitted
Generating reports from the data
The following tasks present a prioritized approach for designing, implementing, and maintaining an Oracle Database:
Task 1: Evaluate the Database Server Hardware
Task 2: Install the Oracle Database Software
Task 4: Create and Open the Database
Task 7: Implement the Database Design
Task 8: Back Up the Fully Functional Database
Task 9: Tune Database Performance
Task 10: Download and Install Patches
Task 11: Roll Out to Additional Hosts
These tasks are discussed in the sections that follow.
Note:
When upgrading to a new release, back up your existing production environment, both software and database, before installation. For information on preserving your existing production database, see Oracle Database Upgrade Guide.Evaluate how Oracle Database and its applications can best use the available computer resources. This evaluation should reveal the following information:
How many disk drives are available to the Oracle products
How many, if any, dedicated tape drives are available to Oracle products
How much memory is available to the instances of Oracle Database you will run (see your system configuration documentation)
As the database administrator, you install the Oracle Database server software and any front-end tools and database applications that access the database. In some distributed processing installations, the database is controlled by a central computer (database server) and the database tools and applications are executed on remote computers (clients). In this case, you must also install the Oracle Net components necessary to connect the remote systems to the computer that executes Oracle Database.
For more information on what software to install, see "Identifying Your Oracle Database Software Release".
See Also:
For specific requirements and instructions for installation, see the following documentation:The Oracle documentation specific to your operating system
The installation guides for your front-end tools and Oracle Net drivers
As the database administrator, you must plan:
The logical storage structure of the database
The overall database design
A backup strategy for the database
It is important to plan how the logical storage structure of the database will affect system performance and various database management operations. For example, before creating any tablespaces for your database, you should know how many data files will comprise the tablespace, what type of information will be stored in each tablespace, and on which disk drives the data files will be physically stored. When planning the overall logical storage of the database structure, consider the effects that this structure will have when the database is actually created and running. Consider how the logical storage structure of the database will affect:
The performance of the computer running Oracle Database
The performance of the database during data access operations
The efficiency of backup and recovery procedures for the database
Plan the relational design of the database objects and the storage characteristics for each of these objects. By planning the relationship between each object and its physical storage before creating it, you can directly affect the performance of the database as a unit. Be sure to plan for the growth of the database.
In distributed database environments, this planning stage is extremely important. The physical location of frequently accessed data dramatically affects application performance.
During the planning stage, develop a backup strategy for the database. You can alter the logical storage structure or design of the database to improve backup efficiency.
It is beyond the scope of this book to discuss relational and distributed database design. If you are not familiar with such design issues, see accepted industry-standard documentation.
Part II, "Oracle Database Structure and Storage", and Part III, "Schema Objects", provide specific information on creating logical storage structures, objects, and integrity constraints for your database.
After you complete the database design, you can create the database and open it for normal use. You can create a database at installation time, using the Database Configuration Assistant, or you can supply your own scripts for creating a database.
See Chapter 2, "Creating and Configuring an Oracle Database", for information on creating a database and Chapter 3, "Starting Up and Shutting Down" for guidance in starting up the database.
After you create the database structure, perform the backup strategy you planned for the database. Create any additional redo log files, take the first full database backup (online or offline), and schedule future database backups at regular intervals.
After you back up the database structure, you can enroll the users of the database in accordance with your Oracle license agreement, and grant appropriate privileges and roles to these users. See Chapter 7, "Managing Users and Securing the Database" for guidance in this task.
After you create and start the database, and enroll the system users, you can implement the planned logical structure database by creating all necessary tablespaces. When you have finished creating tablespaces, you can create the database objects.
Part II, "Oracle Database Structure and Storage" and Part III, "Schema Objects" provide information on creating logical storage structures and objects for your database.
When the database is fully implemented, again back up the database. In addition to regularly scheduled backups, you should always back up your database immediately after implementing changes to the database structure.
Optimizing the performance of the database is one of your ongoing responsibilities as a DBA. Oracle Database provides a database resource management feature that helps you to control the allocation of resources among various user groups. The database resource manager is described in Chapter 27, "Managing Resources with Oracle Database Resource Manager".
See Also:
Oracle Database Performance Tuning Guide for information about tuning your database and applicationsAfter installation and on a regular basis, download and install patches. Patches are available as single interim patches and as patchsets (or patch releases). Interim patches address individual software bugs and may or may not be needed at your installation. Patch releases are collections of bug fixes that are applicable for all customers. Patch releases have release numbers. For example, if you installed Oracle Database 11.2.0.1, the first patch release will have a release number of 11.2.0.2.
See Also:
Oracle Database Installation Guide for your platform for instructions on downloading and installing patches.After you have an Oracle Database installation properly configured, tuned, patched, and tested, you may want to roll that exact installation out to other hosts. Reasons to do this include the following:
You have multiple production database systems.
You want to create development and test systems that are identical to your production system.
Instead of installing, tuning, and patching on each additional host, you can clone your tested Oracle Database installation to other hosts, saving time and avoiding inconsistencies. There are two types of cloning available to you:
Cloning an Oracle home—Just the configured and patched binaries from the Oracle home directory and subdirectories are copied to the destination host and "fixed" to match the new environment. You can then start an instance with this cloned home and create a database.
You can use the Enterprise Manager Clone Oracle Home tool to clone an Oracle home to one or more destination hosts. You can also manually clone an Oracle home using a set of provided scripts and Oracle Universal Installer.
Cloning a database—The tuned database, including database files, initialization parameters, and so on, are cloned to an existing Oracle home (possibly a cloned home).
You can use the Enterprise Manager Clone Database tool to clone an Oracle database instance to an existing Oracle home.
See Also:
Oracle Universal Installer and OPatch User's Guide for Windows and UNIX for information about cloning Oracle software.
Enterprise Manager online help for instructions for cloning a database.
The primary means of communicating with Oracle Database is by submitting SQL statements. Oracle Database also supports a superset of SQL, which includes commands for starting up and shutting down the database, modifying database configuration, and so on. There are three ways to submit these SQL statements and commands to Oracle Database:
Directly, using the command-line interface of SQL*Plus
Indirectly, using the graphical user interface of Oracle Enterprise Manager
With Oracle Enterprise Manager (Enterprise Manager), you use an intuitive graphical interface to administer the database, and Enterprise Manager submits SQL statements and commands behind the scenes.
See Oracle Database 2 Day DBA for more information.
Directly, using SQL Developer
Developers use SQL Developer to create and test database schemas and applications, although you can also use it for database administration tasks.
See Oracle Database 2 Day Developer's Guide for more information.
This section focuses on using SQL*Plus to submit SQL statements and commands to the database. It includes the following topics:
SQL*Plus is the primary command-line interface to your Oracle database. You use SQL*Plus to start up and shut down the database, set database initialization parameters, create and manage users, create and alter database objects (such as tables and indexes), insert and update data, run SQL queries, and more.
Before you can submit SQL statements and commands, you must connect to the database. With SQL*Plus, you can connect locally or remotely. Connecting locally means connecting to an Oracle database running on the same computer on which you are running SQL*Plus. Connecting remotely means connecting over a network to an Oracle database that is running on a remote computer. Such a database is referred to as a remote database. The SQL*Plus executable on the local computer is provided by a full Oracle Database installation, an Oracle Client installation, or an Instant Client installation.
See Also:
SQL*Plus User's Guide and ReferenceOracle Database includes the following components:
The Oracle Database instance, which is a collection of processes and memory
A set of disk files that contain user data and system data
When you connect with SQL*Plus, you are connecting to the Oracle instance. Each instance has an instance ID, also known as a system ID (SID). Because there can be multiple Oracle instances on a host computer, each with its own set of data files, you must identify the instance to which you want to connect. For a local connection, you identify the instance by setting operating system environment variables. For a remote connection, you identify the instance by specifying a network address and a database service name. For both local and remote connections, you must set environment variables to help the operating system find the SQL*Plus executable and to provide the executable with a path to its support files and scripts. To connect to an Oracle instance with SQL*Plus, therefore, you must complete the following steps:
See Also:
Oracle Database Concepts for background information about the Oracle instanceTake the necessary action on your platform to open a window into which you can enter operating system commands.
Depending on your platform, you may have to set environment variables before starting SQL*Plus, or at least verify that they are set properly.
For example, on most platforms, ORACLE_SID and ORACLE_HOME must be set. In addition, it is advisable to set the PATH environment variable to include the ORACLE_HOME/bin directory. Some platforms may require additional environment variables:
On the UNIX and Linux platforms, you must set environment variables by entering operating system commands.
On the Windows platform, Oracle Universal Installer (OUI) automatically assigns values to ORACLE_HOME and ORACLE_SID in the Windows registry.
If you did not create a database upon installation, OUI does not set ORACLE_SID in the registry; after you create your database at a later time, you must set the ORACLE_SID environment variable from a command window.
UNIX and Linux installations come with two scripts, oraenv and coraenv, that you can use to easily set environment variables. For more information, see Administrator's Reference for UNIX Systems.
For all platforms, when switching between instances with different Oracle homes, you must change the ORACLE_HOME environment variable. If multiple instances share the same Oracle home, you must change only ORACLE_SID when switching instances.
See the Oracle Database Installation Guide or administration guide for your operating system for details on environment variables and for information on switching instances.
Example 1-1 Setting Environment Variables in UNIX (C Shell)
setenv ORACLE_SID orcl
setenv ORACLE_HOME /u01/app/oracle/product/11.2.0/db_1
setenv LD_LIBRARY_PATH $ORACLE_HOME/lib:/usr/lib:/usr/dt/lib:/usr/openwin/lib:/usr/ccs/lib
Example 1-2 assumes that ORACLE_HOME and ORACLE_SID are set in the registry but that you want to override the registry value of ORACLE_SID to connect to a different instance.
On Windows, environment variable values that you set in a command prompt window override the values in the registry.
To start SQL*Plus:
Do one of the following:
Ensure that the PATH environment variable contains ORACLE_HOME/bin.
Change directory to ORACLE_HOME/bin.
Enter the following command (case-sensitive on UNIX and Linux):
sqlplus /nolog
You submit the SQL*Plus CONNECT statement to initially connect to the Oracle instance or at any time to reconnect as a different user. The syntax of the CONNECT statement is as follows:
CONN[ECT] [logon] [AS {SYSOPER | SYSDBA}]
The syntax of logon is as follows:
{username | /}[@connect_identifier] [edition={edition_name | DATABASE_DEFAULT}]
When you provide username, SQL*Plus prompts for a password. The password is not echoed as you type it.
The following table describes the syntax components of the CONNECT statement.
| Syntax Component | Description |
|---|---|
/ |
Calls for external authentication of the connection request. A database password is not used in this type of authentication. The most common form of external authentication is operating system authentication, where the database user is authenticated by having logged in to the host operating system with a certain host user account. External authentication can also be performed with an Oracle wallet or by a network service. See Oracle Database Security Guide for more information. See also "Using Operating System Authentication". |
AS {SYSOPER | SYSDBA} |
Indicates that the database user is connecting with either the SYSOPER or SYSDBA system privilege. Only certain predefined administrative users or users who have been added to the password file may connect with these privileges. See "Administrative Privileges" for more information. |
username |
A valid database user name. The database authenticates the connection request by matching username against the data dictionary and prompting for a user password. |
connect_identifier (1) |
An Oracle Net connect identifier, for a remote connection. The exact syntax depends on the Oracle Net configuration. If omitted, SQL*Plus attempts connection to a local instance.
A common connect identifier is a net service name. This is an alias for an Oracle Net connect descriptor (network address and database service name). The alias is typically resolved in the See Oracle Database Net Services Administrator's Guide for more information on connect identifiers. |
connect_identifier (2) |
As an alternative, a connect identifier can use easy connect syntax. Easy connect provides out-of-the-box TCP/IP connectivity for remote databases without having to configure Oracle Net Services on the client (local) computer.
Easy connect syntax for the connect identifier is as follows (the enclosing double-quotes must be included): "host[:port][/service_name][:server][/instance_name]" where:
See Oracle Database Net Services Administrator's Guide for more information on easy connect. |
edition={edition_name | DATABASE_DEFAULT} |
Specifies the edition in which the new database session starts. If you specify an edition, it must exist and you must have the USE privilege on it. If this clause is not specified, the database default edition is used for the session.
See Oracle Database Advanced Application Developer's Guide for information on editions and edition-based redefinition. |
This simple example connects to a local database as user SYSTEM. SQL*Plus prompts for the SYSTEM user password.
connect system
This example connects to a local database as user SYS with the SYSDBA privilege. SQL*Plus prompts for the SYS user password.
connect sys as sysdba
When connecting as user SYS, you must connect AS SYSDBA.
This example connects locally with the SYSDBA privilege with operating system authentication.
connect / as sysdba
This example uses easy connect syntax to connect as user salesadmin to a remote database running on the host dbhost.example.com. The Oracle Net listener (the listener) is listening on the default port (1521). The database service is sales.example.com. SQL*Plus prompts for the salesadmin user password.
connect salesadmin@"dbhost.example.com/sales.example.com"
This example is identical to Example 1-6, except that the service handler type is indicated.
connect salesadmin@"dbhost.example.com/sales.example.com:dedicated"
This example is identical to Example 1-6, except that the listener is listening on the nondefault port number 1522.
connect salesadmin@"dbhost.example.com:1522/sales.example.com"
This example is identical to Example 1-6, except that the host IP address is substituted for the host name.
connect salesadmin@"192.0.2.5/sales.example.com"
This example connects using an IPv6 address. Note the enclosing square brackets.
connect salesadmin@"[2001:0DB8:0:0::200C:417A]/sales.example.com"
This example specifies the instance to which to connect and omits the database service name. A default database service must have been specified, otherwise an error is generated. Note that when you specify the instance only, you cannot specify the service handler type.
connect salesadmin@"dbhost.example.com//orcl"
This example connects remotely as user salesadmin to the database service designated by the net service name sales1. SQL*Plus prompts for the salesadmin user password.
connect salesadmin@sales1
This example connects remotely with external authentication to the database service designated by the net service name sales1.
connect /@sales1
This example connects remotely with the SYSDBA privilege and with external authentication to the database service designated by the net service name sales1.
connect /@sales1 as sysdba
This example connects remotely as user salesadmin to the database service designated by the net service name sales1. The database session starts in the rev21 edition. SQL*Plus prompts for the salesadmin user password.
connect salesadmin@sales1 edition=rev21
See Also:
"Managing Application Workloads with Database Services" for information about database services
SQL*Plus User's Guide and Reference for more information on the CONNECT statement
Oracle Database Net Services Administrator's Guide for more information on net service names
Oracle Database Net Services Reference for information on how to define the default service in listener.ora
Because Oracle Database continues to evolve and can require maintenance, Oracle periodically produces new releases. Not all customers initially subscribe to a new release or require specific maintenance for their existing release. As a result, multiple releases of the product exist simultaneously.
As many as five numbers may be required to fully identify a release. The significance of these numbers is discussed in the sections that follow.
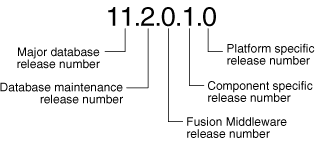
To understand the release nomenclature used by Oracle, examine the following example of an Oracle Database release labeled "11.2.0.1.0".
Figure 1-1 Example of an Oracle Database Release Number
Note:
Starting with release 9.2, maintenance releases of Oracle Database are denoted by a change to the second digit of a release number. In previous releases, the third digit indicated a particular maintenance release.The first digit is the most general identifier. It represents a major new version of the software that contains significant new functionality.
The second digit represents a maintenance release level. Some new features may also be included.
The third digit reflects the release level of Oracle Fusion Middleware.
To identify the release of Oracle Database that is currently installed and to see the release levels of other database components you are using, query the data dictionary view PRODUCT_COMPONENT_VERSION. A sample query follows. (You can also query the V$VERSION view to see component-level information.) Other product release levels may increment independent of the database server.
COL PRODUCT FORMAT A40
COL VERSION FORMAT A15
COL STATUS FORMAT A15
SELECT * FROM PRODUCT_COMPONENT_VERSION;

PRODUCT                                  VERSION     STATUS
---------------------------------------- ----------- -----------
NLSRTL                                   11.2.0.0.1  Production
Oracle Database 11g Enterprise Edition   11.2.0.0.1  Production
PL/SQL                                   11.2.0.0.1  Production
...
It is important to convey to Oracle the results of this query when you report problems with the software.
To perform the administrative tasks of an Oracle Database DBA, you need specific privileges within the database and possibly in the operating system of the server on which the database runs. Access to a database administrator's account should be tightly controlled.
This section contains the following topics:
To perform many of the administrative duties for a database, you must be able to execute operating system commands. Depending on the operating system on which Oracle Database is running, you might need an operating system account or ID to gain access to the operating system. If so, your operating system account might require operating system privileges or access rights that other database users do not require (for example, to perform Oracle Database software installation). Although you do not need the Oracle Database files to be stored in your account, you should have access to them.
See Also:
Your operating system-specific Oracle documentation. The method of creating the account of the database administrator is specific to the operating system.Two administrative user accounts are automatically created when Oracle Database is installed:
SYSTEM (default password: MANAGER)
Note:
Both Oracle Universal Installer (OUI) and Database Configuration Assistant (DBCA) now prompt forSYS and SYSTEM passwords and do not accept the default passwords "change_on_install" or "manager", respectively.
If you create the database manually, Oracle strongly recommends that you specify passwords for SYS and SYSTEM at database creation time, rather than using these default passwords. See "Protecting Your Database: Specifying Passwords for Users SYS and SYSTEM" for more information.
Create at least one additional administrative user and grant to that user an appropriate administrative role to use when performing daily administrative tasks. Do not use SYS and SYSTEM for these purposes.
Note Regarding Security Enhancements:
In this release of Oracle Database and in subsequent releases, several enhancements are being made to ensure the security of default database user accounts. You can find a security checklist for this release in Oracle Database Security Guide. Oracle recommends that you read this checklist and configure your database accordingly.When you create an Oracle database, the user SYS is automatically created and granted the DBA role.
All of the base tables and views for the database data dictionary are stored in the schema SYS. These base tables and views are critical for the operation of Oracle Database. To maintain the integrity of the data dictionary, tables in the SYS schema are manipulated only by the database. They should never be modified by any user or database administrator, and no one should create any tables in the schema of user SYS. (However, you can change the storage parameters of the data dictionary settings if necessary.)
Ensure that most database users are never able to connect to Oracle Database using the SYS account.
When you create an Oracle Database, the user SYSTEM is also automatically created and granted the DBA role.
The SYSTEM user name is used to create additional tables and views that display administrative information, and internal tables and views used by various Oracle Database options and tools. Never use the SYSTEM schema to store tables of interest to non-administrative users.
A predefined DBA role is automatically created with every Oracle Database installation. This role contains most database system privileges. Therefore, the DBA role should be granted only to actual database administrators.
Note:
The DBA role does not include theSYSDBA or SYSOPER system privileges. These are special administrative privileges that allow an administrator to perform basic database administration tasks, such as creating the database and instance startup and shutdown. These system privileges are discussed in "Administrative Privileges".As a DBA, you often perform special operations such as shutting down or starting up a database. Because only a DBA should perform these operations, the database administrator usernames require a secure authentication scheme.
This section contains the following topics:
Administrative privileges that are required for an administrator to perform basic database operations are granted through two special system privileges, SYSDBA and SYSOPER. You must have one of these privileges granted to you, depending upon the level of authorization you require.
Note:
TheSYSDBA and SYSOPER system privileges allow access to a database instance even when the database is not open. Control of these privileges is totally outside of the database itself.
The SYSDBA and SYSOPER privileges can also be thought of as types of connections that enable you to perform certain database operations for which privileges cannot be granted in any other fashion. For example, if you have the SYSDBA privilege, you can connect to the database by specifying CONNECT AS SYSDBA.
The following operations are authorized by the SYSDBA and SYSOPER system privileges:
| System Privilege | Operations Authorized |
|---|---|
SYSDBA |
Effectively, this system privilege allows a user to connect as user |
SYSOPER |
This privilege allows a user to perform basic operational tasks, but without the ability to look at user data. |
The manner in which you are authorized to use these privileges depends upon the method of authentication that you use.
When you connect with SYSDBA or SYSOPER privileges, you connect with a default schema, not with the schema that is generally associated with your username. For SYSDBA this schema is SYS; for SYSOPER the schema is PUBLIC.
This example illustrates that a user is assigned another schema (SYS) when connecting with the SYSDBA system privilege. Assume that the sample user oe has been granted the SYSDBA system privilege and has issued the following statements:
CONNECT oe
CREATE TABLE admin_test(name VARCHAR2(20));
Later, user oe issues these statements:
CONNECT oe AS SYSDBA
SELECT * FROM admin_test;
User oe now receives the following error:
ORA-00942: table or view does not exist
Having connected as SYSDBA, user oe now references the SYS schema, but the table was created in the oe schema.
Database Administrators can authenticate database administrators through the data dictionary, (using an account password) like other users. Keep in mind that beginning with Oracle Database 11g Release 1, database passwords are case-sensitive. (You can disable case sensitivity and return to pre–Release 11g behavior by setting the SEC_CASE_SENSITIVE_LOGON initialization parameter to FALSE.)
In addition to normal data dictionary authentication, the following methods are available for authenticating database administrators with the SYSDBA or SYSOPER privilege:
Operating system (OS) authentication
Password files
Strong authentication with a network-based authentication service, such as Oracle Internet Directory
These methods are required to authenticate a database administrator when the database is not started or otherwise unavailable. (They can also be used when the database is available.)
The remainder of this section focuses on operating system authentication and password file authentication. See Oracle Database Security Guide for information about authenticating database administrators with network-based authentication services.
Notes:
These methods replace the CONNECT INTERNAL syntax provided with earlier versions of Oracle Database. CONNECT INTERNAL is no longer supported.
Operating system authentication takes precedence over password file authentication. If you meet the requirements for operating system authentication, then even if you use a password file, you will be authenticated by operating system authentication.
Your choice will be influenced by whether you intend to administer your database locally on the same system where the database resides, or whether you intend to administer many different databases from a single remote client. Figure 1-2 illustrates the choices you have for database administrator authentication schemes.
Figure 1-2 Database Administrator Authentication Methods
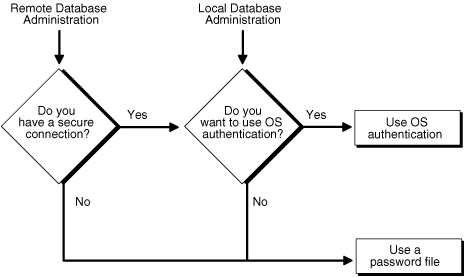
If you are performing remote database administration, consult your Oracle Net documentation to determine whether you are using a secure connection. Most popular connection protocols, such as TCP/IP and DECnet, are not secure.
See Also:
Oracle Database Security Guide for information about authenticating database administrators with network-based authentication services.
To connect to Oracle Database as a privileged user over a nonsecure connection, you must be authenticated by a password file. When using password file authentication, the database uses a password file to keep track of database user names that have been granted the SYSDBA or SYSOPER system privilege. This form of authentication is discussed in "Using Password File Authentication".
You can connect to Oracle Database as a privileged user over a local connection or a secure remote connection in two ways:
If the database has a password file and you have been granted the SYSDBA or SYSOPER system privilege, then you can connect and be authenticated by a password file.
If the server is not using a password file, or if you have not been granted SYSDBA or SYSOPER privileges and are therefore not in the password file, you can use operating system authentication. On most operating systems, authentication for database administrators involves placing the operating system username of the database administrator in a special group, generically referred to as OSDBA. Users in that group are granted SYSDBA privileges. A similar group, OSOPER, is used to grant SYSOPER privileges to users.
This section describes how to authenticate an administrator using the operating system.
Membership in one of two special operating system groups enables a DBA to authenticate to the database through the operating system rather than with a database user name and password. This is known as operating system authentication. These operating system groups are generically referred to as OSDBA and OSOPER. The groups are created and assigned specific names as part of the database installation process. The default names vary depending upon your operating system, and are listed in the following table:
| Operating System Group | UNIX User Group | Windows User Group |
|---|---|---|
| OSDBA | dba |
ORA_DBA |
| OSOPER | oper |
ORA_OPER |
Oracle Universal Installer uses these default names, but you can override them. One reason to override them is if you have multiple instances running on the same host computer. If each instance is to have a different person as the principal DBA, you can improve the security of each instance by creating a different OSDBA group for each instance. For example, for two instances on the same host, the OSDBA group for the first instance could be named dba1, and OSDBA for the second instance could be named dba2. The first DBA would be a member of dba1 only, and the second DBA would be a member of dba2 only. Thus, when using operating system authentication, each DBA would be able to connect only to his assigned instance.
Membership in the OSDBA or OSOPER group affects your connection to the database in the following ways:
If you are a member of the OSDBA group and you specify AS SYSDBA when you connect to the database, then you connect to the database with the SYSDBA system privilege.
If you are a member of the OSOPER group and you specify AS SYSOPER when you connect to the database, then you connect to the database with the SYSOPER system privilege.
If you are not a member of either of these operating system groups and you attempt to connect as SYSDBA or SYSOPER, the CONNECT command fails.
See Also:
Your operating system specific Oracle documentation for information about creating the OSDBA and OSOPER groupsTo enable operating system authentication of an administrative user:
Create an operating system account for the user.
Add the account to the OSDBA or OSOPER operating system defined groups.
A user can be authenticated, enabled as an administrative user, and connected to a local database by typing one of the following SQL*Plus commands:
CONNECT / AS SYSDBA
CONNECT / AS SYSOPER
For the Windows platform only, remote operating system authentication over a secure connection is supported. You must specify the net service name for the remote database:
CONNECT /@net_service_name AS SYSDBA
CONNECT /@net_service_name AS SYSOPER
Both the client computer and database host computer must be on a Windows domain.
See Also:
SQL*Plus User's Guide and Reference for syntax of the CONNECT command
This section describes how to authenticate an administrative user using password file authentication.
To enable authentication of an administrative user using password file authentication you must do the following:
If not already created, create the password file using the ORAPWD utility:
ORAPWD FILE=filename ENTRIES=max_users
See "Creating and Maintaining a Password File" for details.
Notes:
When you invoke Database Configuration Assistant (DBCA) as part of the Oracle Database installation process, DBCA creates a password file.
Beginning with Oracle Database 11g Release 1, passwords in the password file are case-sensitive unless you include the IGNORECASE = Y command-line argument.
Set the REMOTE_LOGIN_PASSWORDFILE initialization parameter to EXCLUSIVE. (This is the default).
Note:
REMOTE_LOGIN_PASSWORDFILE is a static initialization parameter and therefore cannot be changed without restarting the database.Connect to the database as user SYS (or as another user with the administrative privileges).
If the user does not already exist in the database, create the user and assign a password.
Keep in mind that beginning with Oracle Database 11g Release 1, database passwords are case-sensitive. (You can disable case sensitivity and return to pre–Release 11g behavior by setting the SEC_CASE_SENSITIVE_LOGON initialization parameter to FALSE.)
Grant the SYSDBA or SYSOPER system privilege to the user:
GRANT SYSDBA to oe;
This statement adds the user to the password file, thereby enabling connection AS SYSDBA.
See Also:
"Creating and Maintaining a Password File" for instructions for creating and maintaining a password file.Administrative users can be connected and authenticated to a local or remote database by using the SQL*Plus CONNECT command. They must connect using their username and password and the AS SYSDBA or AS SYSOPER clause. Note that beginning with Oracle Database 11g Release 1, passwords are case-sensitive unless the password file was created with the IGNORECASE = Y option.
For example, user oe has been granted the SYSDBA privilege, so oe can connect as follows:
CONNECT oe AS SYSDBA
However, user oe has not been granted the SYSOPER privilege, so the following command will fail:
CONNECT oe AS SYSOPER
Note:
Operating system authentication takes precedence over password file authentication. Specifically, if you are a member of the OSDBA or OSOPER group for the operating system, and you connect as SYSDBA or SYSOPER, you will be connected with associated administrative privileges regardless of the username/password that you specify.If you are not in the OSDBA or OSOPER groups, and you are not in the password file, then attempting to connect as SYSDBA or as SYSOPER fails.
See Also:
SQL*Plus User's Guide and Reference for syntax of the CONNECT command
You can create a password file using the password file creation utility, ORAPWD. For some operating systems, you can create this file as part of your standard installation.
This section contains the following topics:
See Also:
The syntax of the ORAPWD command is as follows:
ORAPWD FILE=filename [ENTRIES=numusers] [FORCE={Y|N}] [IGNORECASE={Y|N}]
Command arguments are summarized in the following table.
| Argument | Description |
|---|---|
FILE |
Name to assign to the password file. You must supply a complete path. If you supply only a file name, the file is written to the current directory. |
ENTRIES |
(Optional) Maximum number of entries (user accounts) to permit in the file. |
FORCE |
(Optional) If y, permits overwriting an existing password file. |
IGNORECASE |
(Optional) If y, passwords are treated as case-insensitive. |
There are no spaces permitted around the equal-to (=) character.
The command prompts for the SYS password and stores the password in the created password file.
The following command creates a password file named orapworcl that allows up to 30 privileged users with different passwords.
orapwd FILE=orapworcl ENTRIES=30
The following sections describe the ORAPWD command line arguments.
This argument sets the name of the password file being created. You must specify the full path name for the file. This argument is mandatory.
The file name required for the password file is operating system specific. Some operating systems require the password file to adhere to a specific format and be located in a specific directory. Other operating systems allow the use of environment variables to specify the name and location of the password file.
Table 1-1 lists the required name and location for the password file on the UNIX, Linux, and Windows platforms. For other platforms, consult your platform-specific documentation.
Table 1-1 Required Password File Name and Location on UNIX, Linux, and Windows
| Platform | Required Name | Required Location) |
|---|---|---|
|
UNIX and Linux |
|
ORACLE_HOME |
|
Windows |
|
ORACLE_HOME |
For example, for a database instance with the SID orcldw, the password file must be named orapworcldw on Linux and PWDorcldw.ora on Windows.
In an Oracle Real Application Clusters environment on a platform that requires an environment variable to be set to the path of the password file, the environment variable for each instance must point to the same password file.
Caution:
It is critically important to the security of your system that you protect your password file and the environment variables that identify the location of the password file. Any user with access to these could potentially compromise the security of the connection.This argument specifies the number of entries that you require the password file to accept. This number corresponds to the number of distinct users allowed to connect to the database as SYSDBA or SYSOPER. The actual number of allowable entries can be higher than the number of users, because the ORAPWD utility continues to assign password entries until an operating system block is filled. For example, if your operating system block size is 512 bytes, it holds four password entries. The number of password entries allocated is always a multiple of four.
Entries can be reused as users are added to and removed from the password file. If you intend to specify REMOTE_LOGIN_PASSWORDFILE=EXCLUSIVE, and to allow the granting of SYSDBA and SYSOPER privileges to users, this argument is required.
Caution:
When you exceed the allocated number of password entries, you must create a new password file. To avoid this necessity, allocate more entries than you think you will ever need.This argument, if set to Y, enables you to overwrite an existing password file. An error is returned if a password file of the same name already exists and this argument is omitted or set to N.
If this argument is set to y, passwords are case-insensitive. That is, case is ignored when comparing the password that the user supplies during login with the password in the password file.
See Also:
Oracle Database Security Guide for more information about case-sensitivity in passwords.You use the initialization parameter REMOTE_LOGIN_PASSWORDFILE to control whether a password file is shared among multiple Oracle Database instances. You can also use this parameter to disable password file authentication. The values recognized for REMOTE_LOGIN_PASSWORDFILE are:
NONE: Setting this parameter to NONE causes Oracle Database to behave as if the password file does not exist. That is, no privileged connections are allowed over nonsecure connections.
EXCLUSIVE: (The default) An EXCLUSIVE password file can be used with only one instance of one database. Only an EXCLUSIVE file can be modified. Using an EXCLUSIVE password file enables you to add, modify, and delete users. It also enables you to change the SYS password with the ALTER USER command.
SHARED: A SHARED password file can be used by multiple databases running on the same server, or multiple instances of an Oracle Real Application Clusters (Oracle RAC) database. A SHARED password file cannot be modified. Therefore, you cannot add users to a SHARED password file. Any attempt to do so or to change the password of SYS or other users with the SYSDBA or SYSOPER privileges generates an error. All users needing SYSDBA or SYSOPER system privileges must be added to the password file when REMOTE_LOGIN_PASSWORDFILE is set to EXCLUSIVE. After all users are added, you can change REMOTE_LOGIN_PASSWORDFILE to SHARED, and then share the file.
This option is useful if you are administering multiple databases or an Oracle RAC database.
If REMOTE_LOGIN_PASSWORDFILE is set to EXCLUSIVE or SHARED and the password file is missing, this is equivalent to setting REMOTE_LOGIN_PASSWORDFILE to NONE.
Note:
You cannot change the password forSYS if REMOTE_LOGIN_PASSWORDFILE is set to SHARED. An error message is issued if you attempt to do so.Keeping Administrator Passwords Synchronized with the Data Dictionary
If you change the REMOTE_LOGIN_PASSWORDFILE initialization parameter from NONE to EXCLUSIVE or SHARED, or if you re-create the password file with a different SYS password, then you must ensure that the passwords in the data dictionary and password file for the SYS user are the same.
To synchronize the SYS passwords, use the ALTER USER statement to change the SYS password. The ALTER USER statement updates and synchronizes both the dictionary and password file passwords.
To synchronize the passwords for non-SYS users who log in using the SYSDBA or SYSOPER privilege, you must revoke and then regrant the privilege to the user, as follows:
Find all users who have been granted the SYSDBA privilege.
SELECT USERNAME FROM V$PWFILE_USERS WHERE USERNAME != 'SYS' AND SYSDBA='TRUE';
Revoke and then re-grant the SYSDBA privilege to these users.
REVOKE SYSDBA FROM non-SYS-user;
GRANT SYSDBA TO non-SYS-user;
Find all users who have been granted the SYSOPER privilege.
SELECT USERNAME FROM V$PWFILE_USERS WHERE USERNAME != 'SYS' AND SYSOPER='TRUE';
Revoke and regrant the SYSOPER privilege to these users.
REVOKE SYSOPER FROM non-SYS-user;
GRANT SYSOPER TO non-SYS-user;
When you grant SYSDBA or SYSOPER privileges to a user, that user's name and privilege information are added to the password file. If the server does not have an EXCLUSIVE password file (that is, if the initialization parameter REMOTE_LOGIN_PASSWORDFILE is NONE or SHARED, or the password file is missing), Oracle Database issues an error if you attempt to grant these privileges.
A user's name remains in the password file only as long as that user has at least one of these two privileges. If you revoke both of these privileges, Oracle Database removes the user from the password file.
Creating a Password File and Adding New Users to It
Use the following procedure to create a password and add new users to it:
Follow the instructions for creating a password file as explained in "Creating a Password File with ORAPWD".
Set the REMOTE_LOGIN_PASSWORDFILE initialization parameter to EXCLUSIVE. (This is the default.)
Note:
REMOTE_LOGIN_PASSWORDFILE is a static initialization parameter and therefore cannot be changed without restarting the database.Connect with SYSDBA privileges as shown in the following example, and enter the SYS password when prompted:
CONNECT SYS AS SYSDBA
Start up the instance and create the database if necessary, or mount and open an existing database.
Create users as necessary. Grant SYSDBA or SYSOPER privileges to yourself and other users as appropriate. See "Granting and Revoking SYSDBA and SYSOPER Privileges", later in this section.
If your server is using an EXCLUSIVE password file, use the GRANT statement to grant the SYSDBA or SYSOPER system privilege to a user, as shown in the following example:
GRANT SYSDBA TO oe;
Use the REVOKE statement to revoke the SYSDBA or SYSOPER system privilege from a user, as shown in the following example:
REVOKE SYSDBA FROM oe;
Because SYSDBA and SYSOPER are the most powerful database privileges, the WITH ADMIN OPTION is not used in the GRANT statement. That is, the grantee cannot in turn grant the SYSDBA or SYSOPER privilege to another user. Only a user currently connected as SYSDBA can grant or revoke another user's SYSDBA or SYSOPER system privileges. These privileges cannot be granted to roles, because roles are available only after database startup. Do not confuse the SYSDBA and SYSOPER database privileges with operating system roles.
See Also:
Oracle Database Security Guide for more information on system privilegesUse the V$PWFILE_USERS view to see the users who have been granted the SYSDBA, SYSOPER, or SYSASM system privileges. The columns displayed by this view are as follows:
| Column | Description |
|---|---|
USERNAME |
This column contains the name of the user that is recognized by the password file. |
SYSDBA |
If the value of this column is TRUE, then the user can log on with the SYSDBA system privileges. |
SYSOPER |
If the value of this column is TRUE, then the user can log on with the SYSOPER system privileges. |
SYSASM |
If the value of this column is TRUE, then the user can log on with the SYSASM system privileges. |
Note:
SYSASM is valid only for Oracle Automatic Storage Management instances.This section describes how to:
Expand the number of password file users if the password file becomes full
Remove the password file
If you receive an error when you try to grant SYSDBA or SYSOPER system privileges to a user because the file is full, then you must create a larger password file and regrant the privileges to the users.
Use the following procedure to replace a password file:
Identify the users who have SYSDBA or SYSOPER privileges by querying the V$PWFILE_USERS view.
Delete the existing password file.
Follow the instructions for creating a new password file using the ORAPWD utility in "Creating a Password File with ORAPWD". Ensure that the ENTRIES parameter is set to a number larger than you think you will ever need.
Follow the instructions in "Adding Users to a Password File".
If you determine that you no longer require a password file to authenticate users, you can delete the password file and then optionally reset the REMOTE_LOGIN_PASSWORDFILE initialization parameter to NONE. After you remove this file, only those users who can be authenticated by the operating system can perform SYSDBA or SYSOPER database administration operations.
Oracle utilities are available to help you maintain the data in your Oracle Database.
SQL*Loader is used both by database administrators and by other users of Oracle Database. It loads data from standard operating system files (such as, files in text or C data format) into database tables.
The Data Pump utility enables you to archive data and to move data between one Oracle Database and another. Also available are the original Import (IMP) and Export (EXP) utilities for importing and exporting data from and to earlier releases.
See Also:
Oracle Database Utilities for detailed information about these utilities
|
Copyright © 2001, 2013, Oracle and/or its affiliates. All rights reserved. Legal Notices |
|