| Oracle® Transparent Gateway for DRDA Installation and User's Guide 10g Release 2 (10.2) for Microsoft Windows Part Number B16218-03 |
|
|
PDF · Mobi · ePub |
| Oracle® Transparent Gateway for DRDA Installation and User's Guide 10g Release 2 (10.2) for Microsoft Windows Part Number B16218-03 |
|
|
PDF · Mobi · ePub |
This chapter describes configuration of the Microsoft SNA Server product on Microsoft Windows for use with the Oracle Transparent Gateway for DRDA. The SNA Server provides the SNA connectivity through the APPC/LU6.2 protocol between the PentiumEbased host and the remote DRDA Server. Microsoft Host Integration Server is the successor product to Microsoft SNA Server, but it retains the same configuration information as SNA Server and the steps for configuring SNA Server, therefore, also apply to Host Integration Server. Read this chapter to learn more about creating server profiles.
This chapter contains the following sections:
This chapter requires you to enter parameters unique to your system in order to properly configure the SNA Server. Refer to Appendix E for a worksheet listing all the installation parameters that you will need to know before you can complete the configuration process. Ask your network administrator to provide you with these parameters before you begin.
The Oracle Transparent Gateway for DRDA requires a stored set of definitions, called Side Information Profiles, to support connections between the gateway and DRDA Servers. Each profile consists of a profile name and a profile type, a set of fields describing the profile. The fields in a given profile type are generally a mixture of operating parameter values and names of other SNA profiles relevant to the profile. Each functional part of APPC, such as the Mode, Remote Transaction Program name, and Logical Unit (LU), is described by a distinct profile type.
Oracle recommends independent LUs for the Oracle Transparent Gateway for DRDA, because they support multiple parallel sessions or conversations. This means the multiple Oracle client applications can be active simultaneously with the same DRDA Server through the independent LU.
Dependent LUs support only a single active session. The CP (SNA Server for Microsoft Windows, in this case) queues additional conversation requests from the gateway server behind an already active conversation. In other words, conversations are singleEthreaded for dependent LUs.
If a dependent LU is correctly defined, then no alterations to the Oracle Transparent Gateway for DRDA configuration are needed, nor should any changes be needed to the DRDA Server.
The operational impact of dependent LUs is that the first client application can start a conversation through the gateway with the DRDA Server. While that session is active (which could be seconds, minutes, or hours, depending on how the client application and transaction are designed), any other client application starting a session with the same DRDA Server appears to stop responding as it waits behind the previous session.
If a production application really uses only one conversation at any one time, then there should be no impact. However, additional concurrent conversations might be required for testing or other application development. Each requires that additional dependent LUs be defined on the remote host, plus additional SNA Server configuration entries which define the additional dependent LUs on the host.
Additional Side Information Profiles should be defined to use the new dependent LUs. New Oracle Transparent Gateway for DRDA instances should be created and configured to use these new Side Information Profiles.
SNA Server definitions can be created and modified in two ways:
Directly with the SNACFG command
Using menus in SNA Server Manager
Maintenance of SNA definitions is normally done by a user with Administrator authority. This information is intended for the person creating SNA definitions for the gateway. You should have some knowledge of SNA before reading this section.
The tg4drda\sna\mssna subdirectory contains a sample set of gateway SNA Server definitions created with the SNACFG command. The snacfg.ctl file contains sample definitions for SNA Server.
Before building the SNA Server definitions, examine the snacfg.ctl file to determine the definitions needed, their contents, and their interrelationships. The file format is textEoriented and each field of each definition is clearly labeled. You can print a copy of the file to use while working with your definitions in an SNA Server Admin or SNA Server Manager session.
You can create and modify these definitions in two ways:
Install the definitions directly on the system using the SNACFG command.
For information on using the SNACFG command, refer to the SNA Server Administration Guide in the Microsoft SNA Server online documentation.
If you use this method, then you must use SNA Server Manager to review and modify the installed definitions. Because of configuration and naming differences, it is unlikely that they will work without modification.
Create the definitions.
SNA Server Manager is the recommended method for creating the definitions. You should be able to accept most of the defaults. The default values assigned to many of the fields in a new set of definitions are acceptable for the gateway.
There are several types of SNA Server definitions relevant to gateway APPC/LU6.2 operation. Each definition can be created and edited using a corresponding SNA Server Manager menu.
The definitions relevant to the gateway are presented here in hierarchical order. Those definition types that are lowest in the hierarchy are discussed first. This matches the logical sequence in which to create the profiles.
Refer to the Microsoft SNA Server online documentation for a complete discussion of SNA Server definitions. This section is an overview of SNA Server definitions in relation to the Oracle Transparent Gateway for DRDA for Microsoft Windows.
Note:
Before beginning to create and edit profiles using SNA Server Admin, you must install the DLC protocol and create the link service. Prior to running SNA Server Admin, use the Microsoft Windows Control Panels Network Manager to install the DLC protocol.This section describes the process of creating your SNA definitions for SNA Server version 3, using SNA Server Manager. All the tasks described in this section are performed from within SNA Server Manager. The other primary administration tool is the SNA Server Management Console. Both tools provide access to the same SNA definitions for the Node, but in slightly different views. The SNA Server Manager gives a localized view of the Node, while the SNA Server Management Console presents a more global view, where the local node may be one of many SNA Nodes in a network that is managed by this syatem. Later versions of SNA Server and Host Integration Server tools may reorganize the profiles placement within the definition tree, but the concepts remain the same. Some extrapolation by the user may be necessary.
Figure 6-1 SNA Server Manager Main Screen: Select a Server
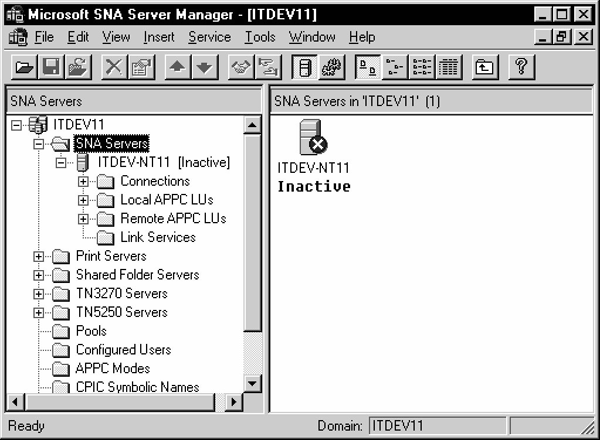
The correct SNA Server must be selected to ensure that definitions created are for that server. Start the SNA Server Manager.
Click the SNA subdomain under your local system (in this example, ITDEV11) and then click to open the SNA Servers folder. From a list of services for that server, select the SNA Service of your choice (in this illustration, ITDEVENT11). Click to open it.
Each SNA Server must have a primary service definition. From the Service menu in the SNA Server Manager window, select Properties. In the Server Properties dialog box, under the General tab, change the Network Name and Control Point Name as needed. Click OK.
A link service must be installed and configured in order for SNA Server to use the network adapter installed in your workstation. From the Insert menu, select Link Service. In the Insert Link Service dialog box, select the desired Link Service from the selection list and click Add. In this example, DLC 802.2 Link Service is selected.
Figure 6-4 Select Link Service Properties
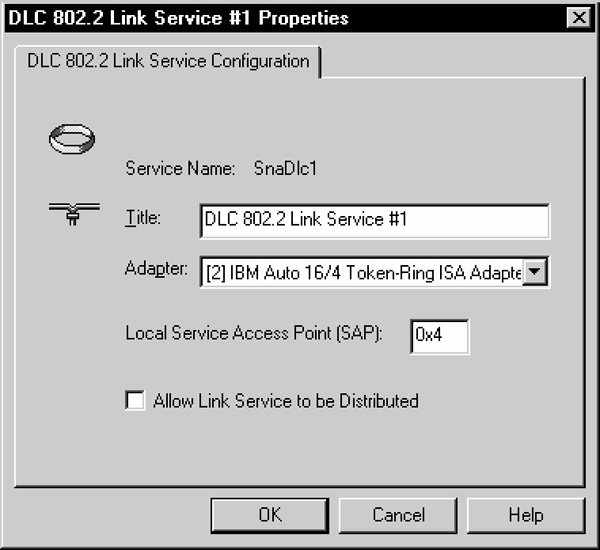
Now, the Link Service Properties dialog box is displayed. Note that the contents of this dialog box will vary, depending on which Link Service was selected. In this example, the DLC 802.2 Link Service Properties box dialog is used:
Select the suitable network adapter from the Adapter drop-down list and click OK. In the Insert Link Service dialog box, click OK. The system now updates the network bindings.
You must create a connection definition to define the devices which SNA Server uses to perform SNA communication. From the Insert menu, select Connection and choose the connection type (802.2 is used in this example). The Connection Properties dialog box appears.
Select the General tab. Enter a Connection Name. This is the name used by SNA Server to name the connection. This example names the connection HQMVS2. From the Link Service drop-down list, select a link service for the connection. All other settings can be left set to their default values.
Select the Address tab. Enter values for Remote Network Address and the Remote SAP address.
Now, select the System Identification tab. Under Local Node Name, enter the Network Name, Control Point Name, and Local Node ID. Under Remote Node Name, enter the Network Name, Control Point Name, and optionally, the Remote Node ID. The XID Type should be set to Format 3.
Next, select the DLC tab. In this example, the 802.2 DLC (Token Ring) is being used. For the 802.2 DLC, all of the defaults are usually acceptable. If you need to change any values, then do so now. Now, all the connection properties are set. Click OK.
You must create a local LU definition. The local LU definition describes the SNA LU through which the gateway communicates with DRDA Server systems.
From the Insert menu, select APPC Local LU. The Local APPC LU Properties dialog box appears.
Figure 6-11 Enter Local APPC LU Properties
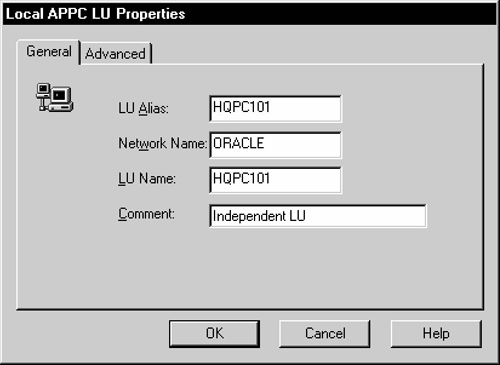
Select the General tab. Enter LU Alias, Network Name, and LU Name. You should contact the person responsible for your SNA network to determine the correct LU and network names.
Select the Advanced tab. Check the Member of Default Outgoing Local APPC LU Pool box. Set the LU 6.2 Type to Independent to enable parallel sessions. Ensure that the APPC Syncpoint Support box is not checked.
Now, the Local LU properties are all set. Click OK button to continue.
This definition describes an SNA mode entry to be used when establishing sessions between LUs. The mode defined here must match a mode defined on the target system.
From the Insert menu, select APPC Mode Definition. The APPC Mode Properties dialog box appears.
Figure 6-14 APPC Mode General Properties Dialog Box
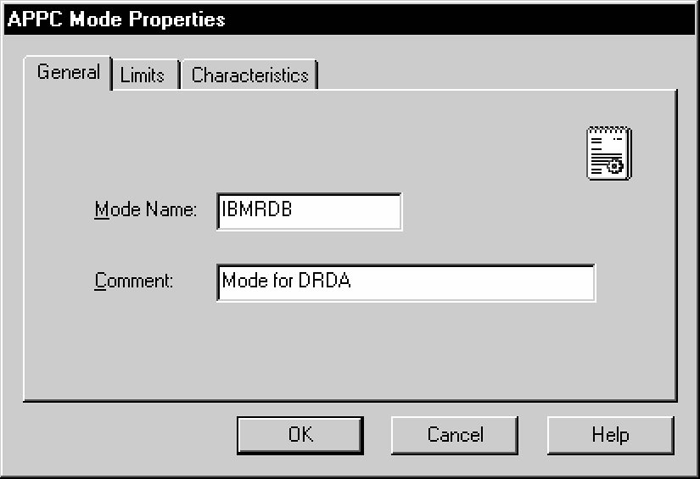
Select the General tab. Enter the Mode Name. The mode name that you specify must be defined to the DRDA Server communications software. Choose the mode name and other mode parameters after consulting the person responsible for configuring the DRDA Server communications software.
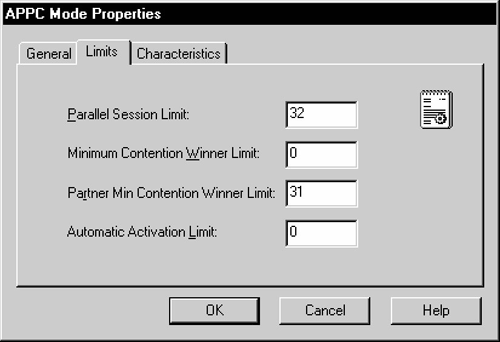
Next, select the Limits tab. Enter values for Parallel Session Limit, Minimum Contention Winner Limit, Partner Min Contention Winner Limit, and Automatic Activation Limit. The Parallel Session limit determines the maximum number of concurrent conversations permitted between the gateway instance and the DRDA Server. This equates to the maximum number of concurrently active remote sessions through the gateway instance.
Figure 6-16 Set APPC Mode Characteristics
Now, select the Characteristics tab. Enter the Pacing Send Count, Pacing Receive Count, Max Send RU Size, and Max Receive RU size. For optimal performance, check the High Priority Mode box. The pacing and RU size parameters are performanceErelated and should be tuned to suit your application. For most installations, the values set in the example will be sufficient.
Now, all the APPC mode properties are set. Click OK to continue.
This definition describes the SNA LU of the DRDA Server system with which the gateway communicates. You must create a remote LU definition for the remote DRDA Server system. From the Insert menu, select APPC Remote LU. The Remote APPC LU Properties dialog box appears.
Figure 6-18 Enter General Remote APPC LU Properties
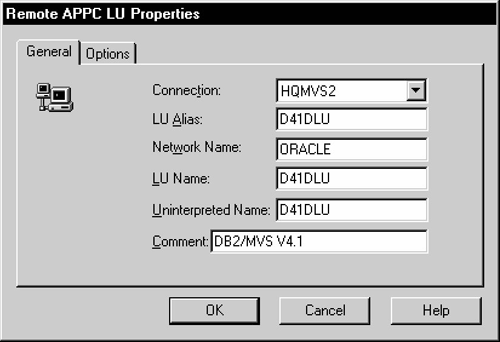
Select the General tab. Determine the link with which to associate the LU (in the example, HQMVS2). Use the Connection drop-down list to select the connection used to access this LU. Enter the LU Alias, Network Name, LU Name, and Uninterpreted LU Name. You should contact the person responsible for your SNA network to determine the correct LU and network names. Note that you can use the LU Alias to define a name known only to SNA Server, and that name can remain the same even if the remote LU name changes. This helps to reduce the amount of maintenance required when network changes occur.
Figure 6-19 Remote APPC LU Properties Options
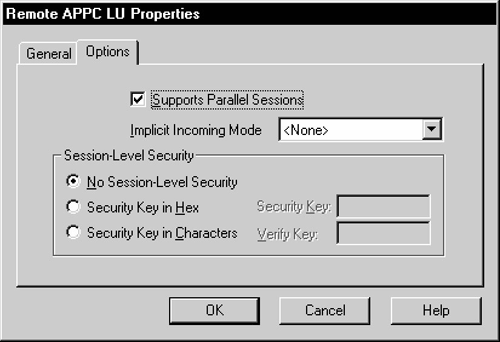
Now, select the Options tab. Check the Supports Parallel Sessions check box. Use the Implicit Incoming Mode drop-down listto select the mode. Set any security options you need.
The remote APPC LU properties are now set. Click OK to continue.
Figure 6-20 CPIEC Symbolic Destination Name Window
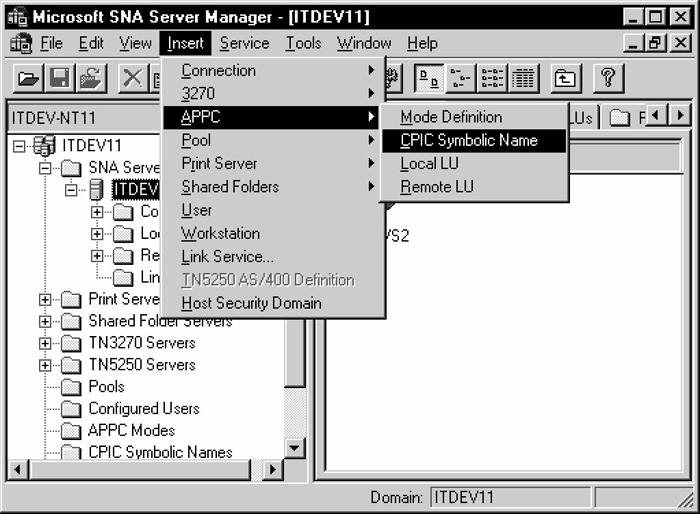
Once the Local and Remote Partner definitions and Mode definitions have been created, you can create CPIEC Symbolic Destination Names, also called Side Information Profiles. The Side Information Profiles are used to identify target DRDA Server systems to be accessed through the gateway. From the Insert menu, select APPC CPIEC Symbolic Name. The CPIEC Name Properties dialog box appears.
Figure 6-21 Enter General CPIEC Name Properties
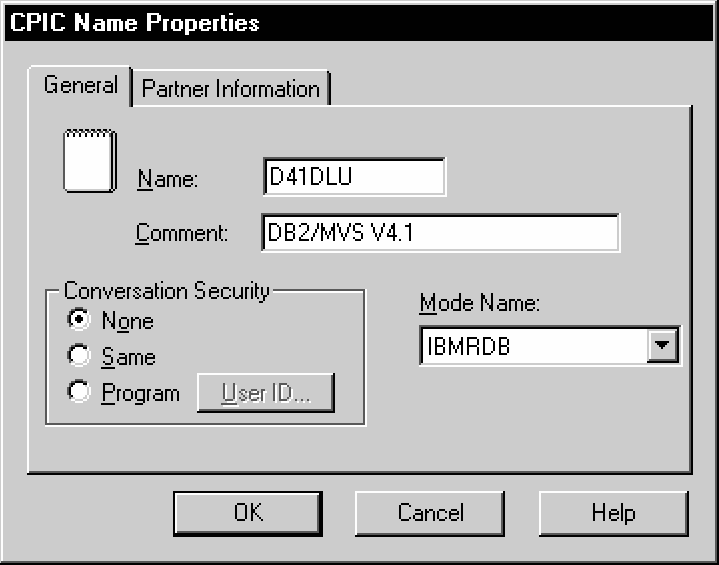
Select the General tab. Enter a Name for Side Information. From the Mode Name drop-down list, select the correct mode.
Note:
TheDRDA_CONNECT_PARM should be assigned the name of the CPIEC Side Information Name entered earlier.Figure 6-22 Enter CPIEC Name Properties Partner Information
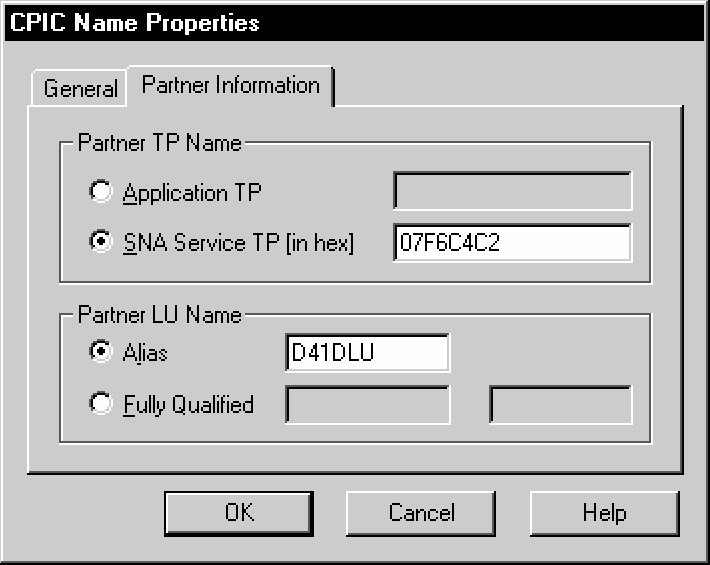
Now, select the Partner Information tab. Select Application TP and enter the TP name. Enter the Partner LU Name alias. Click OK to save the Side Information.
Before proceeding with the gateway configuration tasks in Chapter 10, "Configuring the Gateway", ensure that your connection is working. This can be done using SNA Server Manager.
Figure 6-23, "Relationship Between SNA Server Definitions and Host VTAM Definitions" shows the relationship between SNA Server definitions and the VTAM definitions on the host.
Figure 6-23 Relationship Between SNA Server Definitions and Host VTAM Definitions
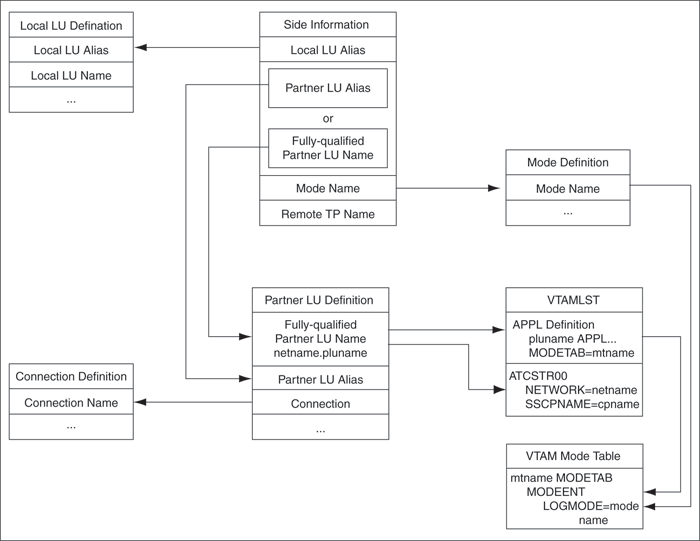
When the database link request for the gateway begins, the gateway attempts to start an APPC conversation with the DRDA Server. Before the conversation can begin, a session must start between the host Logical Unit (LU) and the DRDA Server LU.
SNA and its various access method implementations (including Microsoft SNA Server) provide security validation at session initiation time, enabling each LU to authenticate its partner. This is carried out entirely by network software before the gateway and server application programs begin their conversation and process conversationElevel security data. If sessionElevel security is used, then correct password information must be established in the Pentium-based host Connection Profile and in similar parameter structures in the DRDA Server system that is to be accessed. Refer to Microsoft SNA Server and IBM Communication Server product documentation for detailed information.
SNA conversation security is determined by the setting of the gateway initialization parameter, DRDA_SECURITY_TYPE. This parameter determines whether SNA security option SECURITY is set to PROGRAM or to SAME. Generally, the gateway operates under SNA option SECURITY=PROGRAM, but it can also be set to operate under SNA option SECURITY=SAME.
If DRDA_SECURITY_TYPE=PROGRAM is specified, then the gateway allocates the conversation with SNA option SECURITY=PROGRAM and sends this information to the DRDA Server:
If the database link has explicit CONNECT information, then the specified user ID and password are sent.
If the database link has no CONNECT clause and if the application has logged in to the Oracle integrating server with an explicit user ID and password, then the Oracle user ID and password are sent.
If the application logs in to the Oracle integrating server with operating system authentication, and if the database link lacks explicit CONNECT information, then no user ID and password are sent. If no user ID and password are sent, and if the DRDA Server is not configured to assign a default user ID, then the connection fails.
In general, SECURITY=PROGRAM tells the DRDA Server to authenticate the user ID/password combination using whatever authentication mechanisms are available. For example, if DB2/OS390 is the DRDA Server, then RACF can be used. This is not always the case, however, because each of the IBM DRDA Servers can be configured to process inbound user IDs in other ways.