| Oracle® Objects for OLE Developer's Guide 10g Release 2 (10.2) Part Number B14309-01 |
|
|
PDF · Mobi · ePub |
| Oracle® Objects for OLE Developer's Guide 10g Release 2 (10.2) Part Number B14309-01 |
|
|
PDF · Mobi · ePub |
This chapter describes the use of automation clients to access Oracle data.
This chapter contains these topics:
Oracle Objects for OLE (OO4O) is designed to provide quick and efficient access to the data in an Oracle database using various programming or scripting languages.
OO4O can be easily used with Visual Basic, Excel, Active Server Pages, Internet Information Server (IIS), and other development tools.
Oracle Data Control with Visual Basic allows another method of accessing Oracle data.
Examples are provided for specific methods and properties in this developer's guide. Additionally, example programs are installed with Oracle Objects for OLE and are located in the ORACLE_BASE\ORACLE_HOME\oo4o\ directory under VB, EXCEL, IIS, CPP, and so on.
A Quick Tour of OO4O with Visual Basic is also provided.
The code examples included in this developer's guide and the example applications shipped with Oracle Objects for OLE are designed to work with a demonstration schema (database tables and other objects) and a demonstration user and password, scott/tiger. Code examples are located in the ORACLE_BASE\ORACLE_HOME\oo4o directory.
You can create the OO4O demonstration schema with the demobld7.sql script located in the ORACLE_BASE\ORACLE_HOME\oo4o directory. You can drop the demonstration schema with the demodrp7.sql script.
The demonstration schema includes the following references:
Demonstration tables EMP and DEPT.
The user scott with password tiger (scott/tiger).
The network alias, ExampleDb.
Refer to Oracle Net Services Administrator's Guide for assistance in setting up the network service (database) alias and the tnsnames.ora file.
In many of the examples, you can access a local database using " " (a null string) for the network alias.
Occasionally other schemas are required to run examples. The introductions to the examples contain names and locations of the schemas (in the appendix).
See Also:
"Additional Schemas"The ORACLE_BASE\ORACLE_HOME\oo4o directory contains the following items:
OO4O example programs.
Subdirectories contain both C++ and Visual Basic examples.
The oraexamp.sql script, used to create stored procedures. Additional scripts, such as multicur.sql and empcur.sql, are provided to set up other example programs.
Oracle Objects for OLE global constant file, oraconst.txt, which contains constant values used for option flags and property values. This file is usually not needed as these constants are also included with the Oracle In-Process Server type library.
This example contains code fragments that demonstrate how to create all objects required by a dynaset and then create the dynaset itself.
Start Visual Basic and create a new project. From the Project menu, select References and check InProcServer 5.0 Type Library.
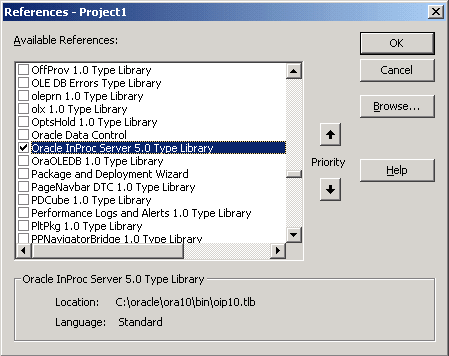
Start Visual Basic and create a new project. Then, add the following code to the Declarations section of a form:
...
' Declare variables
Dim OraSession As OraSession
Dim OraDatabase As OraDatabase
Dim OraDynaset As OraDynaset
Dim OraFields As OraFields
Add the following code to the load procedure associated with the form to display the Oracle data:
' Create the OraSession Object. The argument to CreateObject is the
' name by which the OraSession object is known to the OLE system.
Set OraSession = CreateObject("OracleInProcServer.XOraSession")

' Create the OraDatabase Object by opening a connection to Oracle.
Set OraDatabase = OraSession.OpenDatabase("ExampleDb", "scott/tiger", 0&)

' Create the OraDynaset Object.
Set OraDynaset = OraDatabase.CreateDynaset("select * from emp", 0&)

' You can now display or manipulate the data in the dynaset. For example:
Set OraFields = OraDynaset.fields
OraDynaset.movefirst
Do While Not OraDynaset.EOF
MsgBox OraFields("ename").Value
OraDynaset.movenext
Loop
End Sub
Run the form to view the results.
See Also:
"Using Oracle Objects for OLE with Automation Clients" for more information about using OO4O with Visual Basic
This example uses Active Server Pages (ASP) in a Microsoft Internet Information Server (IIS) to demonstrate the connection pooling feature of Oracle Objects for OLE. The sample code executes a SQL SELECT query and returns the result as an HTML table. The database connection used in this script is obtained from a pool that is created when the global.asa file is executed.
To use Oracle Objects for OLE with OLE Automation and IIS, you need to install IIS 3.0 or later, including all ASP extensions. On the computer where IIS is running, an Oracle database must also be accessible.
Note:
The sample code for this example is available in theORACLE_BASE\ORACLE_HOME\oo4o\iis\samples\asp\connpool directory.Start SQL*Plus and log in to the Oracle database as scott/tiger.
Create the following PL/SQL procedures:
-- creates PL/SQL package to be used in ASP demos
create or replace package ASP_demo as
    --cursor c1 is select * from emp;
    type empCur is ref cursor;
PROCEDURE GetCursor(p_cursor1 in out empCur, indeptno IN NUMBER,
                  p_errorcode OUT NUMBER);
END ASP_demo;
/
Create or replace the ASP_demo package body as follows:
PROCEDURE GetCursor(p_cursor1 in out empCur, indeptno IN NUMBER,
                 p_errorcode OUT NUMBER) is
BEGIN
    p_errorcode:= 0;
    open p_cursor1 for select * from emp where deptno = indeptno;
EXCEPTION
    When others then
    p_errorcode:= SQLCODE;
END GetCursor;
...
END ASP_demo;
/
Create the Active Server Pages (ASP) sample code. The OO4O related code is in bold.
'GLOBAL.ASA <OBJECT RUNAT=Server SCOPE=Application ID=OraSession PROGID="OracleInProcServer.XOraSession"></OBJECT> <SCRIPT LANGUAGE=VBScript RUNAT=Server> Sub Application_OnStart 'Get an instance of the Connection Pooling object and 'create a pool of OraDatabase OraSession.CreateDatabasePool 1,40,200,"exampledb", "scott/tiger", 0 End Sub 'OO4ODEMO.ASP <html> <head> <title>Oracle Objects For OLE (OO4O) </title> </head> <body BGCOLOR="#FFFFFF"> <font FACE="ARIAL,HELVETICA"> <h2 align="center">Oracle Objects For OLE (OO4O) </h2> <form ACTION="OO4ODEMO.asp" METHOD="POST"> <% SqlQuery = Request.Form("sqlquery") %> <p>This sample executes a SQL SELECT query and returns the result as an HTML table. The database connection used in this script is obtained from a pool that is created when the <strong>global.asa</strong> is executed. </p> <p>SQL Select Query: <input SIZE="48" NAME="sqlquery"> </p> <p><input TYPE="SUBMIT"> <input TYPE="RESET"> <input LANGUAGE="VBScript" TYPE="button" VALUE="Show ASP Source" ONCLICK="Window.location.href = "oo4oasp.htm"" NAME="ShowSrc"></p> </form> <% If SqlQuery = "" Then %> <% Else %> <table BORDER="1"> <% Set OraDatabase = OraSession.GetDatabaseFromPool(10) Set OraDynaset = OraDatabase.CreateDynaset(SqlQuery,0) Set Columns = OraDynaset.Fields %> <tr> <td><table BORDER="1"> <tr> <% For i = 0 to Columns.Count - 1 %> <td><b><% = Columns(i).Name %></b></td> <% Next %> </tr> <% while NOT OraDynaset.EOF %> <tr> <% For col = 0 to Columns.Count - 1 %> <td><% = Columns(col) %> </td> <% Next %> </tr> <% OraDynaset.MoveNext %> <% WEnd %> </table> <p></font><%End If%> </p> <hr> </td> </tr> </table> </body> </html>
Create a virtual directory from Microsoft Internet Service Manager with read and execute access, and place all .asp and .asa files in that directory.
Create an HTML page from which to launch the oo4odemo.asp file. Add a link in the page as follows:
<a href="/<your_path>/OO4ODEMO.ASP">This link launches the demo!</a>
Load the page in a web browser and click the link to the demonstration.
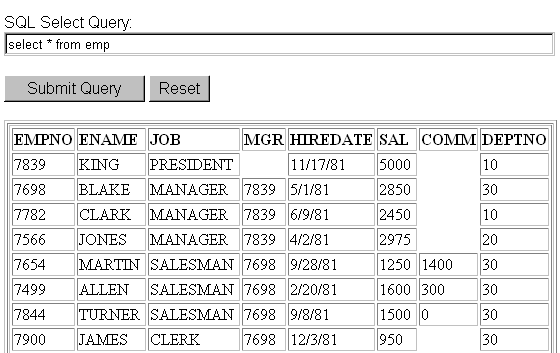
Enter a query, such as 'SELECT * FROM EMP', in the SQL SELECT Query field, and select the Submit Query button. Do not include a semicolon (;) at the end of the query.
This sample shows how to insert Oracle data into an Excel worksheet.
Note:
The sample code for this example is available in theORACLE_BASE\ORACLE_HOME\oo4o\excel\samples\ directory.To use OLE Automation with Microsoft Excel to insert Oracle data into a worksheet, perform the following steps:
Start Excel and create a new worksheet.
Use the Macro options in the Tools menu to create and edit new macros for manipulating the Oracle data.
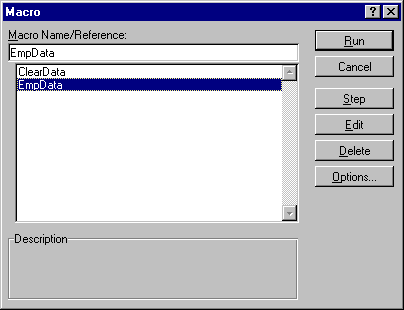
Enter Visual Basic code for macros to create and access an Oracle dynaset, such as the following EmpData() and ClearData() procedures (macros):
Sub EmpData()

'Declare variables
Dim OraSession As OraSession
Dim OraDatabase As OraDatabase
Dim EmpDynaset As OraDynaset
Dim flds() As OraField
Dim fldcount As Integer
  Set OraSession = CreateObject("OracleInProcServer.XOraSession")
  Set OraDatabase = OraSession.OpenDatabase("ExampleDB", "scott/tiger", 0&)
  Set EmpDynaset = OraDatabase.CreateDynaset("select * from emp", 0&)
  Range("A1:H15").Select
  Selection.ClearContents

   'Declare and create an object for each column.
   'This will reduce objects references and speed up your application.
fldcount = EmpDynaset.Fields.Count
ReDim flds(0 To fldcount - 1)
For Colnum = 0 To fldcount - 1
  Set flds(Colnum) = EmpDynaset.Fields(Colnum)
Next

'Insert Column Headings
For Colnum = 0 To EmpDynaset.Fields.Count - 1
  ActiveSheet.Cells(1, Colnum + 1) = flds(Colnum).Name
Next

'Display Data
For Rownum = 2 To EmpDynaset.RecordCount + 1
  For Colnum = 0 To fldcount - 1
    ActiveSheet.Cells(Rownum, Colnum + 1) = flds(Colnum).Value
  Next
  EmpDynaset.MoveNext
Next

Range("A1:A1").Select

End Sub

Sub ClearData()
  Range("A1:H15").Select
  Selection.ClearContents
  Range("A1:A1").Select
End Sub
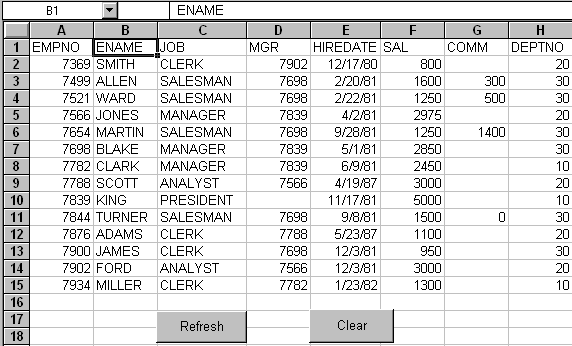
Assign the procedures (macros) that were created, such as EmpData() and ClearData(), to command buttons in the worksheet for easy access. When you select the buttons, you can clear and refresh the data in the worksheet. In the following screenshot, ClearData() is assigned to the Clear button and EmpData() is assigned to the Refresh button.
For details about Oracle Objects for OLE with Visual C++, see Oracle Objects for OLE C++ Class Library Developer's Guide.
Oracle Data Control, when refreshed, automatically creates a client (if needed), session, database, and dynaset. For a basic application, little or no code is required.
This section shows two ways to set the properties of Oracle Data Control:
Using the Visual Basic Properties window
Programming the properties
Start Visual Basic and create a new project.
In the Components option of the Project menu, add Oracle Data Control to the project.
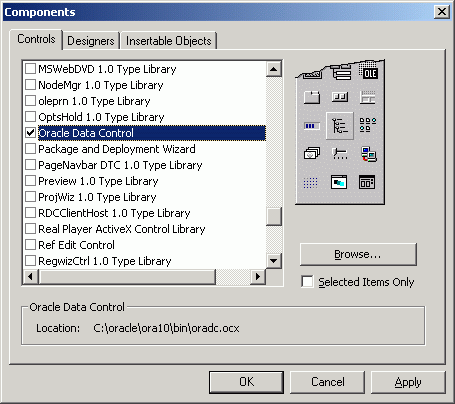
The Oracle Data Control is added to your Visual Basic tool palette and looks like this:

To add Oracle Data Control to a project, drag and drop the control onto a form. Resize and position the control.
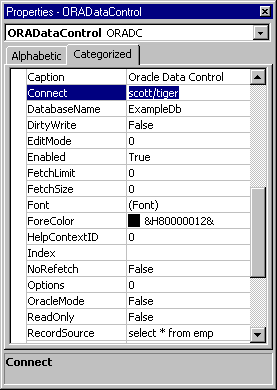
Change the name of the control to OraDataControl. Set up the Connect, DatabaseName, and RecordSource properties as follows to access the Oracle database:
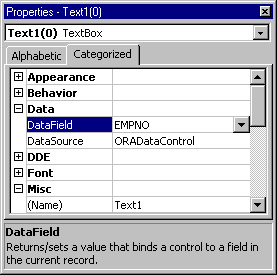
When Oracle Data Control is set up, you can drag and drop a Visual Basic control onto the same form and access the data in the control. Set the Data properties to access the data field and source that you want. The following figure shows a TextBox control that sets up display of the employee numbers.
When the project is run, the data identified by the RecordSource property is displayed using Oracle Data Control.
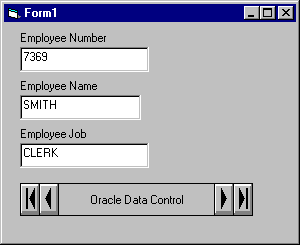
You can also use Microsoft Grid Control to display all the data in the table. You need to add the grid control with the Components option of the Project menu.
The following code fragment demonstrates how to programmatically set the properties of Oracle Data Control required to create a dynaset. These are the same properties that you can set with the Properties window in Visual Basic.
Create a new project, and then in the Components option of the Project menu, add Oracle Data Control to the project.
Drag and drop Oracle Data Control onto a form. Change the name of the control to OraDataControl.
After you have inserted Oracle Data Control onto a form, add the following code to the load procedure associated with the form:
...

'Set the username and password.
OraDataControl.Connect = "scott/tiger"

'Set the database name.
OraDataControl.DatabaseName = "ExampleDb"

'Set the record source.
OraDataControl.RecordSource = "select * from emp"

'Refresh the data control.
OraDataControl.Refresh
...
You now have a valid session, database, and dynaset that can be referenced as follows:
| Object | Reference |
|---|---|
orasession |
oradatacontrol.oradatabase.orasession |
oradatabase |
oradatacontrol.oradatabase |
| oradynaset | oradatacontrol.recordset |
You can access the data in the RecordSource property using Visual Basic controls, such as the TextBox, as shown in the previous example.
This example shows how to create a basic Win32 Application with Oracle Data Control using MS Visual C++. This example assumes that both the Oracle data and DB Grid controls were registered on the system.
Start the Microsoft Visual C++ program.
From the File Menu, select New.
In the Projects tab of the New Window, select MFC AppWizard.exe. Enter a project name, such as OO4O, and determine the location of the project. Click OK.
In Step 1 of the MFC AppWizard, select Dialog based application, then click Next.
In Step 2 of the wizard, make sure the ActiveX Controls box is checked; accept the defaults; and enter a title for the dialog box. Click Next.
In Step 3 of the wizard, accept the defaults. Click Next.
In Step 4, click Finish. At the New Project Information screen, click OK.
In the Project Workspace dialog box, select the ResourceView tab. Expand the Resources folder, then expand the Dialog folder.
Double-click the main project dialog box to edit the dialog box.
Note: If you used OO4O as the project name, it is named IDD_OO4O_DIALOG.
Delete the default controls that are on the dialog box. Resize the dialog box to make it larger.
With the dialog box selected, click the right mouse button to display the menu. Select Properties from the menu. In the General tab of the Properties window, change the caption to Oracle Data Control Example. Close the Properties window.
With the dialog box selected, click the right mouse button to display the menu. Select Insert ActiveX Control... from the menu. Select ORADC Control in the window and then click OK.
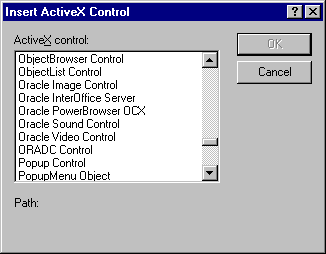
Position the ORADC Control at the bottom of the dialog box. With the data control selected, click the right mouse button to display the menu. Select Properties from the menu.
In the General tab of the Properties window, change the ID to IDC_ ORADATACONTROL. Deselect the check mark for Visible so that the control is hidden when the application is run.
Display the All tab of the Properties window and set the following:
Connect: scott/tiger
DatabaseName: exampledb
RecordSource: select * from emp
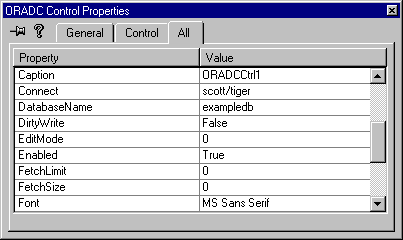
With the dialog box selected, click the right mouse button to display the menu. Select the Insert ActiveX control from the menu. Locate the DBGrid Control and click OK.
Position the DBGrid Control at the top of the dialog box and resize it. Display the properties for the control. In the All tab of the Properties window, set the DataSource property to Oracle Data Control (IDC_ORADATACONTROL). Accept the defaults for the other properties. These can be changed later.
From the File Menu, select Save All.
Build and Execute the project.
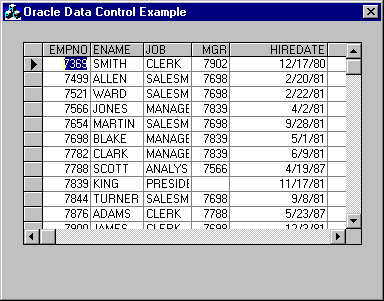
The DBGrid Control displays the records from the emp table as in the following illustration:
