| Oracle® OLAP Application Developer's Guide, 10g Release 2 (10.2) Part Number B14349-05 |
|
|
PDF · Mobi · ePub |
| Oracle® OLAP Application Developer's Guide, 10g Release 2 (10.2) Part Number B14349-05 |
|
|
PDF · Mobi · ePub |
Forecasting is a natural extension to the types of data analysis typically performed on the historical data stored in analytic workspaces. Using Analytic Workspace Manager, you can quickly generate forecasts of your measures. This chapter provides a basic framework for generating and using quantitative forecasting methods for those who do not have a strong statistical background. It also provides specific information about the particular forecasting engine provided with Oracle OLAP.
This chapter contains the following topics:
Forecasts are predictions about future events. They provide a basis for making decisions in a timely manner, which is often in advance of the facts. There are many ways of creating forecasts, and the best method for a particular forecast depends on many factors. Consider this question: Will it rain tomorrow?
The degree of difficulty in correctly predicting tomorrow's weather depends on where you live. You may live where the weather is extremely stable, with little or no variation from one day to the next. In this situation, if it is raining today, then you can be fairly certain that it will rain tomorrow.
However, if you live where the weather is in constant flux, with sudden and dramatic changes, then today's rainfall is not a reliable predictor. You may just make an informed guess, based on your analysis of the current weather pattern, or you might consult an arthritis sufferer whose joints ache with changes in the weather. Nonetheless, all of these methods (today's rainfall, informed guess, or swollen joints) should over time prove to be more accurate than just flipping a coin.
Now consider this question: Will it rain three months from today? Instead of basing your prediction on today's weather, you must consider the frequency of rainfall for the forecast period in previous years. If you live where rainy seasons and dry seasons are clearly defined, then you can probably answer this question with relative certainty based on the season. Otherwise, your ability to predict rainfall on a particular day that far into the future may be no better than a coin toss. To make a meaningful prediction, you may need to expand the forecast period to a week or more. You may also need to expand the size of the area in which you are predicting rain from your neighborhood to a larger region.
Finally, how important is it to correctly predict the weather on a particular day and at a particular place? If accuracy is critical -- such as planning a large outdoor event -- then an accurate forecast is worth some effort, and you might try several forecasting methods to see if their predictions converge. Regardless, you might still plan to erect a tent in case you get a downpour instead of the forecasted clear skies.
This simple example demonstrates several characteristics of forecasting:
Stable patterns in historical data are more likely to generate an accurate forecast.
Different methods are appropriate for different forecasts, depending on how far into the future you want to make a forecast and how stable your data is.
Some forecasting methods are experiential or qualitative (informed guess or aching joints), and others are quantitative (historical data).
The season may be an important factor in the forecast.
Forecasting is not 100% accurate.
The more precise the forecast, the more prone it is to error.
Longer-range forecasts should generate data at higher levels to offset the increasing likelihood of error.
The degree of error may be offset by your tolerance for error.
If you have a low tolerance for error, then you may want to make some provisions that lessen the consequences of forecasting incorrectly.
These observations may help give you a perspective on what you want to forecast, how you want to design the forecast, and how you want to use the forecast in making decisions about your business.
The first step in generating a forecast is to decide how far into the future you want to make your predictions. The approach that produces the best results for short-term forecasts is not a good predictor of long-term performance. The opposite is also true.
The critical question is, of course, how far into the future these time frames reach. Is "short" five weeks or five months? Is "long" five quarters or five years? As illustrated by the rain prediction example in "Introduction to Forecasting Considerations", it all depends on a variety of factors:
What are you trying to forecast?
How stable is the historical data?
How are you going to use this information?
These are just a few of the questions that you must answer in order to define the forecasting time frames for your specific business. Table 7-1 provides some general guidelines for these time periods.
Table 7-1 Guidelines for Choosing a Forecasting Approach
| Time Frame | Typical Forecasting Horizon | Best Approach |
|---|---|---|
|
Short |
Up to 18 months |
Time Series |
|
Medium |
6 to 36 months |
Causal Analysis |
|
Long |
19 months to 5 years |
Expert Opinion |
Time series forecasting methods are based on the premise that you can predict future performance of a measure simply by analyzing its past results. These methods identify a pattern in the historical data and use that pattern to extrapolate future values.
Past results can, in fact, be a very reliable predictor for a short period into the future. You can generate this type of forecast very quickly and easily, and you do not need either forecasting expertise or an in-depth knowledge of your data. The modeling techniques used by the time-series methods are relatively simple and run very fast. Time-series forecasting is extremely useful when hundreds or thousands of items must be forecast.
You may also use time-series methods to generate forecast data further into the future. However, the results are not as accurate, because factors other than past performance have a greater impact over time. For example, you or your competitors may change the pricing structure or run advertising campaigns, competitive products may come onto the market, or shifts in the economy or political events may affect performance. You should consider the forecast data generated by time series methods to be one component of a medium- or long-range forecast, which may be adjusted by expert opinion and other factors.
Analytic Workspace Manager provides access to a time-series forecasting engine, which is described in this chapter.
Causal analysis takes into consideration the external factors (the causes) that can affect a forecast, as described previously under "Time Series". Statistical regression methods are the basis for causal analysis. They use the forecasts for several independent measures to forecast a dependent measure. This type of forecast requires considerable skill and understanding of forecasting methodology and the relationships between independent and dependent variables. A good regression model produces the best results for medium-range forecasts.
However, because of the time, expense, and expertise needed to develop a model, most businesses restrict regression analysis to a few key business measures. For the other measures, they use a combination of methods including time-series and expert opinion.
The forecasting engine used by Analytic Workspace Manager does not support causal analysis. The linear and nonlinear regression methods in the forecasting engine are time-series regression methods that use historical data from a single measure.
As the time horizon for the forecast moves further out into the future, expert opinion becomes the most reliable predictor. The experts, who are usually corporate executives, have their fingers on the pulse of myriad factors that may influence future performance, such as the general direction of the market and plans for new products. Customer surveys also provide input to long-term forecasts. An equivalent computer model to rival expert opinion for long-term forecasts would be too complex to generate within a usable time frame.
Oracle OLAP incorporates a statistical forecasting engine that is used extensively for demand planning applications. This engine has a variety of time-series forecasting methods, which are described in "Forecasting Method Descriptions".
The forecasting engine incorporates advanced filtering technology to identify and process outliers, which are data values that are extremely high or low in relation to the mean. Exception handing is a critical component of forecasting efficiency, and the forecasting engine reduces the time and money spent analyzing exceptions. This technology also enables the forecasting engine to produce accurate short-term forecasts using wildly fluctuating historical data.
Typical applications for OLAP forecasting include the following:
Distribution requirements planning for seasonal monthly forecasts of retail sales for products reaching market saturation.
Business planning with seasonal quarterly forecasts of expenses with upward linear trends.
Sales quota management by forecasting exponential decay in company sales for aging products.
Materials requirement planning with trends in raw material prices with cyclical behavior.
Sales forecasts with exponential growth in industry sales.
Inventory control planning by forecasting S-curve demand growth from increasing distribution.
You can create forecasts in Analytic Workspace Manager by defining a forecast step in a Calculation Plan. These are the steps for creating a forecast. Each one is discussed in more detail in the sections that follow.
The future time periods that you want to forecast must be defined as members of the time dimension in your analytic workspace. If they do not exist already, you must:
Add the new time periods and attributes to the relational tables in the source schema.
Use the Maintenance Wizard in Analytic Workspace Manager to add the new members to the Time dimension in the analytic workspace.
Use whatever mechanism guarantees that these Time dimension members are identical to those for loading actual data at a later date.
You can store the forecast data in the same measure as the actual data, or you can store it in a separate measure. If you store the forecast in the same measure, then the actual data eventually overwrites it. This prevents you from monitoring the accuracy of the forecast. For this reason, you should create a separate forecast measure in the same cube as the source measure.
To create a forecast measure:
In the navigation tree, expand the cube for the actual data.
Right-click Measures and choose Create Measure.
Complete the Create Measure property sheet. Do not map the measure to a data source.
The forecasting engine needs only a year of data to detect trends and seasonality. Business cycles may take two or three years of data to detect.
If your business has experienced a paradigm shift, then you should exclude previous data from your forecast as irrelevant. The following are examples of events that might cause a paradigm shift:
Cellular telephones on the telecommunications industry
Digital cameras on the photography industry
The Internet on the book and music publishing industries
You select the historical data when creating the forecast step.
To generate consistent data at all levels of a hierarchy, you must generate the forecast data at a single level and use it to populate the other forecast levels by aggregation or allocation. If you generate a forecast from multiple levels, then the aggregate forecast data may be inconsistent with the lower levels of forecast data.
The "correct" levels are determined by the time frame of your forecast and by your reasons for making the forecast. For example, you may forecast Customers at the Total level for manufacturing, but at a lower level for marketing. Table 7-2 shows the recommended dimension levels for forecasting products over various time frames.
If you set the levels too low, then large variations in the data may decrease accuracy. These inaccuracies may be magnified in the aggregated forecasts. If you set the levels too high, then the aggregated forecasts may smooth out localized trends and allocate them incorrectly. You select the levels when creating the forecast step.
To create a forecast step in Analytic Workspace Manager:
In the navigation tree, create a new Calculation Plan or open an existing plan.
On the General tab of the Calculation Plan, click New Step, then select New Forecast Step.
The New Forecast Step property pages are displayed.
Complete the General page. For the forecast method, select Automatic.
For information about using other methods, refer to "Designing Your Own Forecast". For information about completing the other fields, click Help.
Keep the default values on the Advanced Settings page unless you have expertise in time-series forecasting.
On the Status page, select the historical time periods and other dimension values to use as the basis for the forecast. Select only one level for each dimension.
Save the forecast step, then save the Calculation Plan.
Create allocation and aggregation steps for the forecast.
If all the time periods and data are already loaded into the analytic workspace, then right-click the Calculation Plan and choose Execute Calculation Plan.
or
If you must load new data, then add the Calculation Plan to the regular maintenance process using the Maintenance Wizard.
Afterward, you can view the forecast data in the Measure Viewer.
If the forecast does not initially look plausible to you, then check that there are no errors in the design of the forecast:
Compare the first few forecast periods to the last few historical periods to verify that a discrepancy exists.
Use the forecast step editor to check the number of forecast periods against the status of the Time dimension. The forecast periods are the last ones in status. For example, if the Time dimension has dimension members defined through the next five months and you designed a 4-month forecast, then you must remove the last month from status. Otherwise, the forecast is based on a month of null historical data.
Use the Measure Viewer to verify that all of the historical data has been loaded in the source measure. If several periods immediately prior to the forecast period are not loaded, then the forecast is 0.
If you used a specific forecasting method (not Automatic):
Compare its results with those of the Automatic option.
Verify that you set Forecast Approach to Manual and Data Filter to the appropriate choice.
If you set any of the advanced parameters, then compare the results against a forecast that uses the default settings.
A standard part of forecasting is to continually monitor the accuracy of the forecast data. The easiest way to compare the forecast data with the actual data is to set up a standard report that includes a line graph. Then you can see how closely the forecast data converges with the actual data.
Short-term forecasts should be fairly precise, with only a small difference between forecast and actual data. If this is not the case, then you should consider modifying the forecast using some of the suggestions listed previously. You may even want to create several forecasts and compare their results over time.
Medium- and long-range forecasts generated by time-series forecasting methods should be qualified by other input, such as expert opinion, because external factors affect performance in these time frames.
The OLAP forecast engine provides an Expert System that generates the best short-term forecasts over the long run, so you should use the Automatic method and the default parameters for most forecasts. However, there may be times when you should override the Expert System and design the forecast yourself.
The Expert System supports the Automatic method by identifying the best statistical method and selecting the best parameter settings for your data. It also distinguishes outliers from factors like trend and seasonality.
The Expert System separates the data into seasonal effects and trend effects. It then uses an iterative approximation method to forecast the seasonal component of the data. After completing the trend forecast, it factors the seasonality portion into the trend forecast for all methods except Holt-Winters, which calculates its own seasonal factors.
The Expert System represents a type of artificial intelligence for statistical forecasting that has been in common use ever since computers took over the task of performing complex and lengthy numerical calculations. Instead of the analyst's having to evaluate the data and make an educated guess as to the best method, the software can quickly try all methods and select the best one based on the results.
You can override the Expert System by setting the Forecast Approach parameter to Manual. The default value of Automatic gives the Expert System the most control in overriding your choices. This is the appropriate setting when using the Automatic method, but it invalidates your attempt to design a forecast.
The Expert System always tests the accuracy of a forecast method using a portion of the historical data called a verification window. For the Automatic method, the Expert System uses this window to select the best statistical method. For the other methods, it verifies that your selection of a method and the parameter settings provide a good fit to the historical data.
For this test, the Expert System divides the historical time periods into two groups. The older time periods retain their role as historical data. The newer historical time periods become the "forecast" periods and form the verification window. The Expert System generates forecast data for the newer time periods, using the older time periods as the basis for the forecast.
The Expert System calculates the precision of the method by comparing the forecast data to the actual data in the verification window. The precision is the distance between the forecast data and the actual data.
The Expert System uses several standard calculations to compare the precision of different forecasting methods: Mean Absolute Deviation (MAD), Mean Absolute Percentage Error (MAPE), and Root Mean Square Error (RMSE).
You may want to control the forecast when you have special knowledge that future performance will deviate from past results.
For example, you may recently have entered an agreement for a major national chain of stores to carry your products, so you anticipate a dramatic increase in sales. Or your company might have been an innovator in developing a new product line, but your competitors are about to introduce rival products. In this case, you expect sales to level off. You or your competitors might also be negotiating a corporate merger, and you expect that transaction to affect performance.
Under circumstances like these, your special knowledge may enable you to design a more accurate forecast than the Expert System.
To override the Expert System, take these steps:
Create or edit a forecast step, as described in "Creating a Forecast Step".
On the General page, select the method that best describes the future performance that you expect, based on your expert knowledge.
On the Advanced Settings page, set Forecast Approach to Manual.
Set the Data Filter parameter to an appropriate setting for your data.
Change the Verification Window Size parameter as desired.
Make whatever other changes to the parameter settings are appropriate.
Complete the definition of the forecast, and run it as described in "Creating a Forecast".
The forecasting methods represent several basic approaches to time-series forecasting. This topic provides descriptions of the various approaches, the methods that use each approach, and the optimization parameters that apply specifically to them.
The Expert System identifies the best fit by quickly testing each statistical method against the portion of historical data specified by the Verification Window Size parameter. The Expert System selects the method and the parameter settings that would have generated the most accurate forecast in the past. It automatically detects and handles outliers, removing noise so that it can better detect trends and seasonality.
The forecasting engine generates a forecast for every combination of dimension members. The Expert System evaluates each forecast separately and picks the best method and parameter settings for each one.
In general, Automatic is the best choice unless you have knowledge that future performance will deviate from the past. Under these special circumstances, you can substitute your own expert judgment for the Expert System.
"What is the Verification Window?" provides more information about how the Expert System selects a method.
Time series regression methods relate a variable (measure) to functions of time describing trend and seasonal components. Regression generates the most reliable forecasts when the trend or seasonal components remain constant.
OLAP forecasting provides both linear and nonlinear regression models.
Linear regression attempts to fit the historical data to a straight line (y=ax+b), and extends that line into future time periods for the forecast. All data points have equal weight. This method identifies steady, long-term trends in the data.
Nonlinear regression attempts to fit the historical data to a curve, and extrapolates that curve into the forecast time periods. All data points have equal weight. The curved lines are defined by mathematical equations. You can choose from the following types of curves:
Polynomial Fit: Fits data that fluctuates with a rise and a drop (x'=log(x); y'=log(y)).
Exponential Fit: Fits data points that rise or drop at an increasingly faster rate (x'=x; y'=ln(y)).
Logarithmic Fit: Fits data points that rise or drop quickly and then level off (x'=log(x); y'=y).
Asymptotic Fit: Fits data points that rise or drop until they approach a fixed value and then level off (x'=1/x; y'=1/y).
Exponential Asymptotic Fit: Fits data points that rise or drop at an increasingly faster rate until they approach a fixed value and then level off (x'=x; y'=ln(y/(K-y))).
For more information about the equations used by each method, refer to the topic "Equations for Forecasting Methods" in Analytic Workspace Manager Help.
The Cyclical Decay smoothing constant is used in the equations for linear and nonlinear regression. This constant determines how quickly a cycle reverts to the mean. A higher value implies slower decay while a lower value implies faster decay. The smaller the value, the less effect cyclical activity has on the forecast.
You can specify a maximum value and a minimum value. You can specify the same value for both the maximum and the minimum. Keep the default settings unless you have a strong background in time-series forecasting.
The exponential smoothing methods weight the historical data using exponentially decreasing weights. The prior period has the most weight and each period prior to it has comparatively less weight. The decline in weight is expressed mathematically as an exponential function. The smoothing parameters determine the weights.
You can choose from the following methods of exponential smoothing:
Single Exponential Smoothing: Identifies the percentage of weight given to the prior period and all other historical periods. It does not adjust for trend or for seasonal variance.
Double Exponential Smoothing: Identifies the trend, and adjusts the forecast data to reflect this trend instead of generating a single parameter for all forecast periods.
Holt-Winters: Identifies both trend and seasonal variance, and adjusts the forecast data to reflect these factors. This method is particularly sensitive to both high and low outliers. A better choice for handling seasonality is Double Exponential Smoothing with the Data Filters parameter set to Seasonal Adjustment.
These smoothing constants are used in the equations for exponential smoothing methods. Keep the default settings unless you have a strong background in time-series forecasting.
Alpha: Determines how responsive a forecast is to sudden jumps and drops. It is the percentage weight given to the prior period, and the remainder is distributed to the other historical periods. Alpha is used in all exponential smoothing methods.
The lower the value of alpha, the less responsive the forecast is to sudden change. A value of 0.5 is very responsive. A value of 1.0 gives 100% of the weight to the prior period, and gives the same results as a prior period calculation. A value of 0.0 eliminates the prior period from the analysis.
Beta: Determines how sensitive a forecast is to the trend. The smaller the value of beta, the less weight is given to the trend. The value of beta is usually small, because trend is a long-term effect. Beta is not used in Single Exponential Smoothing.
Gamma: Determines how sensitive a forecast is to seasonal factors. The smaller the value of gamma, the less weight is given to seasonal factors. Gamma is used only by the Holt-Winters method.
Trend Dampening: Determines how sensitive the forecast is to large trends in recent time periods. Dampening identifies how quickly the trend reverts to the mean. A higher value implies slower dampening while a lower value implies faster dampening. The smaller the value, the less effect the trend has on the forecast.
For each constant, you can specify a maximum value, a minimum value, and an interval. The interval is an incremental value between the maximum and minimum, which the forecasting engine uses to find the optimal value of the constant.
Following are descriptions of the advanced parameters that can be used with all methods.
Parameters that are specific to a particular approach are described in "Forecasting Method Descriptions".
Note:
When using a specific forecasting method (not Automatic), be sure to set the following parameters:Forecast Approach
Data Filter
These parameters provide the forecasting engine with basic information about how you want it to approach a forecast. Always set the Forecast Approach and Data Filter parameters when using a specific forecasting method.
Forecast Approach: Specifies whether the forecasting engine gives control to the Expert System.
Automatic: Give control to the Expert System. Use this setting with the Automatic method.
Manual: Give control to the user. It enables you to choose a method and set the parameters that are appropriate for the historical data. Use this setting with all methods other than Automatic.
Data Filter: Identifies a basic characteristic of the data.
Non-Seasonal Data: No seasonality.
Seasonal Data: Adjust for seasonal patterns in the data. You can use this filter with Double Exponential Smoothing to get a more accurate forecast than Holt-Winters.
Intermittent Data Adjusts for sporadic or intermittent data and, if appropriate, seasonal patterns. Intermittent data has null or zero for over 50% of the values. Do not use median smoothing with this filter, because smoothing eliminates the intermittent characteristic of the data. The purpose of the intermittent data filter is to forecast intermittent demand.
Set the Moving Total Decay parameter when using this filter.
Verification Window Size: The Expert System uses the verification window to determine the best method and parameter settings, as described in "What is the Verification Window?".
The verification window is specified as a fraction of the total number of historical periods. For example, assume that you have three years of historical data for 2004, 2005, and 2006. The default window size is .3333, so the Expert System uses 1/3 of the historical data for the verification window. Thus, the data for 2004 and 2005 are used to generate a "forecast" for 2006. The difference between the forecast data and the actual data for 2006 indicates the precision of the method.
You may want to adjust the window size, depending on the granularity of the data. For monthly data, use a window size of 20% (1/5) or more. For weekly data, use a window size of 12.5% (1/8) or more. For daily or hourly data, you can use a window size of 11.1% (1/9) or less.
These parameters apply to all of the specific forecasting methods.
Allocate Last Cycle: Controls whether the last cycle is calculated by forecasting alone or with allocation. Allocation may reduce the risk of overadjustment for trend or seasonality.
Allocation forecasts an average value for one period of the last cycle. That average value is then multiplied by factors to give the remaining points in that period. For example, a forecast at the day level would calculate an average for all days in the last week rather than forecasting individual days.
Set Periodicity to a value greater than 1 when using this parameter.
Boundary Maximum and Minimum: A constant that constrains the forecasting engine from occasionally generating unreasonably high or low values. The upper boundary is calculated by multiplying Boundary Maximum by the largest value in the historical series. The lower boundary is calculated by multiplying Boundary Minimum by the smallest value in the historical series.
For example, if the Boundary Maximum parameter is 100.0 and the largest historical value 5,600, then no forecast value can be greater than 560,000. If the Boundary Minimum parameter is 0.5 and the smallest historical value 300, then no forecast value can be less than 150.
Moving Total Decay Maximum and Minimum: A constant that is inversely related to noise, random deviation, and stability in the history of intermittent data. Set this value higher when the history is evolving rapidly from one cycle to the next or when the noise level is low. This parameter is used only with the Intermittent Data filter. The difference between the maximum and the minimum must be evenly divisible by 0.4.
Periodicity: The number of periods in a single cycle or the number of periods in each set of nested cycles. The default value of 1 does not group the periods at all, so each period is logically independent.
For example, if you are using Month as the base level for the forecast, and the time hierarchy has levels for Month, Quarter, and Year, then the cycles are 12 months in a year and 3 months in a quarter. For a single cycle, enter the number of periods. For nested cycles, list the cycles in parentheses from the most aggregate to the least aggregate, separated by commas, such as (12,3).
Trials: The number of trials that are run to determine the best method and combination of parameter settings.
These parameters help generate a smoother forecast from intermittent historical data. Alternatively, you can use the intermittent data filter to forecast intermittent demand. Do not combine the smoothing parameters with the intermittent demand filter, because these adjustments are contradictory.
Use Smoothed Historical Data: Controls whether the historical data is smoothed. Smoothing is typically used for weekly or finer-grained data that has many missing values. Smoothing the historical data produces a smoother baseline forecast.
Interpolate Missing Values: Specifies whether you want to smooth the data by inserting estimates for missing values instead of by averaging. This parameter is useful when missing values indicate incomplete data instead of a lack of activity.
Median Smoothing Window: The number of time periods used in a median smoothing window to identify outliers and replace them with adjusted data values. Median smoothing eliminates extreme variations in the data by replacing each data point in a series by the median value of itself and its neighbors. This setting must be an odd number, so that the current time period is in the center of the window.
The larger the window, the smoother the data. If the window is too large, smoothing may eliminate important data patterns. If the window is too small, then smoothing may include outliers that could not be filtered out. As a rule, you should not set this parameter below 3; setting it to 1 has the effect of turning off smoothing.
For monthly data, use a maximum value of 5 to prevent excessive flattening of the data. For weekly data, use a maximum of 13. Use a longer window (15 or more) for daily or hourly data.
The GLOBAL analytic workspace has historical data from January 1998 to July 2004. Thus, the last five months of 2004 and all of 2005 is NA. This example creates a Calculation Plan that generates a four-month Sales forecast from August 2004 to December 2005. An allocation step distributes the forecast data down to the base levels of all dimensions. An aggregation step generates and stores some of the aggregate values to improve runtime performance.
This example stores the forecast data in a separate measure from the historical data so that the results of the forecast can be evaluated more easily.
To create the target measure:
In the UNITS_CUBE folder, right-click Measures and select Create Measure.
The Create Measure dialog box opens.
On the General page, create a measure named SALES_FORECAST.
Select Override the Aggregation Specification of the Cube.
On the Summarize To page, deselect all levels for all dimensions.
Click Create.
The Calculation Plan for this forecast has a forecast step, an allocation step, and an aggregation step.
To create a new Calculation Plan:
Right-click Calculation Plans and select Create Calculation Plan.
The Create Calculation Plan dialog box opens.
Create a new plan named SALES_PLAN. Click Create.
SALES_PLAN appears as a new item in the Calculation Plans folder. It does not yet contain any steps.
This sample forecast uses the Automatic forecast method, which takes the guesswork out of choosing an appropriate forecast method.
On the General page of SALES_PLAN, click New Step, then select New Forecast Step.
The Create Forecast Step dialog box opens.
Complete the General page with these values, as shown in Figure 7-1
Name: forecast_sales_step
Cube: UNITS_CUBE
Source Measure: SALES
Target Measure: SALES_FORECAST
Time Dimension: TIME
Forecast Method: Automatic
Number of Forecast Periods: 5
Keep the default settings on the Advanced Parameters page.
On the Status page, set the Time dimension:
On the Selected Steps tab, click All Levels and select Month from the drop-down list.
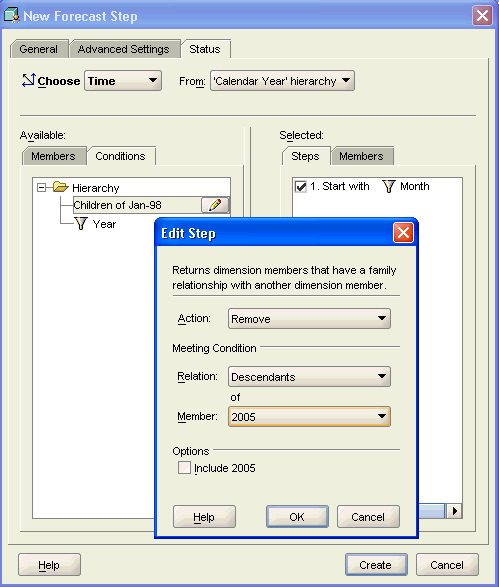
On the Available Conditions tab, expand the Hierarchy folder. Select Children of Jan-98 and click the Edit Step icon.
The Edit Step dialog box opens, as shown in Figure 7-2.
Set Action to Remove, and set Relation to Descendants.
Click Member and choose More from the list.
The Select Members dialog box opens.
Select 2005.
Click OK to close the Select Members dialog box, then click OK to close the Edit Step dialog box.
Add this condition to the Selected Steps.
On the Members tab, verify that only months are in the list and Dec-04 is the last value.
Figure 7-2 Selecting Time Dimension Members
Keep the default selection, which is the top level, for the other dimensions.
Click Create to save the forecast step.
Click Apply to save the Calculation Plan.
To generate the forecast:
Expand the Calculation Plans folder. Right-click SALES_PLAN and choose Execute Calculation Plan SALES_PLAN.
The Maintenance Wizard opens, and SALES_PLAN is a selected target object.
Click Finish.
The build log is displayed when the Calculation Plan is done executing.
This forecast generated values at the base level of Time and at the top level of all other dimensions. To view the forecast data and evaluate whether you are satisfied with these results, you must select this particular portion of the data and compare it to historical results.
Fully expand the UNITS_CUBE folder, right-click the SALES_FORECAST measure, and choose View Data SALES_FORECAST.
The Measure Data Viewer opens. No data is displayed, because the base levels for Product, Customer, and Channel are NA.
From the File menu, choose Query Builder.
The Query Builder opens.
On the Items tab, add Sales to the Selected list.
On the Layout tab, arrange the dimensions so that Measure identifies the rows and Time identifies the columns. Click Help for instructions.
On the Dimensions tab, set the status of Time:
On the Steps tab, remove the initial selection.
On the Conditions tab, expand the Hierarchy folder.
Change Children of 1998 to Children of Q3-04, Q4-04, and add this condition to the Selected Steps.
On the Members tab, verify that only months are in the list from Jul-04 to Dec-04.
Click OK to close the Query Builder.
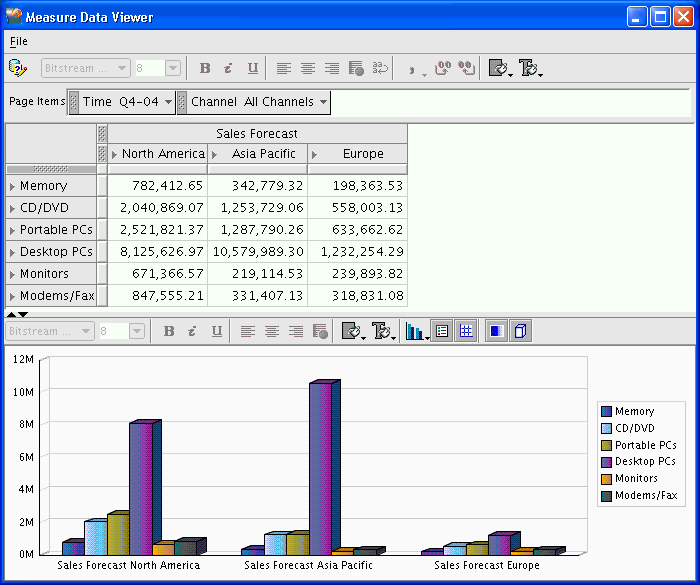
Figure 7-3 shows the results of the forecast, which are displayed in the Measure Viewer.
Figure 7-3 Forecast Data Displayed in the Measure Viewer
This sample forecast only generated five data values, which is only a small slice of the Sales Forecast measure. Before users can query this measure, you must generate additional data from the forecast values:
Allocate the forecast data down the Product, Customer, and Channel dimensions.
The forecast generated a single, top-level value for these dimensions. For the Time dimension, the forecast generated data at the detail Month level, so allocation is not possible.
Precompute some of the aggregate values to improve querying performance.
The measure is not mapped to a data source, so a refresh of the cube does not aggregate a forecast measure. The data is entirely aggregated on the fly unless you precompute some of the values in a separate step. A forecast measure can use the same rules as the other measures in the cube, but you must specify the rules in an Aggregation Step.
Add an Allocation Step to the Calculation Plan.
Add an Aggregation Step.
Run the Maintenance Wizard as described in "Generating the Forecast Data".
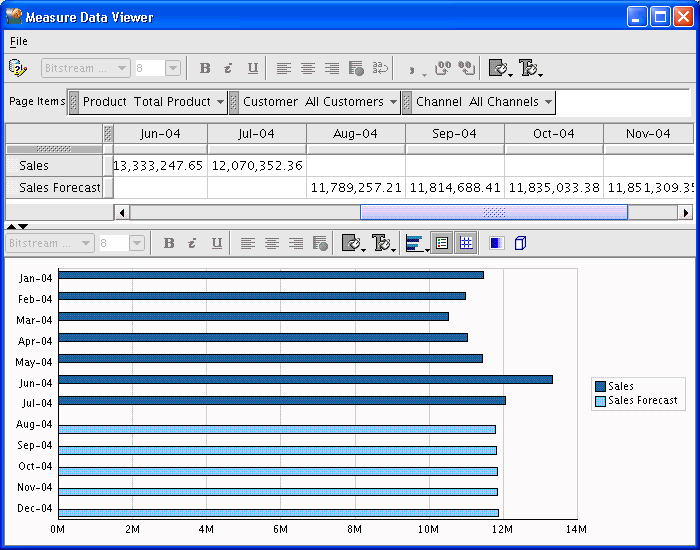
Figure 7-4 shows data in the middle levels of Time, Product, and Customer after allocation and aggregation of the forecast data.
|
Copyright © 2003, 2012, Oracle and/or its affiliates. All rights reserved. Legal Notices |
|