| Oracle® HTML DB 2 Day Developer Release 1.6 Part Number B14377-01 |
|
|
PDF · Mobi · ePub |
| Oracle® HTML DB 2 Day Developer Release 1.6 Part Number B14377-01 |
|
|
PDF · Mobi · ePub |
In Oracle HTML DB, you can create check boxes as form elements, or you can create check boxes in reports. Check boxes on a form work similarly to lists of values. When you define an item to be a check box, you need to provide the check box values in the List of Values section of the Item Attributes page. You define check boxes on a report using the supplied function HTMLDB_ITEM.CHECKBOX.
This tutorial illustrates the different ways you can create check boxes within the demonstration application, Sample Application and explains how to reference and process the values of checked boxes.
This section contains the following topics:
To access Sample Application:
Log in to Oracle HTML DB.
From the Workspace Administration list, select Review Demonstration Applications.
Locate Sample Application and check the Status column:
If the Status column displays Installed, click Run in the Action column.
If the Status column displays Not Installed, select Install in the Action column. When the Application Builder home page appears, click the Run icon.
When prompted, enter the appropriate username and password and click Login
For User Name, enter either demo or admin.
For Password, enter the name of the current workspace using all lowercase letters.
Navigate to the product information page by clicking the Products tab.
Click the Edit icon to the left of a product.
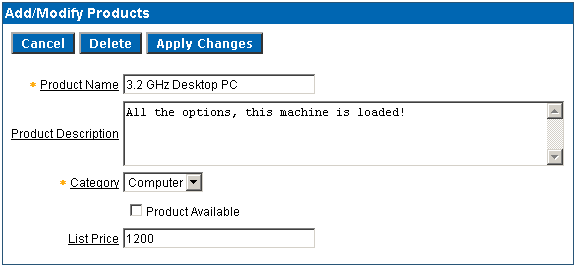
As shown in Figure 5-1, note that Product Available is a radio group. In this exercise that follows you will change this item to a check box.
In this exercise you change the Product Available radio group to a check box and then change the position of the label.
Topics in this section include:
To change the Product Available radio group to a check box:
Navigate to the Page Definition for page 6. Select Edit Page 6 from the Developer Toolbar.
Under Items, select P6_PRODUCT_AVAIL.
From Display As, select Checkbox.
Scroll down to List of Values.
Under List of Values:
From Named LOV, select Select Named LOV.
In List of values definition, enter:
STATIC:;Y
Click Apply Changes.
The Page Definition appears.
Run the page by clicking the Run Page icon.
As shown in Figure 5-2, note that the Product Available item now displays as a check box.
Next, you move the check box label to the right side of the check box.
To change the position of the check box label:
Navigate to the Page Definition for page 6. Select Edit Page 6 from the Developer Toolbar.
Under Items, select P6_PRODUCT_AVAIL.
For Label, delete the text Product Available.
Under List of Values, change the List of values definition to:
STATIC:Product Available;Y
Click Apply Changes.
Run the page by clicking the Run Page icon.
As shown in Figure 5-3, note that the label Product Available now displays to the right of the check box.
Figure 5-3 Product Available Label Moved to the Right

Removing the label and adding the display value to the LOV causes the HTML DB engine to render the check box first and then the display value, Product Available.
In certain circumstances, you may want a check box to be enabled by default. You can accomplish this by setting the default value attribute of the check box item. One disadvantage of this approach is that you need to perform some extra steps to disable it. Because of the way you defined the Product Available check box, it is virtually impossible to disable it.
Consider the following example:
Navigate to the Home page by selecting the Home tab.
From the Tasks list, select Add a New Product.
On the Add/Modify Product page:
Fill in the required fields (fields marked with an asterisk).
Disable the Product Available check box.
Click Create.
Disable the Product Available check box again and click Apply Changes.
The Product Page appears.
Select the Edit icon for product you just added.
Notice that the Product Available check box is enabled even though you disabled it twice when you added the product. This behavior results from the fact:
The Product Available check box has a default value of Y.
When Product Available is NULL, it defaults to the default value Y which enables the check box.
You can alter this behavior by adding a computation that remembers the state of the check box.
To add a computation that tracks the state of the check box:
Navigate to the Page Definition for page 6. Select Edit Page 6 from the Developer Toolbar.
Under Computations, click the Create icon.
For Location, select Item on This Page and click Next.
On Identify Item:
For Computer Item, select P6_PRODUCT_AVAIL.
For Computation Point, select After Submit.
For Computation Type, select Static Assignment.
Click Next.
For Computation, enter the following and click Next.
N
Note:
A static assignment of an item needs to be something other thanY or NULL.Next, create a condition that controls when the computation executes.
On Identify Condition:
For Condition Type, select Value of Item in Expression 1 is NULL.
In Expression 1, enter:
P6_PRODUCT_AVAIL
Because of these settings, this computation will only execute when the value of the check box item, P6_PRODUCT_AVAIL is NULL.
Click Create.
Add another product as you did in the previous procedure. Notice that this time the Product Available check box is not automatically selected.
In the next exercise, you create a multiple check boxes on the Product page. This check box will enable users to filter the report by selecting a category.
Topics in this section include:
To create muli value check box:
Navigate to the Page Definition for page 3.
Under Items, click the Create icon.
For Choose Item Type, select Check Box and click Next.
On Identify Item Name and Display Position:
For Item Name, enter P3_SHOW.
For Region, select Products 1.10.
Click Next.
On Identify List of Values:
For Display Null Option, select No.
In List of Values Query, enter:
SELECT distinct category a, category b
FROM demo_product_info
ORDER BY 1
Note that to create a multi value check box, the List of Values query needs to return more than one row.
Click Next.
On Identify Item Attributes:
For Label, remove the default text by clicking Clear.
Click Next.
On Identify Item Attributes:
For Item Source, select Static Assignment.
For Item Source Value, enter:
Audio:Computer:Phones:Video
When a multi value check box is submitted, the value of the item is a colon delimited string of values. Using this string as the source will ensure all boxes are checked when HTML DB engine renders the page.
Click Create Item.
To edit check box display values (or labels) to appear in bold:
Navigate to the Page Definition for page 3.
Under Items, select P3_SHOW.
Scroll down to Element.
In Form Element Option Attributes, enter:
class="fielddatabold"
Form Element Option Attributes are used exclusively for check boxes and radio buttons and control the way the HTML DB engine renders individual options.
Click Apply Changes.
Next, you edit attributes so that the category check boxes display above the report. To accomplish this, you need to change the Display Point attribute of the region associated with P3_SHOW.
To change the display point of the Products region:
Navigate to the Page Definition for page 3.
Under Region, select Products.
From Display Point, select Page Template Body (3. items above region content).
Click Apply Changes.
If you ran page 3 now, you would notice the category check boxes display vertically. Next, you will change the display so the category check boxes display horizontally.
To alter where the category check boxes display:
Navigate to the Page Definition for page 3.
Under Items, select P3_SHOW.
Scroll down to List of Values.
In Columns, enter 4.
Click Apply Changes.
In order for the report to be driven by the product category check boxes, you need to submit the page.
To create a button to submit the page:
Navigate to the Page Definition for page 3.
Under Buttons, click the Create icon.
For Select a region for the button, select Products 1.10 and click Next.
For Task, select Create a button displayed among this region's items and click Next.
On Identify Button within Items Attributes:
For Button Name, enter P3_GO.
In Sequence, enter 40.
Click Create Button.
Next, you need to create a branch to tell the HTML DB engine where to go after the user clicks the Go button.
To create a branch to page 3:
Navigate to the Page Definition for page 3.
Under Branches, click the Create icon.
On Identify Branch Point and Type, accept the defaults and click Next.
For Page, select 3 and click Next.
Click Create Branch.
In order to generate a report based on the category check box values, you need to change the report query.
To edit the report query:
Under Region, select Products.
Scroll down to Region Source.
In Region Source, change the WHERE clause to read:
WHERE p.image_id = i.image_id (+)AND instr(':'||:P3_SHOW||':',category) > 0
Click Apply Changes.
Run the page by clicking the Run Page icon.
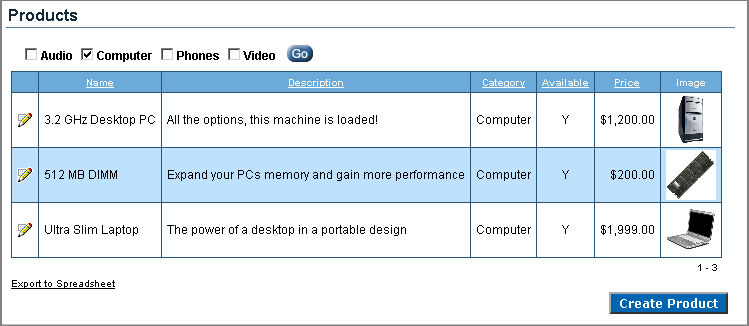
As shown in Figure 5-4, notice you can filter the report by selecting a category check box at the top of the page.
Figure 5-4 Product Page with Category Check Boxes and Go Button

Although the category check boxes correctly filters the content on page 3, if you deselect all the check boxes, notice the report returns all products. This behavior results from the fact that if a check box has a NULL value (that is, it is deselected), it defaults to the default value Y. The default value of Y in turn enables the check box.
You can alter this behavior by adding a computation that remembers the state of the check box.
To add a computation that tracks the state of the check box:
Navigate to the Page Definition for page 3.
Under Computations, click the Create icon.
For Location, select Item on This Page and click Next.
On Identify Item:
For Computer Item, select P3_SHOW
For Computation Point, select After Submit.
For Computation Type, select Static Assignment.
Click Next.
On Identify Computation:
For Computation:
none(bogus_value)
Click Next.
Note:
A static assignment of an item needs to be something other thanY or NULL.Next, create a condition that controls when the computation executes.
On Identify Condition:
For Condition Type, select Value of Item in Expression 1 is NULL.
In Expression 1, enter:
P3_SHOW
As a result of these settings, this computation will only execute when the value of the check box item, P3_SHOW is NULL.
Click Create.
Run the page again and deselect all the category check boxes. Notice that this time the report contains the expected result (no returned records).
In the next exercise you add a delete check box to each row in the Products report. To accomplish this you will edit the report query and make a call to HTMLDB_ITEM package.
HTMLDB_ITEM is a supplied package for generating certain form elements dynamically. In this instance, you will use HTMLDB_ITEM.CHECKBOX to generate check boxes in the Products report. When the page is submitted, the values of the check boxes are stored in global package arrays. You can reference these values using the PL/SQL variables HTMLDB_APPLICATION.G_F01 to HTMLDB_APPLICATION.G_F50 based on the p_idx parameter value that was passed in.
Topics in this section include:
To edit the query to call HTMLDB_ITEM.CHECKBOX:
Navigate to the Page Definition for page 3.
Under Regions, click Products.
In Region Source, add the new line appearing in bold face to the query.
SELECT p.product_id edit_product, p.product_id view_product_id,
htmldb_item.checkbox(1,p.product_id) del,
p.product_name, p.product_description, p.category, p.product_avail, p.list_price, '<img src="#OWNER#.custom_image_display?p_image_id=' || nvl(i.image_id,0) || '"
height="50" width="50" />' img
FROM demo_product_info p, demo_images i
WHERE p.image_id = i.image_id (+)
AND instr(':'||:P3_SHOW||':',category) > 0
HTMLDB_ITEM is an Oracle HTML DB supplied package you can use to generate certain form elements dynamically. Note the value passed in for p_idx in the above example is 1. You will reference the check box values using the global variable HTMLDB_APPLICATION.G_F01 later on.
Select the Report Attributes tab.
Under Report Column Attributes, locate the Del column.
Click the Up arrow until the DEL column is directly beneath VIEW_PRODUCT_ID. (See Figure 5-5).
Click Apply Changes.
To add a button to submit the check box array values:
Navigate to the Page Definition for page 3.
Under Buttons, click the Create icon.
For Select a region for the button, select Products 1.10 and click Next.
For Task, select, select Create a button in a region position and click Next.
On Identify Button within Items Attributes:
For Button Name, enter DELETE_PRODUCTS.
For Label, enter Delete Products.
Click Next.
For Button Template, accept the default selection and click Next.
For Position, select Top of Region and click Next.
For Branch to Page, select 3 and click Create Button.
To add process that executes when the user clicks the Delete Products button:
Under Processes, click the Create icon.
On Select Process Type, select PL/SQL and click Next.
For Name, enter Delete Products.
Enter following PL/SQL process and click Next:
FOR i in 1..HTMLDB_APPLICATION.G_F01.count
LOOP
   DELETE FROM demo_product_info
   WHERE product_id = HTMLDB_APPLICATION.G_F01(i);
END LOOP;
HTMLDB_ITEM is an Oracle HTML DB supplied package you can use to generate certain form elements dynamically. When a page is submitted, the values of each column are stored in global package arrays, which you can reference using the PL/SQL variable HTMLDB_APPLICATION.G_F01 to HTMLDB_APPLICATION.G_F50. In this exercise, the value passed in for p_idx in EMPNO column is 1, so you reference the EMPNO column values using the global variable HTMLDB_APPLICATION.G_F01.
On Identify Messages:
In Success Message, enter:
Product(s) deleted.
In Failure Message, enter:
Unable to delete product(s).
Click Next.
Click Create Process.
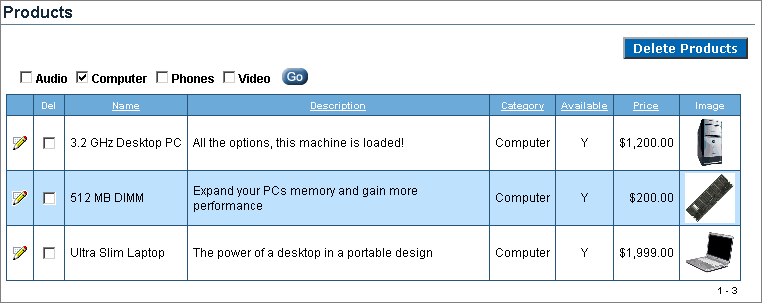
If you run the page, the Delete Products button appears above the report. (See Figure 5-6). To remove a product from the report, select the Del check box and click Delete Products.
Figure 5-6 Products Report with Delete Products Check Box
