| Oracle® Data Mining Administrator's Guide 10g Release 2 (10.2) Part Number B14338-02 |
|
|
PDF · Mobi · ePub |
| Oracle® Data Mining Administrator's Guide 10g Release 2 (10.2) Part Number B14338-02 |
|
|
PDF · Mobi · ePub |
Because Oracle Data Mining is completely integrated with Oracle Database, you will use Oracle Database tools to administering Data Mining. You can administer Oracle Database locally or from a remote computer with network access.
In this chapter, you will learn about post-installation administrative tasks, such as creating users and exporting and importing models.
This chapter contains the following topics:
Several tools for administrators and application developers are installed along with Oracle Database. For Microsoft Windows platforms, the Start menu contains an Oracle home program group with links to the tools.
Following are descriptions of a few of the basic administrative tools.
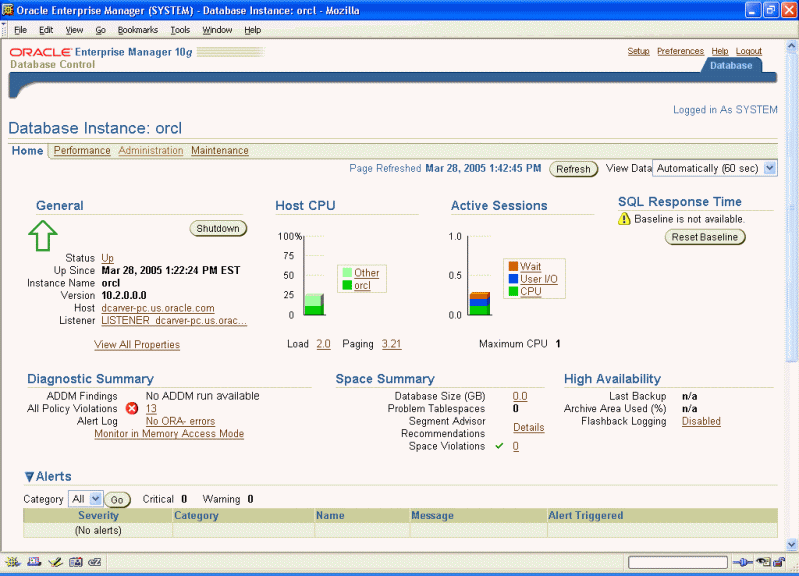
Database Control provides a Web-based graphical interface for managing all aspects of Oracle Database.
To open Database Control from the Windows Start menu, click Start > Programs > Oracle– oracle_home > Database Control– database_name.
You can also open Database Control from the URL provided during installation.
The following figure shows the Database Control home page.
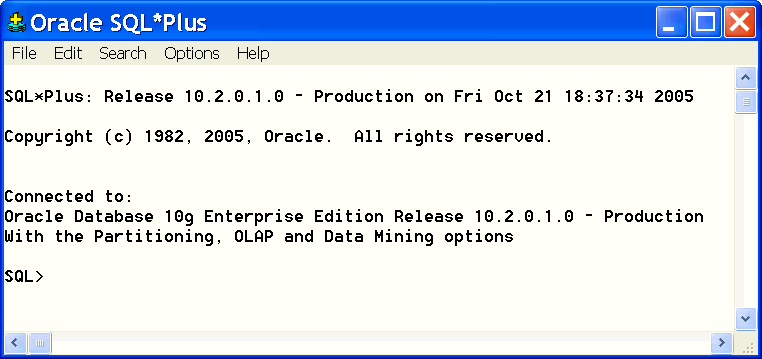
SQL*Plus is a command-line interface for the SQL language. You can perform all Oracle administrative tasks using SQL.
To open SQL*Plus from the Windows Start menu, click Start > Programs > Oracle– oracle_home > Application Development > SQL Plus.
You will be prompted for your user name and password. You must supply a host string only when connecting to a remote computer. The host string takes the form host_name:port:SID, such as myhost:1521:orcl.
The following figure shows the SQL Plus window.
Database Configuration Assistant provides a graphical user interface for creating, configuring, and deleting database instances. A single installation of Oracle Database can support numerous individual database instances. You can use Database Configuration Assistant to install the sample schemas if you did not install them with the database.
To open Database Configuration Assistant from the Windows Start menu, click Start > Programs > Oracle– oracle_home > Configuration and Migration Tools > Database Configuration Assistant.
You can use Oracle Universal Installer to list the Oracle products on your computer or to deinstall them.
To open Oracle Universal Installer from the Windows Start menu, click Start > Programs > Oracle– oracle_home > Oracle Installation Products > Universal Installer.
You must shut down all databases and supporting services before deinstalling Oracle Database. Refer to the installation guide for your platform for more information.
The Oracle Database installation creates several services. The following table describes some of them.
| Service Name | Description | Usage |
|---|---|---|
OracleServiceSID |
Oracle Database | Enables you to start and stop Oracle Database from the Service window. |
OracleHome_NameTNSListener |
Oracle Database listener | Enables you to open a connection with Oracle Database from a remote computer. |
OracleHome_NameiSQL*Plus |
iSQL*Plus application server | Enables you to open iSQL*Plus from a browser. |
OracleDBConsoleSID |
Oracle Enterprise Manager Database Control console | Enables you to open Database Control from a browser. |
To manage them, open Administrative Tools in the Windows Control Panel and choose Services.
The same tools that are installed locally on a Windows platform are also installed on Linux. You can run the local administrative tools from the shell command line. They are located in $ORACLE_HOME/bin. These are a few of the tools:
To open SQL*Plus, type sqlplus.
To open Database Configuration Assistant, type dbca.
To open Enterprise Manager Database Control, open a browser and type the URL provided during installation.
To open Oracle Universal Installer, type $ORACLE_HOME/oui/bin/runInstaller.
To start and stop the various Oracle processes, use these commands:
lsnrctl: Oracle Database listener
isqlplusctl: iSQL*Plus application server
emctl: Oracle Enterprise Manager Database Control console
For descriptions of these tools, refer to "Local Administration on Microsoft Windows".
You can open these tools in any browser by typing the URLs listed during installation on the End of Installation page:
The administration tools installed with Oracle Database are also installed with Oracle Client. If you are administering a remote database, you must install Oracle Client to obtain the full suite of administration tools. See "Installing Oracle Client" for information on Oracle Client installation.
Anyone who wants to use Oracle Database must have a user name and password. Data Mining users must have several database permissions, plus SELECT access to the tables containing data for analysis. Data mining activities typically require resources for working with large amounts of data.
The examples in this chapter show how to use Database Control or SQL commands to create data mining users. You can cut and paste the SQL commands into SQL*Plus.
Note:
In Oracle Database 10.1, a data mining user account, calledDMUSER, was provided with the software. In Oracle Database 10g Release 2 (10.2), DMUSER is no longer provided; you must create your own data mining user accounts.See Also:
Chapter 4 if you wish to create a demo user with permissions for running the demo programs.All users require a permanent tablespace and a temporary tablespace in which to do their work. Performance may start to degrade if multiple users are sharing the same tablespace while mining large data sets. You can improve performance by creating individual tablespaces for each user.
You must log in with system privileges to create tablespaces.
The following SQL command creates a new permanent tablespace.
CREATE TABLESPACE "ODMPERM" DATAFILE
    'C:\ORACLE\PRODUCT\10.2.0\ORADATA\ORCL\odm1.dbf'
     SIZE 20M REUSE AUTOEXTEND ON NEXT 20M;
The next SQL command creates a new temporary tablespace.
CREATE TEMPORARY TABLESPACE "ODMTEMP" TEMPFILE
    'C:\ORACLE\PRODUCT\10.2.0\ORADATA\ORCL\odmtemp.tmp'
     SIZE 20M REUSE AUTOEXTEND ON NEXT 20M;
From the Database Control home page, select the Administration tab.
In the Storage category on the Administration page, choose Tablespaces.
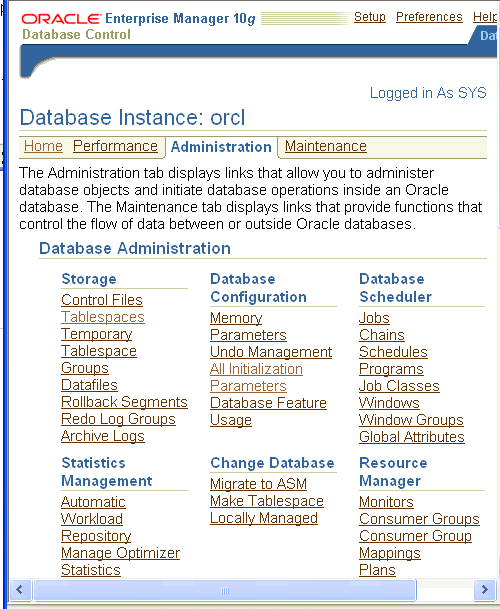
On the Tablespaces page, click the Create button.
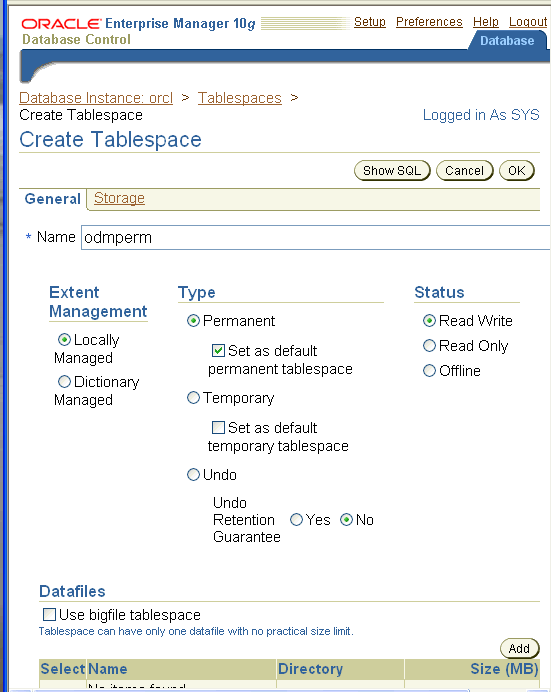
On the General tab of the Create Tablespace page, provide a name for the tablespace. Specify whether it is temporary or permanent, and set it as the default. To create the datafile, click the Add button.
On the Add Datafile page, provide a file name for the tablespace. Specify the file size and click the Reuse Existing File box. In the Storage section, specify AUTOEXTEND and provide the increment size. Click Continue.
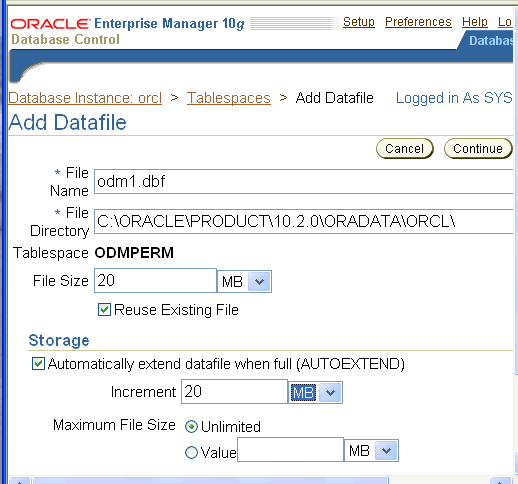
On the Create Tablespace page, click OK.
Data mining users that will mine large data sets should have personal tablespaces, as described in "Creating Tablespaces".
Data mining users require several CREATE privileges. For text mining, users must also have access to the Oracle Text package ctxsys.ctx_ddl. The following privileges are required.
CREATE PROCEDURECREATE SESSIONCREATE TABLECREATE SEQUENCECREATE VIEWCREATE JOBCREATE TYPECREATE SYNONYMEXECUTE ON ctxsys.ctx_ddlData mining users must also have SELECT privileges on the data being mined.
See Also:
Chapter 4 for information about theshgrants script, which grants privileges to a demo user.Users who want to export and import Data Mining models need additional access rights, as described in "Exporting and Importing Data Mining Models".
You must log in with system privileges to create users.
The following command creates a user named DMUSER1 with the password change_now, and provides default access to two personal tablespaces.
CREATE USER dmuser1 IDENTIFIED BY change_now
     DEFAULT TABLESPACE odmperm
     TEMPORARY TABLESPACE odmtemp
     QUOTA UNLIMITED on odmperm;
The following commands in a stored procedure grant the required privileges to the user DMUSER1.
GRANT create procedure to DMUSER1
/
GRANT create session to DMUSER1
/
GRANT create table to DMUSER1
/
GRANT create sequence to DMUSER1
/
GRANT create view to DMUSER1
/
GRANT create job to DMUSER1
/
GRANT create type to DMUSER1
/
GRANT create synonym to DMUSER1
/
GRANT execute on ctxsys.ctx_ddl to DMUSER1
Unless a user owns the data being analyzed, you must grant access rights to that data using a SQL command like this one.
GRANT SELECT ON owner.tablename TO user
For example, the following SQL command grants SELECT access to the EMPLOYEES table in the sample HR schema to DMUSER1.
GRANT SELECT ON hr.employees TO DMUSER1;
On the Database Control home page, select the Administration tab.
In the Users & Privileges category on the Administration page, choose Users.
On the Users page, click Create.
On the Create User page, provide the user name and password, and specify default and temporary tablespaces. Select the System Privileges tab.
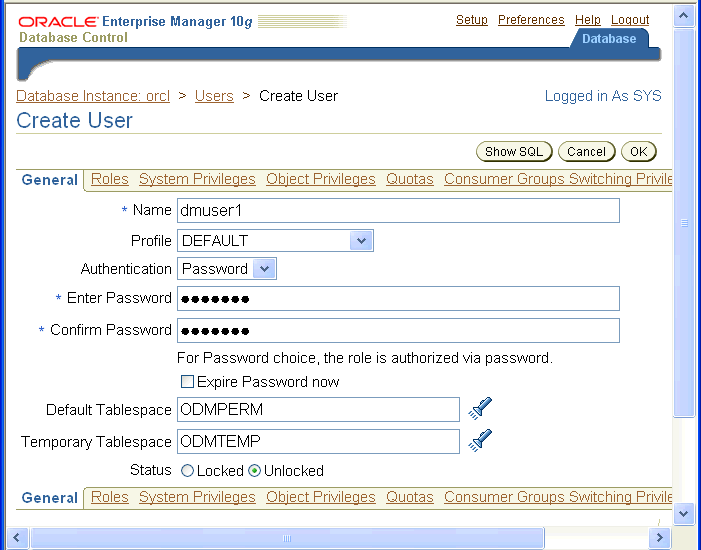
On the System Privileges page, choose Edit List.
On the Modify System Privileges page, use the arrows to move the required privileges from the Available box to the Selected box. Click OK. 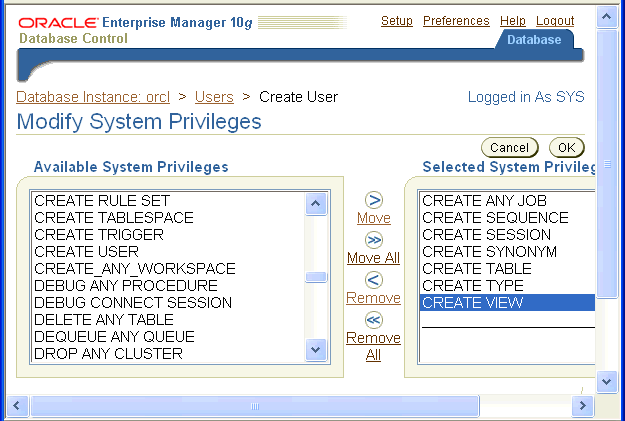
On the Create User page, select the Object Privileges tab to grant access to the mining data. In the Select Object Type drop down list, choose Table. Click Add.
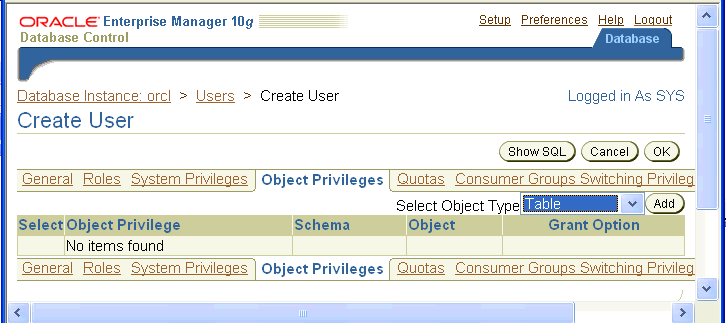
On the Add Table Object Privileges page, choose the table where the mining data is stored and grant SELECT access to it. The following example provides the user with SELECT access to the sample HR.COUNTRIES table. Click OK.
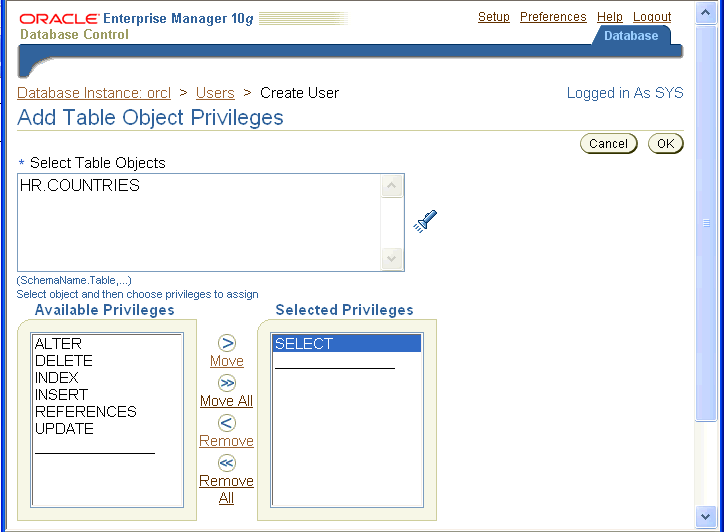
Repeat steps 7 and 8, choosing Package instead of Table. Grant EXECUTE access to the CTXSYS.CTX_DLL package. Click OK.
Click Apply.
You can view the definition of the user you have created by clicking the View button.
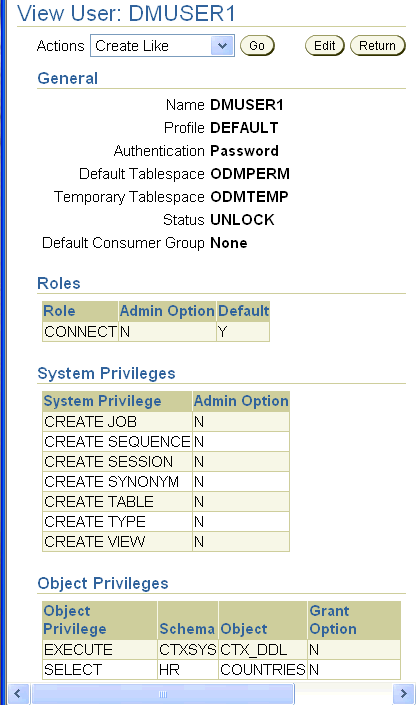
Information about all models created in a database is stored in tables owned by the DMSYS user. During a typical installation, the DMSYS user has SYSAUX defined as its default tablespace.
Important:
Do not delete, truncate, or modify the tables in theDMSYS schema. They support the data mining activities of all users in the database.You can export data mining models to flat files to back up work in progress or to move models to a different instance of Oracle Database Enterprise Edition (such as from a development database to a production database). All methods for exporting and importing models are based in Oracle Data Pump technology.
Oracle Data Pump consists of two command-line clients and two PL/SQL APIs. The command-line clients, expdp and impdp, provide an easy-to-use interface to the Data Pump export and import utilities. The Data Mining APIs also use the Data Pump export and import utilities.
You can export and import models at different levels, depending on your access rights in the database:
Database. When a DBA exports a full database using expdp, all data mining models in the database are exported. The impdp utility imports all the models with the other objects in the database.
Schema. When a DBA or an individual user exports a schema using expdp, all the data mining models in the schema are exported. Likewise, impdp imports all the models with the other objects in the schema.
Models Only. The Data Mining APIs contain utilities for exporting and importing either all Data Mining models in a schema or models that match specific criteria.
The Data Pump export utility writes the tables and metadata that constitute a model to a dump file set, which consists of one or more files. The Data Pump import utility retrieves the tables and metadata from the dump file and restores them to the target database. Because the expdp and impdp clients and the Data Mining APIs use the Data Pump export and import utilities, you can use the APIs to extract individual models from a dump file of a schema or database.
Note that the older exp and imp database utilities do not export or import data mining models.
See Also:
Oracle Database Utilities for a complete discussion of Oracle Data Pump and the expdp and impdp utilities
Oracle Database PL/SQL Packages and Types Reference for detailed information about the export and import procedures in the DBMS_DATA_MINING package.
Oracle Data Mining Java API Reference for information about the export and import classes in the Oracle Data Mining Java API.
To export and import Data Mining models, you must have read and write access to a directory object, and you may need additional database permissions.
A directory object is a logical name in the database for a physical directory on the host computer. Without read and write access to a directory object, you cannot access the host computer file system from within Oracle Database.
You must have the CREATE ANY DIRECTORY privilege to create directory objects.
The following SQL command creates, or re-creates if it already exists, a directory object named DMTEST. The file system directory (in this example, C:\ORACLE\PRODUCT\10.2.0\DMINING) must already exist and have shared read/write access rights granted by the operating system.
CREATE OR REPLACE DIRECTORY dmtest AS 'c:\oracle\product\10.2.0\dmining';
This SQL command gives user DMUSER1 both read and write access to DMTEST.
GRANT ALL ON DIRECTORY dmtest TO dmuser1;
For more information about creating database directories, refer to the CREATE DIRECTORY and GRANT commands in the Oracle Database SQL Reference.
You may need special privileges in the database to take full advantage of all Data Pump features, such as importing models and other objects into a different schema. These privileges are granted by the EXP_FULL_DATABASE and IMP_FULL_DATABASE roles.
You do not need these roles to export models from your own schema. To import models, you must have the same database roles or be as privileged as the user who created the dump file set. Otherwise, you need the IMP_FULL_DATABASE role.
Privileged users (such as SYS or a user with the DBA role) have sufficient access rights and do not need these additional roles.
The following SQL commands grant these roles to DMUSER1:
GRANT EXP_FULL_DATABASE TO dmuser1;
GRANT IMP_FULL_DATABASE TO dmuser1;
The DBMS_DATA_MINING PL/SQL package contains these two procedures:
EXPORT_MODEL
IMPORT_MODEL
For more information about these procedures, refer to the Oracle Database PL/SQL Packages and Types Reference.
Oracle Database implements the industry-standard Java Data Mining (JDM) API Specification, which includes these two interfaces:
For more information about the standard JDM API, refer to the Java Help for the JSR-73 Specification, which is available on the Oracle Technology Network at
http://www.oracle.com/technology/products/bi/odm/JSR-73/index.html
Two tables are created in the user's schema by the Data Mining export and import utilities:
DM$P_MODEL_EXPIMP_TEMP. Used for internal purposes during export and import, and provides a job history.
DM$P_MODEL_TABKEY_TEMP. Used only for internal purposes during export and import.
Do not alter these tables. However, you may drop them when no export or import job is running. The utilities will re-create them for the next job.
This example creates a dump file with three models and imports the models from the dump file.
The following command exports all models from DMUSER, who is currently connected to the database in SQL*Plus.
SQL> EXECUTE DBMS_DATA_MINING.EXPORT_MODEL('allmodels.dmp','DMTEST');

PL/SQL procedure successfully completed.
An export or import creates a log file in the same directory as the dump file. Error messages are returned to the current output device (such as the screen), and the log file may provide additional information.
This command was successful and creates two files in the DMTEST directory:
A dump file named allmodels01.dmp (note the 2-digit suffix added to the name)
A log file with a default name of DMUSER_exp_4589.log
For detailed information about the default names of files, see the DBMS_DATA_MINING package in the Oracle Database PL/SQL Packages and Types Reference.
You can view the log file using a system command or editor. You must know the path of the physical directory in order to locate the file.
DMUSER_exp_4589.log lists the three Data Mining models that were in the schema, plus additional objects as shown here:
Starting "DMUSER"."DMUSER_exp_45":  DM_EXPIMP_JOB_ID=45
Estimate in progress using BLOCKS method...
Processing object type TABLE_EXPORT/TABLE/TABLE_DATA
Total estimation using BLOCKS method: 1.062 MB
>>> . . exported Data Mining Model "DMUSER"."ABN_CLAS_SAMPLE"
>>> . . exported Data Mining Model "DMUSER"."ASSOCIATION_RULES_SAMPLE"
>>> . . exported Data Mining Model "DMUSER"."NAIVE_BAYES_SAMPLE"
Processing object type TABLE_EXPORT/TABLE/PROCACT_INSTANCE
Processing object type TABLE_EXPORT/TABLE/TABLE
Processing object type TABLE_EXPORT/TABLE/GRANT/OWNER_GRANT/OBJECT_GRANT
Processing object type TABLE_EXPORT/TABLE/INDEX/INDEX
Processing object type TABLE_EXPORT/TABLE/CONSTRAINT/CONSTRAINT
Processing object type TABLE_EXPORT/TABLE/INDEX/STATISTICS/INDEX_STATISTICS
Processing object type TABLE_EXPORT/TABLE/INDEX/FUNCTIONAL_AND_BITMAP/INDEX
Processing object type TABLE_EXPORT/TABLE/INDEX/STATISTICS/FUNCTIONAL_AND_BITMAP/INDEX_STATISTICS
Processing object type TABLE_EXPORT/TABLE/STATISTICS/TABLE_STATISTICS
. . exported "DMUSER"."DM$P0ASSOCIATION_RULES_SAMPLE"    7.640 KB      15 rows
. . exported "DMUSER"."DM$P0NAIVE_BAYES_SAMPLE"          18.35 KB     219 rows
. . exported "DMUSER"."DM$P1ABN_CLAS_SAMPLE"             6.945 KB       2 rows
. . exported "DMUSER"."DM$P1NAIVE_BAYES_SAMPLE"          5.929 KB       2 rows
. . exported "DMUSER"."DM$P2ASSOCIATION_RULES_SAMPLE"    6.210 KB      11 rows
. . exported "DMUSER"."DM$P3ASSOCIATION_RULES_SAMPLE"    6.179 KB      18 rows
. . exported "DMUSER"."DM$P4ASSOCIATION_RULES_SAMPLE"    5.492 KB      26 rows
. . exported "DMUSER"."DM$P5ABN_CLAS_SAMPLE"             5.304 KB       2 rows
. . exported "DMUSER"."DM$P5NAIVE_BAYES_SAMPLE"          5.984 KB      27 rows
. . exported "DMUSER"."DM$P6ABN_CLAS_SAMPLE"             16.47 KB      34 rows
. . exported "DMUSER"."DM$P7ABN_CLAS_SAMPLE"             7.007 KB       5 rows
. . exported "DMUSER"."DM$P8ABN_CLAS_SAMPLE"             5.414 KB       5 rows
. . exported "DMUSER"."DM$P8ASSOCIATION_RULES_SAMPLE"    5.335 KB       3 rows
. . exported "DMUSER"."DM$P8NAIVE_BAYES_SAMPLE"          5.359 KB       3 rows
. . exported "DMUSER"."DM$PEABN_CLAS_SAMPLE"             9.093 KB     116 rows
. . exported "DMUSER"."DM$PENAIVE_BAYES_SAMPLE"          8.742 KB     116 rows
. . exported "DMUSER"."DM$P_MODEL_EXPIMP_TEMP"           6.273 KB      10 rows
. . exported "DMUSER"."DM$PEASSOCIATION_RULES_SAMPLE"        0 KB       0 rows
Master table "DMUSER"."DMUSER_exp_45" successfully loaded/unloaded
******************************************************************************
Dump file set for DMUSER.DMUSER_exp_45 is:
  /dat2/10gR2/oracle/product/10.2.0/db_1/dmtest/allmodels01.dmp
Job "DMUSER"."DMUSER_exp_45" successfully completed at 08:40:08
DMUSER can restore these models from the dump file at a later date if, for whatever reason, he or she wants to revert to this version of the models. Note that an import will not overwrite an existing model with the same name unless the model is incomplete or corrupted.
The following command restores all models from the dump file to the DMUSER schema:
SQL> EXECUTE DBMS_DATA_MINING.IMPORT_MODEL('allmodels01.dmp','DMTEST');
A user with the necessary privileges can load the models from a dump file into a different schema. In the next example, the SYSTEM user issues the following command, which loads the three models into the SCOTT schema:
SQL> EXECUTE DBMS_DATA_MINING.IMPORT_MODEL('allmodels01.dmp', 'DMTEST', null, null, null, 'toscott', 'DMUSER:SCOTT');
This import command specifies toscott.log as the name of the log file; the .log extension is added automatically to the name. The log file shows the names of the imported models and supporting metadata.
Master table "SYSTEM"."toscott" successfully loaded/unloaded
Starting "SYSTEM"."toscott":  DM_EXPIMP_JOB_ID=51|DM_SELECT_IMPORT
Processing object type TABLE_EXPORT/TABLE/PROCACT_INSTANCE
>>> . . imported Data Mining Model "SCOTT"."ABN_CLAS_SAMPLE"
>>> . . imported Data Mining Model "SCOTT"."ASSOCIATION_RULES_SAMPLE"
>>> . . imported Data Mining Model "SCOTT"."NAIVE_BAYES_SAMPLE"
Processing object type TABLE_EXPORT/TABLE/TABLE
Processing object type TABLE_EXPORT/TABLE/TABLE_DATA
Processing object type TABLE_EXPORT/TABLE/GRANT/OWNER_GRANT/OBJECT_GRANT
Processing object type TABLE_EXPORT/TABLE/INDEX/INDEX
Processing object type TABLE_EXPORT/TABLE/CONSTRAINT/CONSTRAINT
Processing object type TABLE_EXPORT/TABLE/INDEX/STATISTICS/INDEX_STATISTICS
Processing object type TABLE_EXPORT/TABLE/STATISTICS/TABLE_STATISTICS
Job "SYSTEM"."toscott" completed with 1 error(s) at 09:08:12