Release 2.6.4
Part Number B15853-04
Contents
Previous
Next
| Oracle Workflow Developer's Guide Release 2.6.4 Part Number B15853-04 | Contents | Previous | Next |
This chapter tells you how to use Oracle Workflow Builder to define a workflow process definition.
This chapter covers the following topics:
Oracle Workflow Builder is a graphical tool for creating, viewing, and modifying workflow process definitions. It contains a Navigator window that you use to define the activities and components of your business process. You then assemble the activities in a process window to create a process diagram. See: Creating Process Definitions in Oracle Workflow Builder.
Note: A workflow process definition can also be stored as a flat file, which can be opened and edited in a text editor so that the process definition can be spoken by a screen reader for greater user accessibility.
Oracle Workflow Builder Navigator Window and Process Window
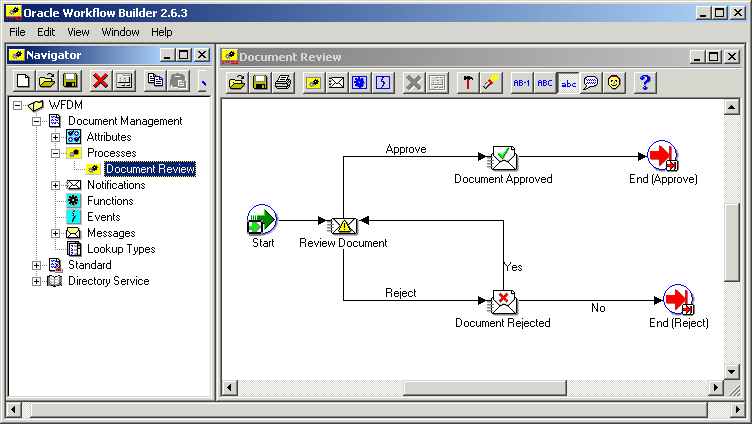
Note: If you maximize the Navigator window or any process window in Oracle Workflow Builder, you will not be able to access the menu from your keyboard using the Alt key.
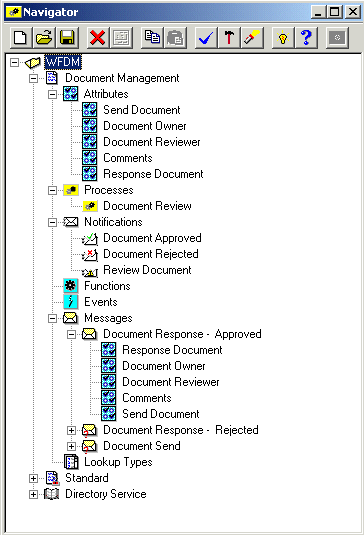
The Navigator window displays a navigator tree hierarchy for each data store that you open or load into Oracle Workflow Builder. A data store (primary branch) is a database connection or flat file that holds your workflow process definition. Within each data store there is at least one item type heading (secondary branch) that represents the grouping of a particular set of processes and its component objects. The following tertiary branches appear beneath each item type branch:
Attributes - lists the attributes for the current item type. Item type attributes describe features of an item type. For example, if an item type is a purchase order requisition, then an item type attribute can be the requisition amount or the requisition ID. See: Item Type Attributes.
Processes - lists the process activities or workflow process definitions for the current item type. See: Process Window and Activities.
Notifications - lists the notification activities associated with the current item type. A notification activity sends a message to a user or role. The message may prompt for a response or may simply provide information. See: Activities.
Functions - lists the function activities associated with the current item type. A function activity represents a PL/SQL stored procedure that the Workflow Engine executes automatically. A function activity can also have activity attributes associated with it. See: Activities.
Events - lists the event activities associated with the current item type. An event activity represents a business event that the process receives, raises, or sends. See: Activities.
Messages - lists the messages that a notification activity associated with the current item type can send to a user or role. A message can have message attributes associated with it. See: Messages.
Lookup Types - lists the lookup types associated with the current item type. A lookup type has one or more values called lookup codes associated with it. A lookup type is a list of values that can be referenced by a message, or by a notification, function, or process as its possible result type. See: Lookup Types.
Note: Each data store also contains a Directory Service branch. The Directory Service branch lists all the directory service roles that you load from your Oracle Workflow database. See: Roles.
If the data store is a database connection and the database contains other item types that you have not loaded into Oracle Workflow Builder, a branch called Hidden Item Types appears. When you double-click on Hidden Item Types, you get a Show Item Types window that lets you load other item types into Oracle Workflow Builder.
The navigator tree is organized much like the hierarchy of a file system, where you can expand branches that begin with a plus sign (+) to further sub-branches until you find your component of interest. Sub-branches appear indented below the branches from which they are expanded. Branches that are expanded are preceded by a minus sign (-). You can expand no further when a branch displays neither a plus nor minus sign. You can use either your mouse or the arrow keys on your keyboard to expand or collapse the navigator tree.
The Navigator window also contains a toolbar that you can use to perform actions within the Navigator window. See: Navigator Toolbar.
Navigator Window
To Find an Object in the Navigator Tree
Choose Find... from the Edit menu to display a Search window that lets you specify search criteria to find an object in the navigator tree.
Search Window
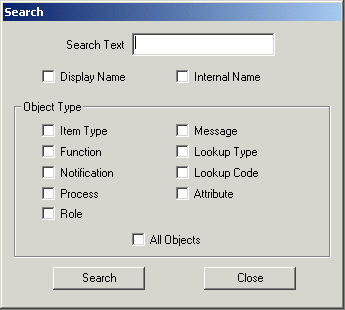
Enter the text to search for in the Search Text field. The search is case insensitive and looks for the text pattern that you specify in the field that you specify.
Specify to search for this text in the object's Display Name or Internal Name.
Specify the object type to restrict this search to or check All Objects to search for the text within the property pages of all objects.
Choose Search.
You can choose Find Again from the Edit menu to repeat the search using the search criteria previously defined in the Search window.
Before using Oracle Workflow Builder, you should plan what your process needs to accomplish. In particular, determine what activities need to occur, the order of the activities, what results dictate the different branches of the process, who needs to be informed and what they need to know. Oracle Workflow provides several demonstration workflow examples. See: Sample Workflow Processes.
There are several ways you can go about creating a workflow process definition:
Top-Down Design - If you prefer to approach your design from a high level, you can first sketch out the process diagram with activities, then go back later to create the supporting objects for each activity. See: To Create a Process Definition from Top-Down.
Bottom-Up Design - If you prefer to take a more programmatic approach to your design, you can first define each of the supporting objects of your process before attempting to create a higher level process diagram. See: To Create a Process Definition From Bottom-Up.
The Quick Start Wizard helps you build a process definition from scratch using a process definition template. The Quick Start Wizard creates a new item type for your process, prompting you for the minimum required information. It then creates an outline process diagram from which you can flesh out with more activities. Once the Quick Start Wizard sets up the template, you can use either the top-down or bottom-up approach to complete the design. See: To Use the Quick Start Wizard.
Oracle Workflow Builder assigns a version number to each new activity that you create. It also updates the version number whenever you make changes to an existing activity. It saves the new version of the activity to the database without overwriting older versions of the activity. In Oracle Workflow, activities also have dates of effectivity so that at any point in time, only one version of the activity is "in effect". If a process is running, Oracle Workflow uses the version of the activity that was in effect when the process was initiated. It does not switch versions of the activity mid-way through the process. Note that a process itself is an activity, so a process definition always remains constant until the process instance completes.
Oracle Workflow Builder also supports the concept of saving and loading process definitions according to an effective date. For example, you can load a definition into Oracle Workflow Builder that was effective at an earlier point in time. You can also save a definition to the database to be effective at some future time.
Note that Oracle Workflow Builder does not maintain version information for objects that are considered constant, such as item types, item type attributes, messages and lookup types. For these objects, their latest definition always apply, so you should always consider whether a change to any of these objects is backwards compatible. If the modification affects existing processes, you should create a new object rather than edit the existing object.
See: Modifying Objects in Oracle Workflow Builder.
Using the Edit Button in a Property Page
To create an object in Oracle Workflow Builder, you enter information in the object's property page. Some of the information you provide can be selected from a list of values. If a poplist field yields values that are themselves defined from some other property pages in Oracle Workflow Builder, an Edit button appears to the right of that poplist. When you select a value from a poplist, you can choose the adjacent Edit button to display and edit the source property page(s) of the value. When you are done with the source property page(s) and choose OK or Cancel, you return to the original property page you were working on.
For example, if you create a notification activity, you must specify a Result Type for the activity. The Result Type poplist field lets you select the value <None> or some predefined lookup type. If you select a lookup type, you can then choose the adjacent Edit button to display the property page for that lookup type. When you finish viewing or editing the property page for that lookup type, you can choose OK or Cancel to return to the notification activity property page.
To Create a Process Definition From Bottom Up
To start Oracle Workflow Builder, double-click the Oracle Workflow Builder icon located in the Application Development folder within the Oracle - <SID NAME> program group. If you are using Windows 98 or NT 4.0 or higher, you can also select the Oracle Workflow Builder icon from the appropriate program folder of the Start menu.
Choose New from the File menu to create a workspace for your new process definition.
Tip: Alternatively, you can use the Quick Start Wizard to first create the framework for your new process definition. Once the Quick Start Wizard creates your new item type and new process activity, you can skip to step 4 below to begin defining the supporting objects for the new item type and process activity. See: To Use the Quick Start Wizard.
Create a new item type. The item type classifies the work item to be managed by the process. See: To Create an Item Type.
You can define item type attributes to fully describe your item type and have the activities in your process refer to these attributes for information. See: To Define an Item Type or Activity Attribute.
Create new lookup types. See: To Create Lookup Types.
Before defining an activity, you should define the lookup type that represents your activity's Result Type. A Result Type is a list of possible results that an activity can have upon completion. After defining a lookup type and an activity, you can drag the lookup onto an activity in the navigator tree to assign that lookup as the activity's result type. Lookup types can also be referenced by item type attributes, activity attributes, messages, or message attributes.
Create new messages. See: To Create a Message.
If you wish to create a notification activity for your process, you should first create the message that you want the notification activity to send. You can drag a new message onto a notification activity in the navigator tree to assign the message to that activity.
You can also create message attributes for the message. You can incorporate message attributes of type 'Send' into a message that are token substituted at runtime to provide dynamic content. You can also define message attributes of type 'Respond' to prompt the notification recipient for a response. See: To Define a Message Attribute.
Create a new process activity, notification activity, function activity, or event activity. You may also use predefined standard activities associated with the Standard item type. See: Activities and Standard Activities.
You need to define at least one process activity that represents your high level process diagram. The process diagram establishes the relationship of all the activities in your process.
Diagram the process.
Display the Process window for your process activity to diagram the activities and transitions that define your workflow process. You can drag activities from the navigator tree into the Process window. See: Diagramming a Process.
Save your work by choosing Save or Save As from the File menu. See: To Save Your Work.
In a database accessible by your Oracle Workflow server, create the PL/SQL stored procedures called by your PL/SQL function activities. You can do this through SQL*Plus or the Oracle Procedure Builder. See: Oracle Workflow Procedures and Functions, Oracle Workflow API Reference and Standard API for PL/SQL Procedures Called by Function Activities.
To Create a Process Definition from Top Down
To start Oracle Workflow Builder, double-click on the Oracle Workflow Builder icon located in the Application Development folder within the Oracle - <SID NAME> program group. If you are using Windows 98 or NT 4.0 or higher, you can also select the Oracle Workflow Builder icon from the appropriate program folder of the Start menu.
Use the Quick Start Wizard to create the framework for your new process definition. Specify the requested information for the new item type and new process activity. See: To Use the Quick Start Wizard.
A Process window appears, that shows a Start and an End activity node. Create your process diagram by defining new activity nodes to place between the Start and End nodes. See: To Define Nodes in a Process.
You may also use predefined standard activities associated with the Standard item type. See: Standard Activities.
Model your process by drawing transitions between your activities. See: Diagramming a Process.
Save your work by choosing Save or Save As from the File menu. See: To Save Your Work.
Important: When you save your work, Oracle Workflow automatically validates the process definition for any invalid or missing information and displays what it finds in a Workflow Error verification window. The Workflow Error window is non-modal, so you can keep it up on your screen while you go back to your process to correct the problems that are identified. You can also save your work as is, and fix the problems later. Use the Copy button to copy the information to the clipboard if you want to paste it into another document for later reference. If you save your work without correcting the problems, the Workflow Error window will appear when you open this process definition later.
To Modify a Process Definition
To start Oracle Workflow Builder, double-click on the Oracle Workflow Builder icon located in the Application Development folder within the Oracle - <SID NAME> program group. If you are using Windows 98 or NT 4.0 or higher, you can also select the Oracle Workflow Builder icon from the appropriate program folder of the Start menu.
Choose Open from the File menu to open a connection to the database or file that contains the process definition you want to modify. See: To Access Process Definitions in an Existing Data Store.
Select and expand the existing item type associated with the process definition you want to modify.
You can modify an item type, item type attribute, lookup, message, message attribute, process activity, notification activity, function activity, or activity attribute. See: To Create an Item Type, To Define an Item Type or Activity Attribute, To Create Lookup Types, To Create a Message, To Define a Message Attribute, or Activities.
You can also modify the process diagram by displaying the Process window for your process activity. See: Diagramming a Process.
Save your work by choosing Save or Save As from the File menu. See: To Save Your Work.
Related Topics
Deleting Objects in Oracle Workflow Builder
Modifying Objects in Oracle Workflow Builder
Using Oracle Workflow Builder with Different Server Versions
All processes are associated with an item type. An item type can include one or more processes. You can save an item type to a database or to a flat file. When you save your work to a database, you actually save everything in the current data store that has been modified. When you save your work to a flat file, you actually save everything in the current data store to the file. You can also load an item type into Oracle Workflow Builder from a database or flat file. Opening an item type automatically retrieves all the attributes, messages, lookups, notifications, functions and processes associated with that item type.
Important: Always save a copy of your workflow process definition as a flat file and check that file into a source control system to maintain a working version of your process definition. Avoid using the process definition stored in your database as your source controlled version, as others with access to the database can update the definition.
Note: To connect from Oracle Workflow Builder to a database, the language of your Oracle Workflow Builder installation must match one of the available languages of the Oracle Workflow Server installation in the database.
To Access Process Definitions in an Existing Data Store
To start Oracle Workflow Builder, double-click on the Oracle Workflow Builder icon located in the Application Development folder within the Oracle - <SID NAME> program group. If you are using Windows 98 or NT 4.0 or higher, you can also select the Oracle Workflow Builder icon from the appropriate program folder from the Start menu. In Oracle Workflow Builder, select Open... from the File menu.
Open Window
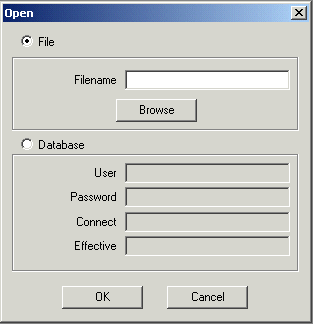
Select database or file to connect to the source containing the item type to which your process definition is associated.
To open a file: Provide the complete file path and choose OK, or use Browse to locate and open the file (extension .wft).
Note: You can also drag and drop a .wft file from the Microsoft Windows 98/2000/XP/NT 4.0 Explorer or Microsoft Windows NT File Manager into the navigator tree to open that file in Oracle Workflow Builder.
Note: When you use Browse to find and open a file, the current directory that you open the file from becomes the new default directory from which you open files in the future. This default directory persists until you use Browse again to locate another file.
To open a database connection: Enter the username and password for the database. Enter the name of the database alias or connect string and choose OK.
Note: If you are using the version of Oracle Workflow embedded in Oracle Applications, use the APPS schema to connect to the database.
If you wish to retrieve a process definition that was effective at a particular point in time, you can specify a date and time in the Effective field and have Oracle Workflow Builder retrieve that data from the database. The format that you should use to specify the date and time depends on the date and time preferences defined in the Regional Settings of your Windows Control Panel.
If multiple item types exist in the data store, the Show Item Types window appears. Select from the Hidden list, the item type(s) you want to view, and choose << to move it into the Visible list. Choose OK to load these item types into the navigator tree.
Show Item Types Window
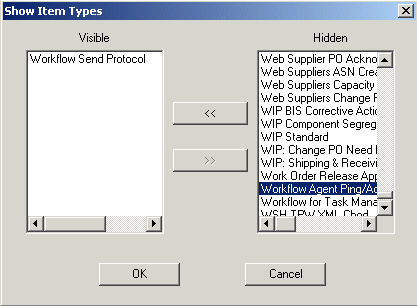
If at any time you want to view and modify item types that are hidden in the current data store, you can double-click on the Hidden Item Types branch in the navigator tree to display the Show Item Types window and select the item types you want to show. You can also choose Show/Hide Item Types from the File menu to display the Show Item Types window.
Note: You can copy item types from one store to another in any order even if the item types reference each other. However, you may get validation errors due to foreign key references. Pay attention to these errors as they may indicate that you need to also copy other item types into the new store to resolve the foreign key references. The final process definition in the new store will be valid as long as all referenced item types are copied to the new destination store.
When you finish working, choose Save from the File menu to preserve your changes and make them effective immediately. See: To Save Your Work.
To Save Your Work
Choose Save from the File menu to save your work and make the changes immediately effective.
When you use the Save command, you save all modified objects in the currently selected data store (even those that are hidden) back to that data store. If you want to save only specific item types, then you must create a new data store, and copy the specific item types you want to save into the new store and save the new store.
Important: Oracle Workflow Builder can save your work to the database using one of two modes. In the "About Oracle Workflow Builder" dialog box from the Help menu, there is a check box called "Allow modifications of customized objects". If you check this check box, Oracle Workflow Builder saves your edits in 'upload' mode, overwriting any protected objects that you have access to modify, as well as any previously customized objects. If you uncheck this check box, Oracle Workflow Builder runs in 'upgrade' mode and will only save edits to protected objects that you have access to change and will not overwrite objects that have been previously customized. These two modes match the upgrade and upload behavior of the Workflow Definitions Loader program. As the default, the check box is unchecked. See: To Set the Access Level for an Object and Using the Workflow Definitions Loader, Oracle Workflow Administrator's Guide.
Save As Window
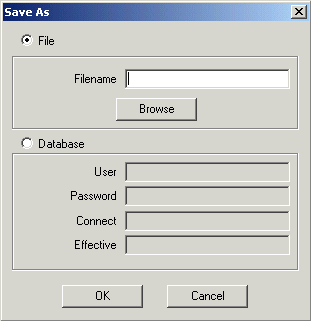
If you want to save your work to a different data store (database or flat file), or if you want to save it to a database with an effective date other than the current system date, then choose Save As... from the File menu. Use the Save As window to specify the file or database you want to save your process definition to, and the date when you want your process definition to take effect in the database. You can leave the Effective field blank to save and make the changes effective immediately. See: Version/Effective Date, Oracle Workflow API Reference.
Note: If you save your work to a database with a future effective date, and then in the same Oracle Workflow Builder session, continue to modify your process and later choose Save from the File menu, you automatically save the process definition to the same database using the previously specified effective date.
Note that when you save your work, Oracle Workflow automatically validates the process definition for any invalid or missing information and displays what it finds in a Workflow Error verification window. You can either correct the information before saving your work, or save your work as is, and fix the problems later. Use the Copy button to copy the information from the Workflow Error window to the clipboard for later reference. If you save your work without correcting the problems, the Workflow Error window will reappear when you reopen your process definition.
Choose Close Store from the File menu to close your connection to the current database or file data store.
Choose Exit from the File menu to exit Oracle Workflow Builder.
Important: The Close Store and Exit options from the File menu are enabled only when the Navigator window is the current window.
To Start Oracle Workflow Builder from the MS-DOS Prompt
Rather than starting Oracle Workflow Builder by double-clicking on its Windows icon, you can also type in a command at the MS-DOS prompt and specify the file or database to connect to.
In an MS-DOS prompt window, type the following command to start Oracle Workflow Builder with a specific workflow data file, where <filename.wft> represents the full path and name of the data file:
wfbldr <filename.wft>To start Oracle Workflow Builder with a specific database connection, type the following command at the MS-DOS prompt, where <username/password@connect> represents the database account information to connect to:
wfbldr -c <username/password@connect> Note: If you run Oracle Workflow Builder in Microsoft Windows 98 or Windows NT 4.0 or higher, you can also double-click on a workflow data file (.wft) from the Windows Explorer to automatically open that file and start Oracle Workflow Builder.
Note: If you are using the version of Oracle Workflow embedded in Oracle Applications, use the APPS schema to connect to the database.
To start Oracle Workflow Builder and open a specified item type in a data store, append the following to the appropriate command shown in Step 1 or 2, where <item_type> represents the internal name of the item type you want to open:
-E <item_type> For example:
wfbldr wfdemo.wft -E wfdemo
To start Oracle Workflow Builder and open a specified process diagram in a data store, append the following to the appropriate command shown in Step 1 or 2, where <item_type:process> represents the internal names of the item type and process you want to open:
-E <item_type:process> For example:
wfbldr wfdemo.wft -E WFDEMO:NOTIFYAPPROVER
Related Topics
Using the Workflow Definitions Loader, Oracle Workflow Administrator's Guide
Creating a Shortcut to a Workflow Process
The Quick Start Wizard lets you begin designing a workflow process immediately. It first loads a file called wftemplate.wft that is an outline of all the mandatory objects you need to build a workflow process and then displays a Process window for you to diagram your process. Once you initiate the Quick Start Wizard, you can take the bottom-up or top-down approach to complete your workflow process definition.
To Use the Quick Start Wizard
Select Quick Start Wizard from the File menu.
Workflow Quick Start Wizard Window
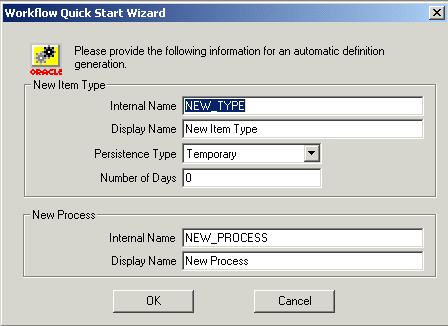
The Workflow Quick Start Wizard window prompts you for the following mandatory information:
New Item Type
Internal Name - Specify an all uppercase internal name with a maximum of eight characters. All Oracle Workflow APIs, SQL scripts, and PL/SQL procedures refer to the internal name when identifying an item type.
Important: To update the internal name of an item type once it is defined, you must use a special SQL script called wfchitt.sql. See: Wfchitt.sql, Oracle Workflow Administrator's Guide.
Caution: Do not include colons ":" or leading/trailing spaces in your internal name.
Display Name - Enter a translatable Display Name for the item type.
Persistence Type - Specify Temporary or Permanent persistence for the status audit trail of the item type.
Days - If Persistence Type is Temporary, specify the number of days from the time an item type instance completes before its status audit trail can be purged. See: Persistence Type.
New Process
Internal Name - Specify an all uppercase internal name.
Important: To update the internal name of an activity once it is defined, you must use a special SQL script called wfchact.sql. See: Wfchact.sql, Oracle Workflow Administrator's Guide.
Caution: Do not include colons ":" or leading/trailing spaces in your internal name.
Display Name - Enter a translatable Display Name for the process activity. The Display Name also appears in the title bar of your Process window.
The Quick Start Wizard does the following:
Creates a new data store called "Untitled-n" in the Navigator window.
Uses the information you entered in the Workflow Quick Start Wizard window to create a new item type and process activity in the data store.
Loads the Standard item type into the new data store so that you can include standard activities in the process you create.
Opens the Process window for the new process activity you defined. The Process window displays a Start and an End activity.
You can now customize your process definition in one of two ways:
Take a bottom-up design approach by first creating activities and all their supporting objects before trying to draw a workflow diagram. See: To Create a Process Definition From Bottom-Up.
Take a top-down design approach by creating activities that contain minimum information so you can draw the workflow diagram first. You can go back later to fill in the details of each activity and its supporting objects. See: To Create a Process Definition from Top-Down.
The Oracle Workflow Builder Release 2.6.3 shipped with Oracle Applications is compatible with all versions of the Oracle Workflow server embedded in Oracle Applications Release 11i. The Oracle Workflow Builder Release 2.6.3.5 available from the Oracle Technology Network (http://www.oracle.com/technology/) is compatible with Release 2.6.4, Release 2.6.3.5, Release 2.6.3, Release 2.6.2, Release 2.6.1, base Release 2.6, and Release 2.5 of the standalone version of the Oracle Workflow server.
Note: For Release 2.6.4, you can install the Oracle Workflow Builder from the same Oracle Technology Network client download that was originally made available for Oracle Workflow Release 2.6.3.5. There are no changes in the Oracle Workflow Builder for Release 2.6.4. Ensure that you install the Oracle Workflow Builder into a new Oracle home. You can then use this version of the Oracle Workflow Builder to connect to an Oracle Workflow Release 2.6.4 server.
You can create, view, and modify workflow process definitions that include new features introduced in Release 2.6, such as Business Event System components and, for standalone Oracle Workflow only, external Java function activities. The current Oracle Workflow Builder versions can upload and download these process definitions to a database with Oracle Workflow Server Release 2.6 installed.
Alternatively, if you do not want to take advantage of the Release 2.6 features, you can create, view, and modify workflow processes that include only Release 2.5 features. The current Oracle Workflow Builder versions can upload and download these process definitions to a database with Oracle Workflow Server Release 2.5 installed.
Using the Release 2.6.3 Oracle Workflow Builder with a Release 2.6 Embedded Server, or the Release 2.6.3.5 Oracle Workflow Builder with a Release 2.6.4, 2.6.3.5, 2.6.3, 2.6.2, or 2.6.1 Standalone Server
If you are using the Oracle Workflow Builder with Oracle Workflow Server Release 2.6 embedded in Oracle Applications, or with the standalone version of the Oracle Workflow Server Release 2.6.4, Release 2.6.3.5, Release 2.6.3, Release 2.6.2, or Release 2.6.1, you can use all currently available features for your version of Oracle Workflow, either standalone or embedded, in your workflow processes. You can save these process definitions to the database and open process definitions from the database to view or modify them.
You can also open existing process definitions that were created with a Release 2.5 or earlier Release 2.6 Oracle Workflow Builder and save these process definitions to a database with Oracle Workflow Server Release 2.6 embedded in Oracle Applications, or with standalone Oracle Workflow Server Release 2.6.4.
Using the Release 2.6.3.5 Oracle Workflow Builder with a Release 2.6 Standalone Server
If you are using the Oracle Workflow Builder with the base standalone version of Oracle Workflow Server Release 2.6, you can include most of the currently available features in your workflow processes. However, you must not use the Event Parameter lookup code which is now available in the Event Property lookup type, because this feature was added in the version of Release 2.6 embedded in Oracle Applications. Do not use the Event Parameter lookup code in any custom activities, and do not select the Event Parameter property in any of the following standard Workflow activities:
Get Event Property
Set Event Property
Compare Event Property
You can open existing process definitions that were created with the base Release 2.6 Oracle Workflow Builder, view or modify these process definitions using only the base Release 2.6 components, and save the definitions to a database with base standalone Oracle Workflow Server Release 2.6.
You can also create new workflow processes using only base Release 2.6 components. However, the version of the Standard item type used by the Oracle Workflow Builder Release 2.6.3.5 contains some later Release 2.6 components. If you want to save a new process definition to a database with base standalone Oracle Workflow Server Release 2.6, perform the following steps:
Create a new workflow process definition.
Force delete the Standard item type from your data store.
Force save the process definition to the database with base standalone Oracle Workflow Server Release 2.6.
Reopen the process definition from the database. The process definition now includes the base Release 2.6 version of the Standard item type.
Continue defining your workflow process using only base Release 2.6 components.
Using the Release 2.6.3.5 or Release 2.6.3 Oracle Workflow Builder with a Release 2.5 Standalone or Embedded Server
If you are using the Oracle Workflow Builder with either the standalone or the embedded version of Oracle Workflow Server Release 2.5, you must include only Release 2.5 features in your workflow processes. You must not use any of the following new features introduced in Release 2.6:
Event activities
Item attributes of type Event
External Java function activities
You can open existing process definitions that were created with the Release 2.5 Oracle Workflow Builder, view or modify these process definitions using only Release 2.5 components, and save the definitions to a database with Oracle Workflow Server Release 2.5.
You can also create new workflow processes using only Release 2.5 components. However, the version of the Standard item type used by the Oracle Workflow Builder Release 2.6.3 or Release 2.6.3.5 contains some Release 2.6 components. If you want to save a new process definition to a database with Oracle Workflow Server Release 2.5, perform the following steps:
Create your workflow process definition.
Force delete the Standard item type from your data store.
Force save the process definition to the database with Oracle Workflow Server Release 2.5.
Reopen the process definition from the database. The process definition now includes the Release 2.5 version of the Standard item type.
In standalone Oracle Workflow, the Web-based Item Type Definition page provides you with distributed access to workflow definitions stored in your Oracle Workflow database. The page provides a detailed view of the attributes, processes, notifications, functions, events, messages, and lookup types that are associated with a given item type, allowing you to present or do a design review of your workflow process.
To display an item type definition, you use the Find Item Type Web page to first query for an item type. You can query for an item type based on an effective date and time.
The Item Type Definition page then appears. The information is displayed in two frames, modeled like the Oracle Workflow Builder, so that you can review the contents easily and effectively. The left frame lists all the objects in your item type definition in an expandable navigator tree. The right frame displays the details of the object you select in the navigator tree. You can also select either frame at any time and use your Web browser to print all the information in that frame.
To Query an Item Type
Enter the following URL in your Web browser:
<webagent>/wf_item_definition.find_item_type
Replace <webagent> with the base URL of the Web agent configured for Oracle Workflow in your Web server. See: Setting Global User Preferences, Oracle Workflow Administrator's Guide.
Important: This URL accesses a secured page, so if you have not yet logged on as valid user in the current Web session, you will be prompted to do so before the page appears.
Note: You can also access the Find Item Type Web page from the Oracle Workflow home page. See: Accessing the Oracle Workflow Home Page, Oracle Workflow Administrator's Guide.
Item Type Page
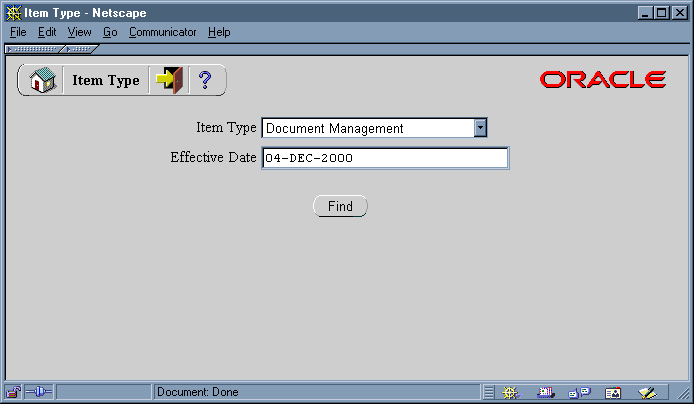
Use the Item Type poplist field to select an item type.
Specify the effective date and time of the item type definition you want to display using the format specified in the Date Format field of your User Preferences Web page. See: Setting User Preferences, Oracle Workflow User's Guide.
Choose Find to display the item type in the Item Type Definition Web page.
To Review an Item Type Definition
The Item Type Definition Web page displays two frames. The frame on the left lists the components of an item type definition in hierarchical format similar to the navigator tree in Oracle Workflow Builder. The frame on the right lists the details of each component.
Click on any component link in the left hand frame to display the details of that component in the right hand frame.