| Oracle® Automatic Storage Management Administrator's Guide 11g Release 2 (11.2) E18951-03 |
|
|
PDF · Mobi · ePub |
| Oracle® Automatic Storage Management Administrator's Guide 11g Release 2 (11.2) E18951-03 |
|
|
PDF · Mobi · ePub |
This chapter describes how to administer Oracle Automatic Storage Management (Oracle ASM) by using Oracle Enterprise Manager to provision and manage data file storage. This chapter contains the following topics:
Configuring Oracle ASM Initialization Parameters with Oracle Enterprise Manager
Managing Oracle ASM File Access Control with Oracle Enterprise Manager
Managing Directories, Files, and Aliases with Oracle Enterprise Manager
Managing Disk Group Templates with Oracle Enterprise Manager
Monitoring Oracle ASM Performance with Oracle Enterprise Manager
Performing Bad Block Recovery with Oracle Enterprise Manager
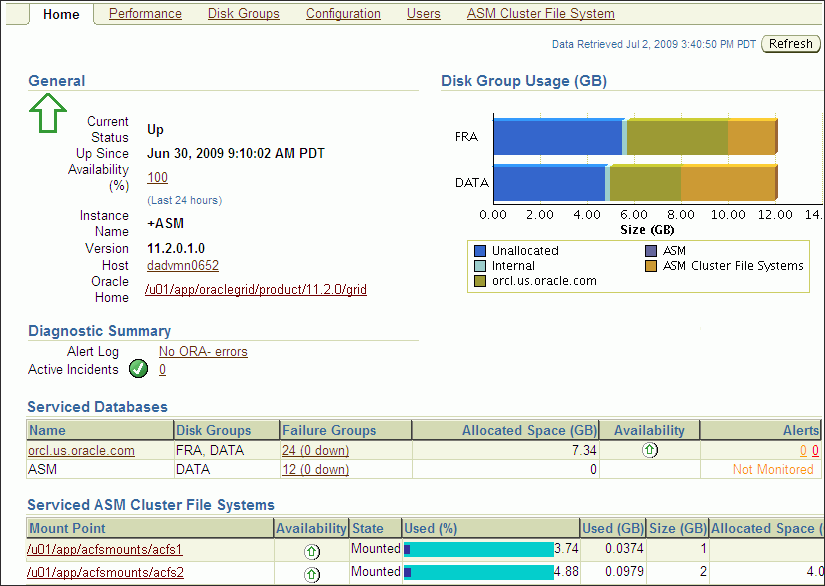
All Oracle ASM administration tasks begin with the Oracle Automatic Storage Management Home page in Oracle Enterprise Manager, shown in Figure 9-1. The Oracle Automatic Storage Management Home page displays:
The status of the Oracle ASM instance.
A chart that shows the used and free space of each disk group and disk group internal usage.
A list of databases that are serviced by the Oracle ASM instance.
A list of Oracle Automatic Storage Management Cluster File System (Oracle ACFS) file systems that are serviced by the Oracle ASM instance.
A list of other non-Oracle ACFS volumes.
A list of alerts for the Oracle ASM instance and the host computer.
Links to the Oracle ASM Performance, Disk Groups, Configuration, Users, and Oracle ACFS pages.
Figure 9-1 Oracle Automatic Storage Management Home Page
To access the Oracle Automatic Storage Management Home page on a single-instance system:
Access the Database Home page by logging in as any database user.
See Also:
Oracle Database 2 Day DBA for more informationUnder the heading labeled General on the left side of the Database Instance Home page, click the link next to the last entry in the General column labeled Oracle ASM.
If prompted for Oracle ASM login credentials, then enter the user SYS, provide the SYS password that was set for the Oracle ASM instance upon installation, and connect as SYSASM. Oracle Enterprise Manager displays the Oracle Automatic Storage Management Home page similar to the page in Figure 9-1.
See Also:
"Authentication for Accessing Oracle ASM Instances" for more information about authenticationTo access the Oracle Automatic Storage Management Home page in an Oracle Real Application Clusters (Oracle RAC) environment:
Log in to Oracle Enterprise Manager Database Control on any node that is running Oracle Management Service (OMS).
OMS is automatically started on the node on which Database Configuration Assistant (DBCA) was originally run to create the cluster database. Depending on your configuration, OMS might also be running on other nodes.
See Also:
Oracle Database 2 Day + Real Application Clusters Guide for more informationOn the Cluster Database page, under the Instances heading, click a link to access an Oracle ASM instance.
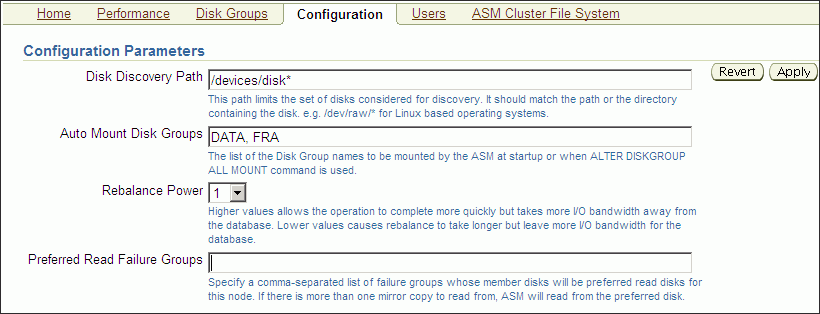
You can configure Oracle ASM with the Oracle Enterprise Manager Configuration Parameters page similar to the screen shown in Figure 9-2.
Figure 9-2 Oracle Automatic Storage Management Configuration Parameters Page
To configure the Oracle ASM instance:
Access the Oracle Automatic Storage Management Home page.
See "Oracle Automatic Storage Management Home Page" for instructions.
Click the Configuration link at the top of the page to view the Configuration Parameters page.
Update the configuration options on the page as follows:
Disk Discovery Path (ASM_DISKSTRING initialization parameter)
Enter a string value. See "ASM_DISKSTRING".
Auto Mount Disk Groups (ASM_DISKGROUPS initialization parameter)
Enter a string value. See "ASM_DISKGROUPS".
Rebalance Power (ASM_POWER_LIMIT initialization parameter)
Enter an integer value. See "ASM_POWER_LIMIT".
Preferred Read Failure Groups (Only in Oracle RAC environments) (ASM_PREFERRED_READ_FAILURE_GROUPS initialization parameter)
Enter a comma-delimited string of values in which each string represents a failure group. This parameter is generally used only for clustered Oracle ASM instances. See "ASM_PREFERRED_READ_FAILURE_GROUPS".
Click Apply to save your changes or click Revert to discard any changes made on the page.
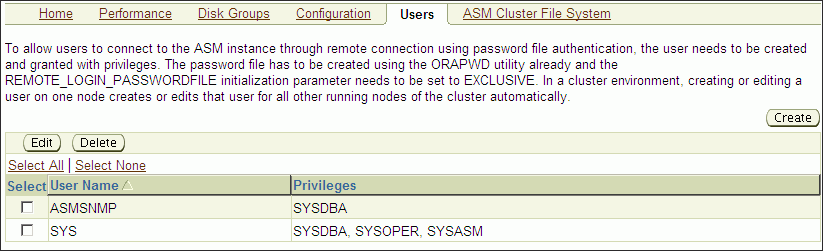
You can manage Oracle ASM users with the Oracle Enterprise Manager Users page, shown in Figure 9-3. Access this page by clicking the Users tab that is near the top center of the Oracle Automatic Storage Management Home page.
Figure 9-3 Oracle Automatic Storage Management Users Page
Access the Oracle Automatic Storage Management Home page.
See "Oracle Automatic Storage Management Home Page" for instructions.
Click the Users link at the top to view the Users property page.
Note that ASMSNMP is a less privileged user that is primarily used by Oracle Enterprise Manager to monitor Oracle ASM instances. This account is granted the SYSDBA privilege. ASMSNMP is created by Oracle ASM Configuration Assistant (ASMCA) when an Oracle ASM instance is created. For information about creating an Oracle ASM instance with ASMCA, see "Creating Oracle ASM Instances with Oracle ASM Configuration Assistant".
See Also:
Oracle Grid Infrastructure Installation Guide for information about installing Oracle ASM
Oracle Database Installation Guide for information about reviewing database accounts and passwords
Click Create to add a new Oracle ASM user. When you add users, Oracle Enterprise Manager displays a Create User page in which you must enter user login credentials that include the user name, password, and password confirmation. You can also grant privileges to the new user by selecting privileges in the Available Privileges column and clicking the right arrow buttons to move privileges to the Granted Privileges column, or move the privilege by double clicking it. The available privileges include SYSDBA, SYSOPER, and SYSASM. Click OK to create the user, Cancel to cancel the procedure, or Show SQL to view the SQL that Oracle Enterprise Manager uses to create the user.
To edit a user's properties, select the box in the Select column of the user to edit, then click Edit. On the Edit User page, modify the password if needed. You can also alter the privileges that are assigned to the user by selecting the privilege and using the right and left arrow buttons to move the privilege from the Granted Privileges column to the Available Privileges column and vice versa. You can also move the privilege by double clicking it. Click OK to edit the user properties, Revert to cancel the procedure, or Show SQL to view the SQL that Oracle Enterprise Manager uses to edit the user's properties.
To delete an Oracle ASM user, select the box in the Select column for the user to delete, then click Delete. On the confirmation dialog, click Yes to delete the user or No to stop the user deletion procedure.
See Also:
"Authentication for Accessing Oracle ASM Instances" for more information about user authenticationThis section describes how to manage disk groups under the following topics:
You can create additional Oracle ASM disk groups to:
Have disk groups with different redundancy levels (normal, high, or external), depending on availability requirements and storage system capabilities.
Separate different classes of storage, such as SCSI drives and SATA drives, into different disk groups. Disks in a disk group should have similar size and performance characteristics.
Store the fast recovery area in a separate disk group from the database.
To create a disk group:
Access the Oracle Automatic Storage Management Home page.
See "Oracle Automatic Storage Management Home Page" for instructions.
Click the Disk Groups link at the top of the page to display the Disk Groups property page.
If you are not logged in, then the Log In page appears and you should log in as the SYS user, connecting as SYSASM. Provide the SYS password for the Oracle ASM instance. This password was set up when the Oracle ASM instance was created.
Click Create and Oracle Enterprise Manager displays a Create Disk Group page similar to the page in Figure 9-4. The Create Disk Group page displays a list of Oracle ASM disks that are available to be added to a disk group. This includes disks with a header status of CANDIDATE, PROVISIONED, or FORMER, and so on.
Figure 9-4 Oracle Automatic Storage Management Create Disk Group Page
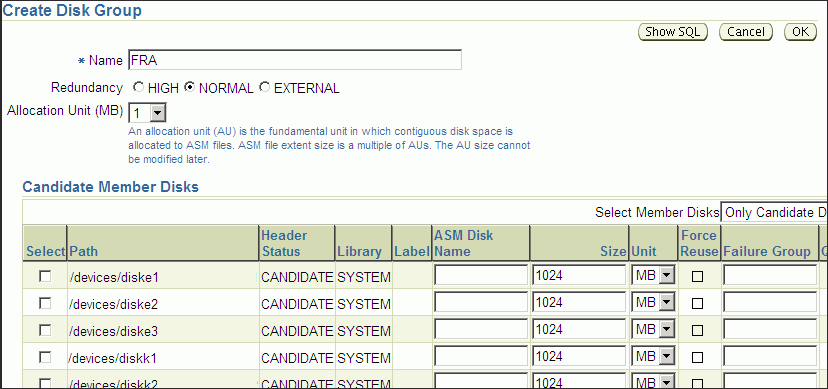
To display not only disks that are available to be added to a disk group, but all Oracle ASM disks, including disks that belong to a disk group (header status = MEMBER), select All Disks from the Select Member Disks list.
The page is re-displayed with the complete list of Oracle ASM disks that were discovered by the Oracle ASM instance.
Enter the disk name, select a redundancy type (high, normal, or external), and optionally, you can enter a failure group name.
Select disks as follows:
Select the box to the left of each disk to be included in the new disk group.
Optionally, you can enter a disk name, the size of the disk for Oracle ASM to use, and the failure group name.
To force the inclusion of a disk in the disk group, select the Force Usage box for that disk.
Caution:
Selecting the Force Usage box causes the disk to be added to the new disk group even if the disk belongs to another disk group and has valid database data. The existing data is then lost. You must be certain that you are selecting a disk that can legitimately be added to the disk group. See "Creating Disk Groups" for a discussion of theFORCE option.Specify a Disk Compatibility value for the disk group to enable your system to use the latest Oracle ASM features. See "Configuring Disk Group Compatibility Attributes".
Note:
You cannot reverse setting a disk compatibility value.For information about disk group compatibility attributes, see "Disk Group Compatibility".
Click OK to create the disk group or click Cancel to stop the disk group creation operation. You can also click Show SQL to show the SQL statements that the disk group creation operation uses.
See Also:
See "Creating Disk Groups" for more information about creating disk groups and theV$ASM_DISK view in Oracle Database Reference for information about the various header statuses of Oracle ASM disksYou can add disks to a disk group to increase the storage space in a disk group. If you add multiple disks in a single operation, then Oracle ASM rebalances the disk group to evenly distribute the data on all disks, including the newly added disks.
You can control the power of a rebalance operation with the setting of the Rebalance Power. The higher the number, the faster the rebalance operation completes. Lower numbers cause rebalancing to take longer, but consume fewer processing and I/O resources. This leaves these resources available for the database. The default value of 1 minimizes disruption to the database.
A value of 0 blocks the rebalance operation. Manual or automatic rebalance can then occur later. You might want to postpone rebalancing until there are fewer demands on the database, or when you have completed all of your disk group changes.
For information about controlling rebalance operations, refer to "Manually Rebalancing Disk Groups" and "Tuning Rebalance Operations". For information about rebalance power settings and the ASM_POWER_LIMIT initialization parameter, refer to "ASM_POWER_LIMIT".
To add one or more disks to a disk group:
Access the Oracle Automatic Storage Management Home page.
For instructions, refer to "Oracle Automatic Storage Management Home Page"
Click the Disk Groups link to display the Disk Groups property page.
If the Oracle ASM Login page appears, then log in as the SYS user, connecting as SYSASM. Provide the SYS password for the Oracle ASM instance. This password was set up when the Oracle ASM instance was created.
Click a link in the Name column to select the disk group to which you want to add disks. The Disk Group page similar to the page in Figure 9-7 appears, displaying a list of disks that are in the disk group.
Click Add and Oracle Enterprise Manager displays the Add Disks page. This page displays a list of Oracle ASM disks that are available to be added to the disk group. This includes disks with the header status of CANDIDATE, PROVISIONED, or FORMER, and so on.
Figure 9-5 Oracle Automatic Storage Management Add Disks Page
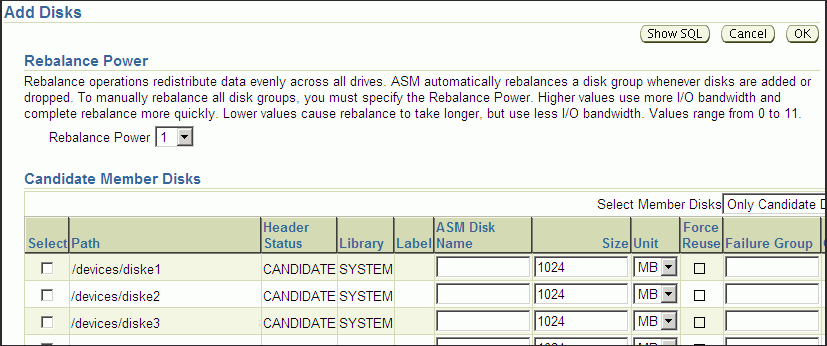
To display not only disks that are available to be added to a disk group, but all of the Oracle ASM disks, including disks that belong to a disk group (header status = MEMBER), select All Disks from the Select Member Disks drop-down list on the right hand side of the page. Oracle Enterprise Manager re-displays the page with the complete list of Oracle ASM disks that were discovered by the Oracle ASM instance.
Optionally change the rebalance power by selecting a value from the Rebalance Power list.
Select disks as follows:
Check the box to the left of each disk to be added to the disk group.
To force the inclusion of a disk in the disk group, select the Force Reuse box in the right-most column.
Caution:
The Force Reuse box causes the disk to be added to the disk group even if the disk belongs to another disk group and has valid database data. The existing data is then lost. You must be certain that you are selecting a disk that can legitimately be added to the disk group. Refer to "Adding Disks to a Disk Group" for an example of theFORCE option.Optionally enter an Oracle ASM disk name for each disk. Oracle ASM provides a name if you do not.
Click OK to add the selected disks.
See Also:
"Altering Disk Groups" for more information about modifying disk group propertiesPerform the following procedures to bring a disk online or offline:
Access the Oracle Automatic Storage Management Home page.
See "Oracle Automatic Storage Management Home Page" for instructions.
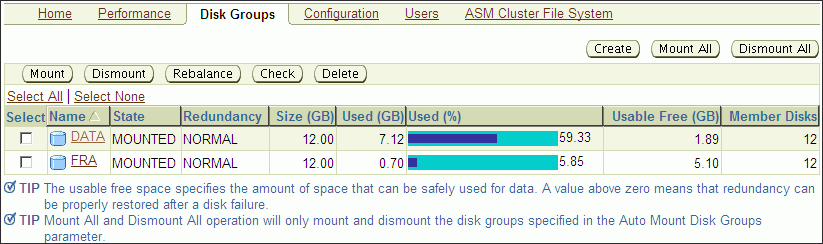
Click the Disk Groups link at the top of the page to view the Disk Groups page. Oracle Enterprise Manager displays a page similar to the one shown in Figure 9-6.
Figure 9-6 Oracle Automatic Storage Management Disk Groups List Page
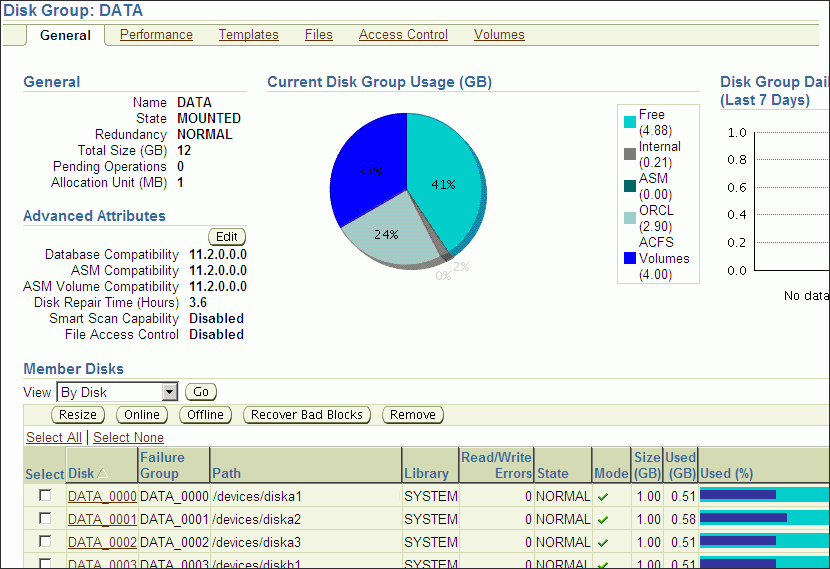
Click the name of a disk in the Name column and Oracle Enterprise Manager displays the General page for the disk group to modify. The General page that you see should be similar to the one shown in Figure 9-7.
Figure 9-7 Oracle Automatic Storage Management Disk Group General Page
To bring a disk online, select the disk to bring online and click Online. If you bring a disk online, then Oracle ASM performs the following:
Oracle ASM performs the online operation on the selected disks. You can select one or more or disks, or all of the disks to bring online. If you select all of the disks, then Oracle uses the ALL keyword for this operation. Otherwise, only the selected disks are affected by the online operation.
During the online process, Oracle Enterprise Manager first places a disk into online mode to accommodate write operations. Then Oracle Enterprise Manager resynchronizes stale data on the disk with the current data until the disk is fully online for read operations; this is the Oracle ASM fast mirror resync feature.
You can also choose the By Failure Group view to perform this operation on a selected disk group. In this case, Oracle uses the SQL for disks in failure group.
You can also select a disk that is online, but Oracle Enterprise Manager ignores that selection and only brings disks online that were previously offline.
Click Yes on the Oracle Enterprise Manager Confirmation dialog to begin bringing the disk online or click No to cancel the operation. You can also click Show SQL to review the SQL that Oracle Enterprise Manager uses for the online operation.
To take a disk offline, select the disk to take offline and click Offline. If you bring a disk offline, then Oracle ASM performs the following:
Depending on how much data is stale, the operation may require additional time to complete. You can monitor the operation's progress using the Pending Operations link from the Disk Group Home page.
The value that you set for Rebalance Power using ASM_POWER_LIMIT must be a whole number. The text on the page describes how the value of Rebalance Power affects the fast mirror resync operation. If the ASM_POWER_LIMIT is set to 0, then Oracle ASM does not perform automatic rebalance. For information about rebalance power settings and the ASM_POWER_LIMIT initialization parameter, refer to "ASM_POWER_LIMIT".
By default, the Rebalance Power value uses the value of the ASM_POWER_LIMIT initialization parameter.
Oracle Enterprise Manager displays an Offline Confirmation page and the text on this page explains that after Oracle Enterprise Manager takes the selected disks offline, the Oracle ASM instance waits for the time interval that is specified by the value that you have set for the DISK_REPAIR_TIME initialization parameter before Oracle ASM drops the disks. During the disk repair time period, you can repair the disks and then place them back online. For each disk that you successfully place online, the pending drop operation is canceled and a resynchronization operation begins.
If you have set DISK_REPAIR_TIME to a large value, for example, greater than one day, then this increases the possibility of data loss. This is because the files in the disk group are protected with a lower degree of redundancy during this period.
Click Yes on the Oracle Enterprise Manager Conformation dialog to begin the offline processing or click No to stop the operation. You can also click Show SQL to see the SQL that Oracle Enterprise Manager uses for the offline operation.
When you drop a disk from a disk group, Oracle ASM rebalances the disk group by moving all of the file extents from the dropped disk to other disks in the disk group. Oracle ASM then releases the disk and you can then add the disk to another disk group or use it for other purposes. You can drop one or more disks in a single operation. You can also optionally set rebalance power for the drop operation. The following is a list of possible reasons for dropping a disk:
A disk is starting to fail and you must replace it
To upgrade a disk
To reallocate the disk to a different disk group or reallocate the disk to a different storage system
Note:
Dropping disks from a disk group only logically deletes the disks from the disk group. It does not delete the disk contents. However, the contents are lost when you add the disk to a new disk group.To drop one or more disks from a disk group:
Access the Oracle Automatic Storage Management Home page.
See "Oracle Automatic Storage Management Home Page" for instructions.
Click the Disk Groups link to display the Disk Groups property page.
If the Oracle Automatic Storage Management Login page appears, log in as the SYS user, connecting as SYSASM. Provide the SYS password for the Oracle ASM instance. This password was set up when the Oracle ASM instance was created.
Click a link in the Name column to select the disk group that contains the disks to be dropped.
The Disk Group page appears.
Under the Member Disks heading, in the Select column, select the boxes for the disks that you plan to drop, and then click Remove.
A confirmation page appears.
To change the rebalance power, or to set the FORCE option for dropping disks, do the following:
Click Show Advanced Options.
Optionally select the Force option or select a rebalance power in the Rebalance Power list.
Note:
You might need theFORCE option if Oracle ASM cannot read from or write to the disk. See "Dropping Disks from Disk Groups" for a discussion of the FORCE option.Click Yes to drop the disks.
The Disk Group page returns, and displays a state of DROPPING for each disk being dropped.
Refresh the page until the dropped disks no longer appear in the disk group.
Caution:
You cannot reuse or disconnect the dropped disks until the drop and rebalance operations are complete. Operations are complete when the dropped disks no longer appear in the disk group.See "Dropping Disks from Disk Groups" for more information, and for other caveats for dropping disks.When you drop a disk group, you delete the disk group optionally with all of its files. You cannot drop a disk group if any of its database files are open. Oracle ASM deletes all of the disk group contents only if you specify the including contents option. After dropping a disk group, you can add its member disks to other disk groups or use them for other purposes.
One reason to drop a disk group is to change the redundancy level (normal, high, or external). Because you cannot change the redundancy of a disk group, you must drop the disk group and then re-create it with the proper redundancy. In this case, you must back up or move disk group data before you drop the disk group.
To drop a disk group:
Access the Oracle ASM Home page.
See Also:
"Oracle Automatic Storage Management Home Page" for instructions about how to access the Oracle Automatic Storage Management Home pageClick the Disk Group tab to display the Disk Groups page.
If the Oracle ASM Login page appears, log in as the SYS user, connecting as SYSASM. Provide the SYS password for the Oracle ASM instance. This password was set up when the Oracle ASM instance was created.
Click the box in the Select column to select a disk group that you plan to drop.
Click Delete and the confirmation page appears.
To delete the disk group even if it still contains files, click Show Advanced Options and ensure that the Including Contents option is selected. If the disk group contains files and the Including Contents option is not selected, then you cannot drop the disk group.
To delete a disk group that belongs to a disk group that you cannot mount, use the FORCE option in the Advanced Options confirmation dialog. The FORCE option applies to the DISMOUNTED disk group only. This option enables you to delete a disk header and mark it as FORMER.
Caution:
Use extreme care when using theFORCE option because the Oracle ASM instance does not verify whether the disk group is used by any other Oracle ASM instance before Oracle ASM deletes the disk group.On the confirmation page, click Yes.
See Also:
"Dropping Disk Groups" for more information about dropping disksPerform the following procedures to monitor disk group usage:
To view Oracle ASM disk group usage and free space:
Access the Oracle Automatic Storage Management Home page.
See Also:
"Oracle Automatic Storage Management Home Page" for instructions about how to access the home pageClick the Disk Groups link to view the Disk Groups property page.
If the Oracle ASM Login page appears, then log in as the SYS user, connecting as SYSASM. Provide the SYS password that was set up for Oracle ASM when the Oracle ASM instance was created.
The Disk Group list page, similar to the page shown in Figure 9-6, displays all of the disk groups and their space usage information.
The Usable Free column displays the space in megabytes that is available in the disk group. The values in this column consider the redundancy level of the disk group, and exclude the space that the disk group reserves for restoring full redundancy for all files in the disk group after a disk failure.
Use the FORCE option to mount a disk group when there are missing disks or missing failure groups. The FORCE option corrects configuration errors, such as incorrect values for ASM_DISKSTRING, without incurring unnecessary rebalance operations. Disk groups mounted with the FORCE option have one or more disks offline if the disks were not available at the time of the mount. You must take corrective action to restore those devices before the time set with the DISK_REPAIR_TIME value expires. Failing to restore and put those disks back online within the disk repair time frame results in Oracle ASM automatically removing the disks from the disk group. This would then require a rebalance operation to restore redundancy for all of the files in the disk group. Perform the following procedures to mount a disk with the FORCE option:
From the Oracle ASM home page click the Disk Groups tab.
Select the disk group that has a disk that you must repair and click Dismount. Click OK on the Dismount confirmation dialog. The State column of the Disk Group home page should show the Status as DISMOUNTED.
Perform any needed repairs to the disk in the disk group.
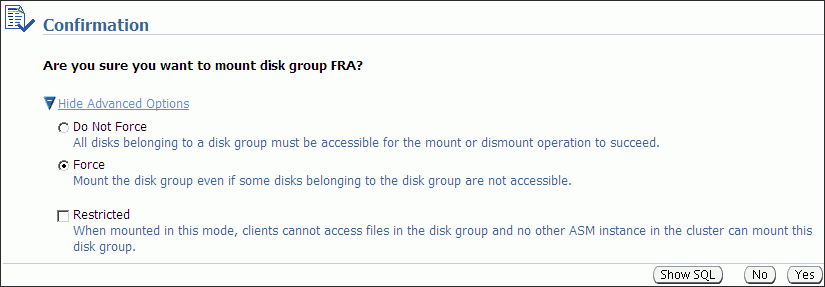
Click the box in the Select column next to the disk that you plan to force mount, then click Mount.
On the Disk Mount Confirmation dialog, click the Show Advanced Options link.
On the Mount Force Confirmation dialog as shown inFigure 9-8, select the Force option and click Yes. You can also click No to cancel the mount force operation and Show SQL to review the SQL that Oracle Enterprise Manager uses to perform the mount force operation.
Figure 9-8 Mount Force Confirmation Dialog
This section explains how to administer advanced disk group properties.
Perform the following steps to change the values for disk group attributes that can be altered after the disk group has been created.
On the Automatic Storage Disk Group List page, click a disk group name and Oracle Enterprise Manager displays the Disk Group Home page.
Click Edit under the Advanced Attributes section.
The topics contained in this section are:
Figure 9-9 shows the advanced attributes that can be altered for an existing disk group. This screenshot only shows the top portion of the Edit Advanced Attributes for Disk Group Page.
Figure 9-9 Oracle Automatic Storage Management Edit Advanced Attributes for Disk Group Page
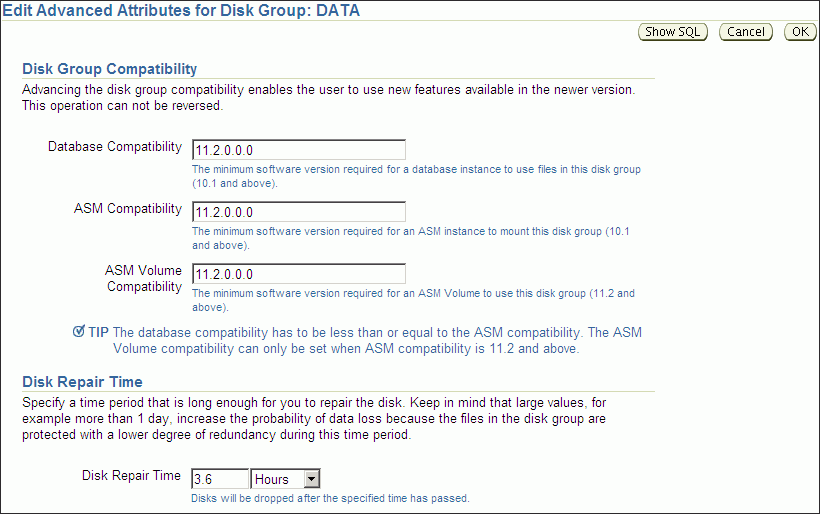
Specify a Disk Compatibility value for the disk group to enable your system to use the latest Oracle ASM features.
Note:
You cannot reverse setting a disk compatibility value.ASM Compatibility
Specify the value that is the minimum software version required for an Oracle ASM instance to mount this disk group.
Database Compatibility
Specify a value that must be less than or equal to the Oracle ASM compatibility. This is the minimum software version that is required for a database instance to use the files in the disk group. If the database compatibility value that you use is greater than the Oracle ASM compatibility, then Oracle Enterprise Manager displays an error.
Note:
You cannot modify the database compatibility for an Oracle ASM cluster that is in a rolling migration state.ASM Volume
Specify a value that is 11.2 or greater to use the Oracle ASM Dynamic Volume Manager (Oracle ADVM) functionality. The ASM disk group compatibility must be set to 11.2 or greater to enable Oracle ADVM. Also, the Oracle ADVM volume drivers must be loaded in the supported environment.
For information about disk group compatibility attributes, see "Disk Group Compatibility".
Specify a time period that is long enough for you to repair a disk in the disk group.
For information about disk group repair time, see "Oracle ASM Fast Mirror Resync".
Specify to disable or enable smart scan compatibility for the disk group.
This attribute is only applicable to Oracle Exadata storage.
See Also:
Oracle Exadata documentation for information about theCELL.SMART_SCAN_CAPABLE attributeSpecify to disable or enable Oracle ASM File Access Control. If Oracle ASM File Access Control is enabled, then specify the default permissions for newly created files in the disk group.
For information about Oracle ASM File Access Control, see "Managing Oracle ASM File Access Control for Disk Groups".
You can manage Oracle ASM File Access Control with Oracle Enterprise Manager Integration for Oracle ASM File Access Control, shown in Figure 9-10.
Figure 9-10 Oracle Automatic Storage Management Disk Group Access Control Home Page
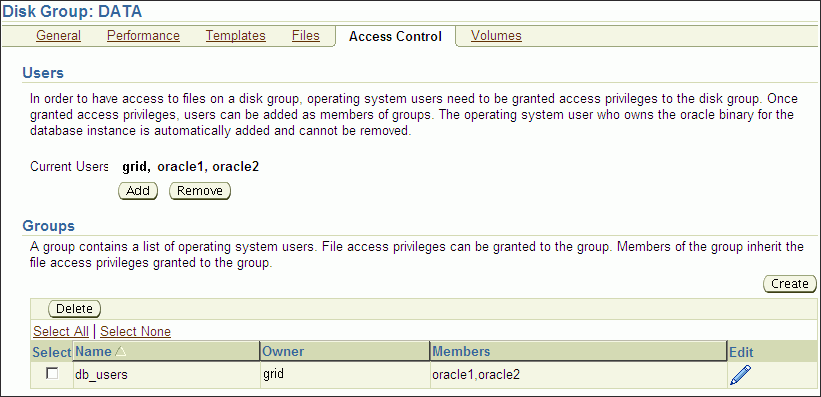
To manage Oracle ASM File Access Control:
Access the Oracle Automatic Storage Management Home page.
See "Oracle Automatic Storage Management Home Page" for instructions.
Click the Disk Groups link to display the Disk Groups property page.
Click a link in the Name column to select a disk group.
Click the Access Control tab to display the Access Control page.
On this page, you can add or remove users from a user group and create or delete user groups.
Figure 9-11 shows the Create Group page for Oracle ASM File Access Control.
Figure 9-11 Oracle Automatic Storage Management Create Group Page
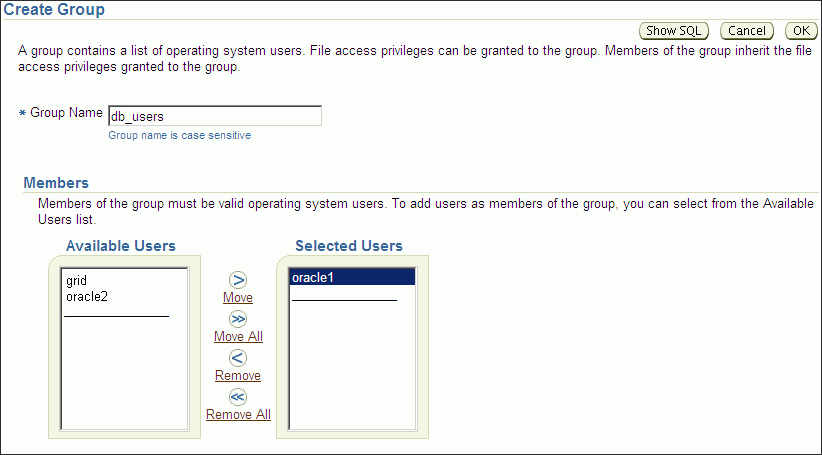
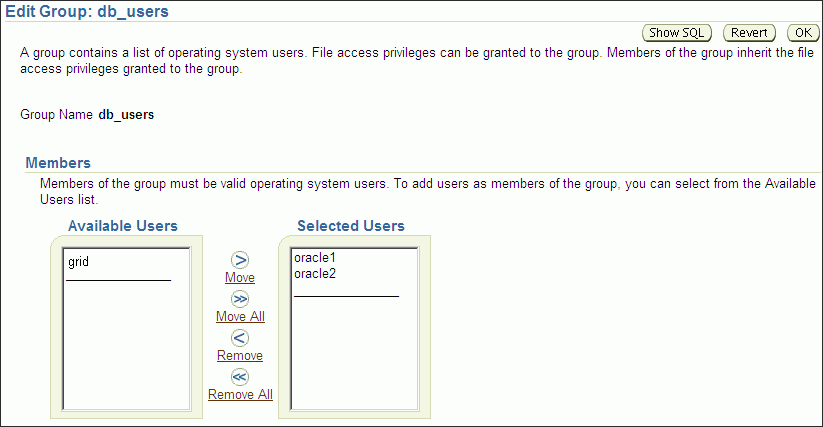
Figure 9-12 shows the Edit Group page for Oracle ASM File Access Control.
Figure 9-12 Oracle Automatic Storage Management Edit Group Page
For more information about Oracle ASM File Access Control, see "Managing Oracle ASM File Access Control for Disk Groups".
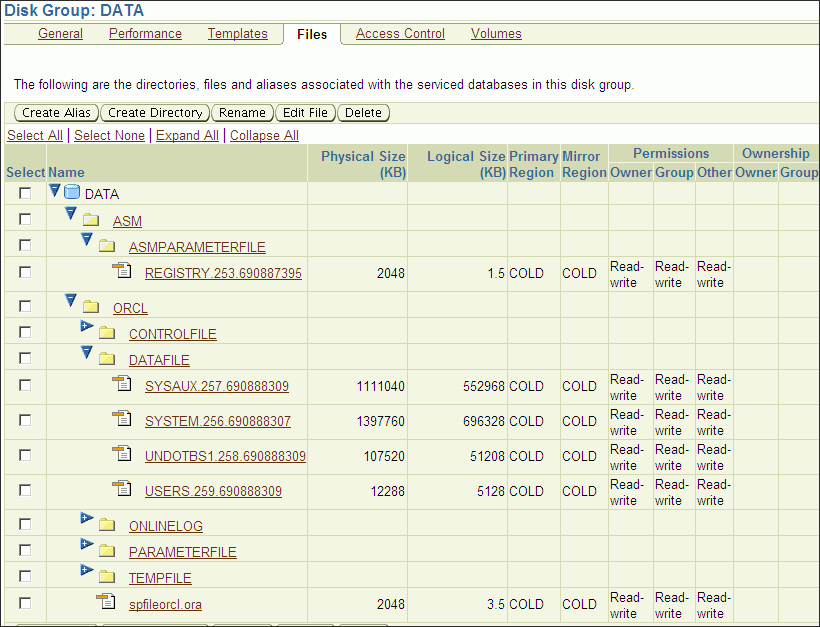
You can manage directories, files, and aliases with the Files tab of the Oracle Enterprise Manager Disk Group page, shown in Figure 9-13.
Figure 9-13 Oracle Automatic Storage Management Files Tab
Access the Oracle Automatic Storage Management Home page.
See "Oracle Automatic Storage Management Home Page" for instructions.
Click the Disk Groups link to display the Disk Groups property page.
Click a link in the Name column to select a disk group.
Click the Files tab to display the Files page.
Click the + to expand a database folder to view template folders.
Click the + to expand a templates folder to view individual files.
You can select a file with the Select box, then click Rename to rename the file, click Edit to change the properties of a file, or click Delete to remove a file.
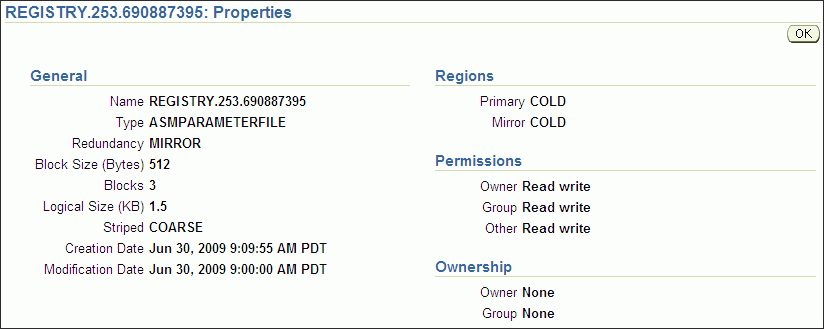
You can click the name of a file to display the properties page.
For more information about managing Oracle ASM files, directories, and aliases, see Chapter 7, "Administering Oracle ASM Files, Directories, and Templates".
You can manage disk group templates with the Templates tab of the Disk Group page, shown in Figure 9-14.
Figure 9-14 Oracle Automatic Storage Management Templates Page
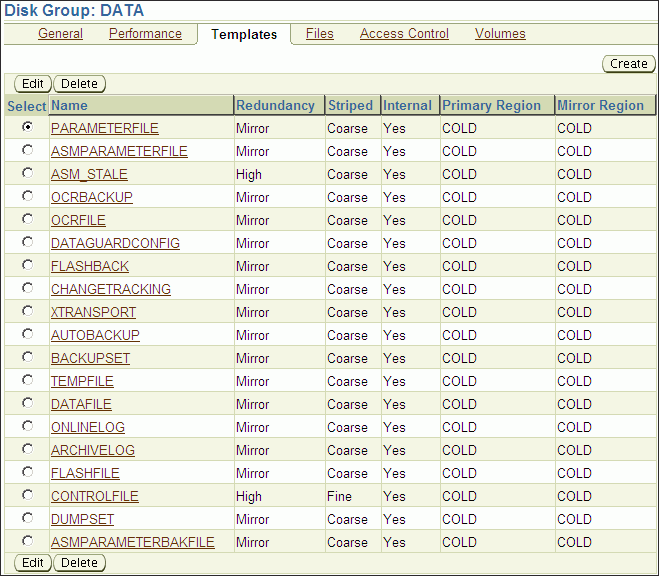
To manage Oracle ASM templates:
Access the Oracle Automatic Storage Management Home page.
See "Oracle Automatic Storage Management Home Page" for instructions.
Click the Disk Groups link to display the Disk Groups property page.
Click a link in the Name column to select a disk group.
Click the Templates tab to display the Templates page.
You can click Create to add a new template, click Edit to change a page, or click Delete to remove a template.
If you click Create, then the Create Template page displays and you can enter a name in the Template Name field. You can also specify a redundancy level, striped granularity, and extent regions (hot or cold).
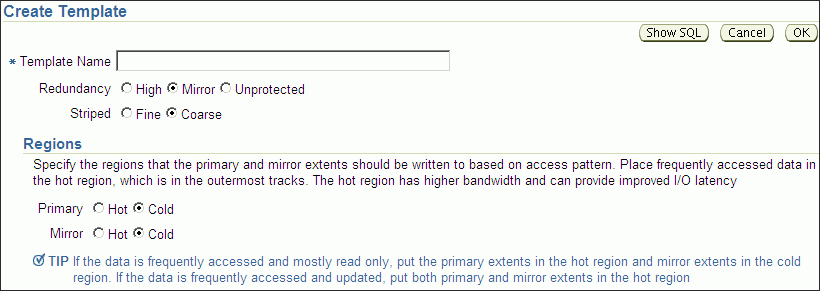
For more information about disk group templates, see "Managing Disk Group Templates". For information about hot and cold disk regions, see "Intelligent Data Placement".
This section describes how to perform the following performance-related Oracle ASM administrative tasks:
You can monitor Oracle ASM performance with the Oracle Enterprise Manager Performance page, shown in Figure 9-15.
Figure 9-15 Oracle Automatic Storage Management Performance Page
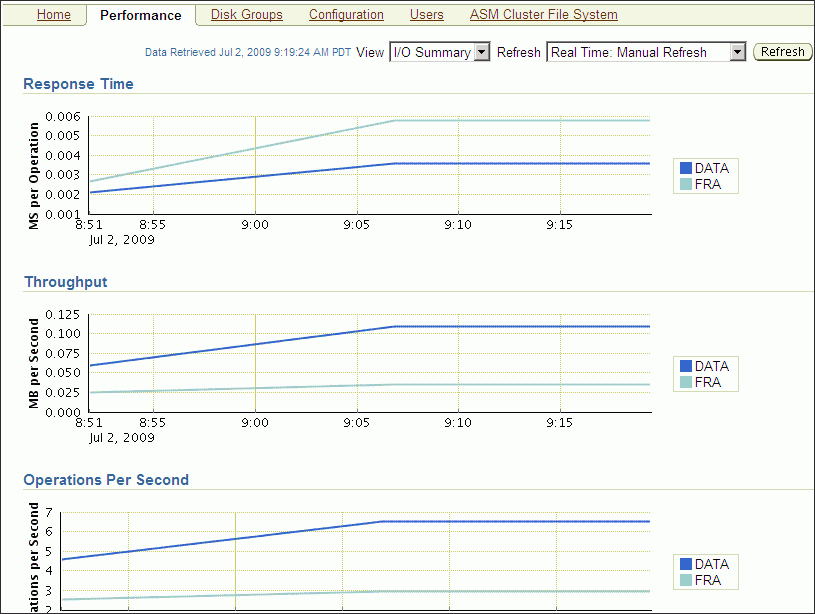
To monitor Oracle ASM performance:
Access the Oracle Automatic Storage Management Home page.
See Also:
"Oracle Automatic Storage Management Home Page" for more information about accessing the home pageClick the Performance link to view the Performance property page.
Determine the view and refresh rate of the performance graphs with the View and Refresh options. Click Refresh to manually refresh the graphs. The refresh option has the following two intervals:
Manual refresh: manual, 15 second interval, 30 second interval
Historical data: Last 24 hours, last 7 days, last 31 days
When you check the integrity of Oracle ASM disk groups, Oracle Enterprise Manager performs consistency checks on all of the disk group metadata. If Oracle ASM detects errors, then Oracle ASM stores information about errors in the alert log. To check disk groups, perform the following steps:
From the Disk Groups Administration page click Check and Oracle ASM displays a confirmation dialog for the check disk group operation.
Figure 9-16 Oracle Automatic Storage Management Check Diskgroup Confirmation Dialog
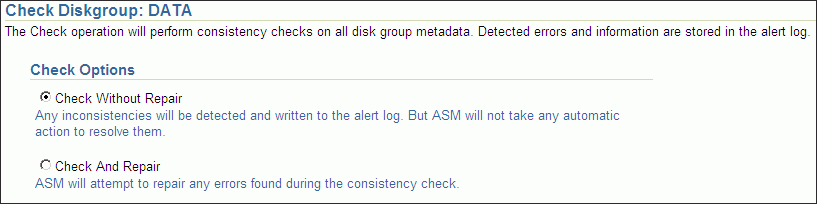
Select Check Without Repair to record information about disk group inconsistencies in the alert log. In this operation, Oracle ASM does not resolve the errors. Select Check And Repair to attempt to repair errors that Oracle Enterprise Manager identifies during the disk group consistency check.
Click Yes to start the disk group check operation or No to cancel it. You can also select Show SQL to review the SQL statements that the disk group check operation uses. Click OK to run the check operation as a command. To schedule a job, click Schedule Job. Optionally, you can modify or reenter the job name and description. Also provide host credentials and enter the scheduling options by selecting Immediately or Later and modifying the date and time as needed. Click OK to schedule the job or Cancel to terminate the job creation process.
Oracle recommends that you use RMAN to back up files managed by Oracle ASM. The procedures for using RMAN are documented in Oracle Database 2 Day DBA.
You can also back up your Oracle ASM managed files by performing a files related operation using the following procedures:
Create an alias.
Create a director.
Delete the alias and directory.
Rename the alias and directory.
For information about migrating data with RMAN, see Chapter 8, "Performing Oracle ASM Data Migration with RMAN".
See Also:
For additional information about RMAN, refer to the Oracle Database Backup and Recovery User's Guide.The procedures that you use in Oracle Enterprise Manager to perform bad block recovery correspond to the steps that you could manually perform with the remap command using the Oracle ASM Command utility (ASMCMD). Use the following procedures to perform bad block recovery:
Go to the Oracle Automatic Storage Management home page.
Click the Disk Groups link at the top of the page.
If you are not logged in, then the Log In page appears and you should log in as the SYS user, connecting as SYSASM. Provide the SYS password for the Oracle ASM instance. This password was set up when the Oracle ASM instance was created.
Click a disk group name and Oracle Enterprise Manager displays the disk group home page for that disk group.
Click a box in the Select column to the left of a disk in which to recover bad blocks, then click Recover Bad Blocks.
Note:
You can only recover bad blocks for disk groups that you have configured with normal or high redundancy; you cannot use this feature for disk groups that you have configured with external redundancy.This section explains how to use Oracle Enterprise Manager to migrate your database storage to use Oracle ASM.
Perform the following steps to migrate to Oracle ASM:
At the top of the Oracle Enterprise Manager Database Instance Home Page, click the link labeled Server. Oracle Enterprise Manager displays Database Server Page.
On the top left-hand side of the Database Server Page under the Storage heading, click the link labeled Migrate to Oracle ASM.
If prompted for Oracle ASM login credentials, then enter the user SYS, provide the SYS password that was set for the Oracle ASM instance during installation, and connect as SYSDBA. Oracle Enterprise Manager displays the Migrate Database To Oracle ASM: Migration Options Page.
For more information about authentication, see "Authentication for Accessing Oracle ASM Instances".
On the Migrate Database To ASM: Migration Options Page, which is the first step in a four-step process, verify the information about the files that you plan to migrate to Oracle ASM. If the target database is in ARCHIVELOG mode, then you could perform online or offline migration by selecting the corresponding option. Otherwise, using offline migration is the default. If you perform an online migration, then you can suspend the migration by selecting the check box next to Suspend Migration Job Before Switching Database To ASM.
Additionally, you can enter an e-mail address to which Oracle Enterprise Manager sends a message to notify you about the suspension. By default on this page, the Recovery-related Files option is selected. Deselect this option if you do not want to use it. Also verify the entry for the initialization parameter file. Lastly, the Parallelize File Copy Operations option is selected by default. Deselect this if you do not want Oracle Enterprise Manager to perform copy operations in parallel. Click Next when you complete your selections on this page and Oracle Enterprise Manager displays the Migrate Database To ASM: Disk Group Options page.
On the Disk Group Options page under Database Area, verify the location where Oracle ASM should create data files, temporary files, redo log files, and control files. Also verify the fast recovery area where Oracle ASM should create the recovery-related files such as archived redo log files, backup files, and so on. Also under fast recovery area, the option for Setup fast recovery area without Migrating Recovery-related Files is selected by default. If needed, change the selection to migrate the files. Click Next when you complete your selections on the Disk Group Options page.
If you chose to use a fast recovery area and Oracle Enterprise Manager displays a warning that the available space on the disk group is less than the specified fast recovery area size for the migration, then you can either continue by clicking Yes, or click No to stop the operation and modify your storage.
When you continue, Oracle Enterprise Manager displays the Schedule page on which you can specify a job name and a date and time for the migration job to begin. Click Next when you have configured your desired settings.
Oracle Enterprise Manager displays the Review page on which you can review all of your selections before beginning your migration operation. To expand the tablespace details and review them, click the plus (+) sign next to Tablespaces and Files To Be Migrated. Click Back to modify any of your selections or Submit Job to begin the migration. Click Cancel to cancel the operation.
Caution:
If your migration job fails, then do not start your database until you complete a recovery operation. Otherwise, you may corrupt your database.After you submit your job, Oracle Enterprise Manager should display a confirmation dialog indicating that the migration job was successful. Click View Status on the confirmation dialog to examine the progress of your migration job.
After the migration job has completed, the Oracle ASM links on the Oracle Enterprise Manager page may not display immediately. You can wait for the links to display after a subsequent refresh, or restart the Oracle Enterprise Manager agent as follows:
$ emctl stop dbconsole
$ emctl start dbconsole
Oracle Enterprise Manager provides Oracle ASM Support Workbench to monitor Oracle ASM alerts and incidents.
To access Support Workbench for Oracle ASM:
Click the Software and Support tab on the database home page.
Click Support Workbench under the Support section on the Software and Support page.
Click Support Workbench(ASM_instance_name) under the Related Links section on the Support Workbench page.
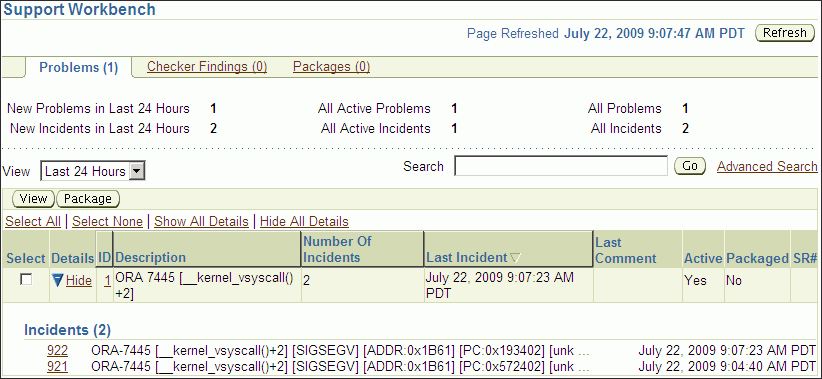
Figure 9-17 shows the Oracle ASM Support Workbench page with the Problems tab displayed. You can view information about current and past problems in this tab. On this page, you have options to view additional details and create a package that you can send to Oracle Support Services.
Figure 9-17 Oracle Automatic Storage Management Support Workbench Problems
To create a package, select an incident and click Package on the Support Workbench Problems page. Support Workbench guides you through the packaging process.
Figure 9-18 shows step one the Oracle ASM Support Workbench Create New Package wizard.
Figure 9-18 Oracle Automatic Storage Management Support Workbench Create Package
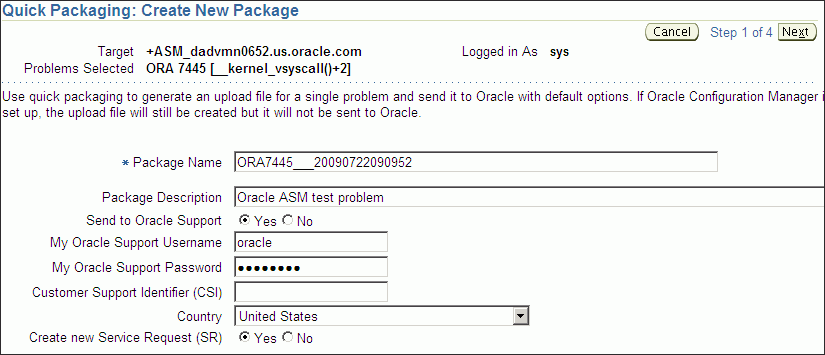
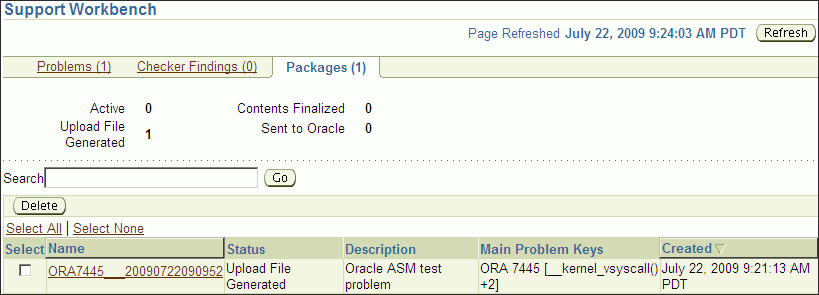
Figure 9-19 shows the Oracle ASM Support Workbench page with the Packages tab displayed. On this tab, you can view and edit information about incident packages created for problems.
Figure 9-19 Oracle Automatic Storage Management Support Workbench Check Packages
You can view additional details for a problem by selecting a problem on the Problems tab, and then clicking on View. The problem details page displays as shown in Figure 9-20.
Figure 9-20 Oracle Automatic Storage Management Support Workbench Problem Details
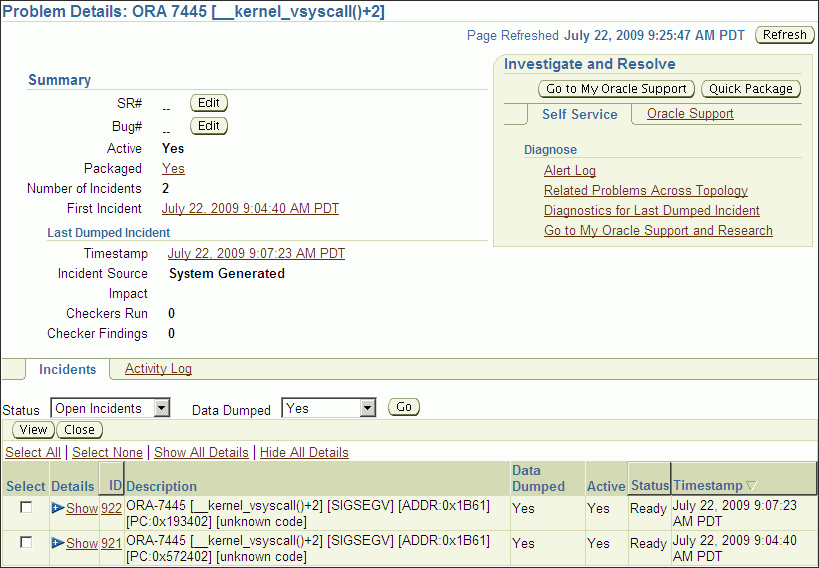
On the Problem Details page, you can access additional diagnostic tools. You can also use quick packaging to send an incident package to Oracle Support Services.
See Also:
Oracle Database Administrator's Guide for information about viewing problems with Oracle Enterprise Manager Support Workbench
Oracle Database 2 Day DBA for information about accessing the Oracle Enterprise Manager Support Workbench home page and viewing problems using Oracle Enterprise Manager Support Workbench
Oracle by Example (OBE) has a series on the Oracle Database 2 Day DBA book. This OBE steps you through Oracle Database tasks and includes annotated screen shots.
To view the Oracle Database OBE, point your browser to the following location:
http://www.oracle.com/webfolder/technetwork/tutorials/obe/db/11g/r2/2day_dba/asm/asm.htm
|
Copyright © 2007, 2012, Oracle and/or its affiliates. All rights reserved. Legal Notices |
|