| Oracle® OLAP Application Developer's Guide, 10g Release 2 (10.2) Part Number B14349-05 |
|
|
PDF · Mobi · ePub |
| Oracle® OLAP Application Developer's Guide, 10g Release 2 (10.2) Part Number B14349-05 |
|
|
PDF · Mobi · ePub |
This chapter describes the preliminary steps you must take to use Oracle OLAP. It assumes that you have already installed Oracle Database 10g Enterprise Edition. The OLAP option is installed automatically as part of a Basic installation of Oracle Database.
Note:
To start querying dimensional objects immediately, install the Global analytic workspace, as described in "Installing the Sample Schema". Then follow the instructions in one of these chapters:This chapter includes the following topics:
You can download and install the sample Global schema from the Oracle Web site and use it to try the examples shown throughout this guide:
http://www.oracle.com/technetwork/database/options/olap/olap-downloads-098860.html
Instructions for installing the schema are provided in the README file.
Sales History (SH) is a sample star schema that is delivered with Oracle Database. Although Global is used for most of the examples in this manual, Sales History has a very different set of data characteristics and demonstrates a correspondingly different set of build choices.
You can download a template for a Sales History analytic workspace from:
http://www.oracle.com/technetwork/database/options/olap/prevsampschemasfordoc-085509.html
Then you can simply examine the definitions of various objects instead of creating them manually. You still must run the Maintenance wizard to load the data.
You should create undo, permanent, and temporary tablespaces that are appropriate for use by dimensional objects. Follow the recommendations in "Storage Management".
Anyone who needs to create or manage dimensional objects in Oracle Database must have the necessary privileges. These privileges are different from those needed just to query the data stored in dimensional objects, which are described in "Security of Multidimensional Data in Oracle Database".
DBAs and application developers need the following roles and privileges.
To create dimensional objects in the user's own schema:
To create dimensional objects in different schemas:
Users also need an unlimited quota on the tablespace in which the dimensional objects are stored. The tablespaces should be defined specifically for OLAP use, as described in Chapter 12.
If the source tables are in a different schema, then the owner of the dimensional objects needs SELECT object privileges on those tables.
Example 2-1 shows the SQL statements for creating the GLOBAL user.
In this section, you learn how to install Analytic Workspace Manager software and make a connection to Oracle Database.
You can install Analytic Workspace Manager from the Oracle Database installation media or from the Oracle Technology Network.
Analytic Workspace Manager is distributed on the Oracle Database Client installation media.
If you are installing on the same system as the database, then choose a Custom installation and install into the same Oracle home directory as the database. Select OLAP Analytic Workspace Manager and Worksheet from the list of components.
If you are installing on a remote system, then choose either an Administrator or a Custom installation. The Administrator choice automatically installs Analytic Workspace Manager on the client.
See Also:
An installation guide for your client platform, such as the Oracle Database Client Quick Installation Guide for 32-Bit Windows.A more recent version of Analytic Workspace Manager may be available for download from the Oracle Technology Network. Check the available downloads at
http://www.oracle.com/technetwork/database/options/olap/olap-downloads-098860.html
Follow the installation instructions provided in the README file.
On Windows, open Analytic Workspace Manager from the Start menu. Choose Oracle - Oracle_home, then Integrated Management Tools, and then OLAP Analytic Workspace Manager and Worksheet.
On Linux, open Analytic Workspace Manager from the shell command line:
$ORACLE_HOME/olap/awm/awm.sh
You can define a connection to each database that you use for OLAP. After you define a connection, the database instance is listed in the navigation tree for you to access at any time.
To define a database connection:
Right-click the top Databases folder in the navigation tree, then choose Add Database to Tree from the shortcut menu.
Complete the Add Database to Tree dialog box.
Click the plus icon (+) next to a database in the navigation tree.
Complete the Connect to Database dialog box.
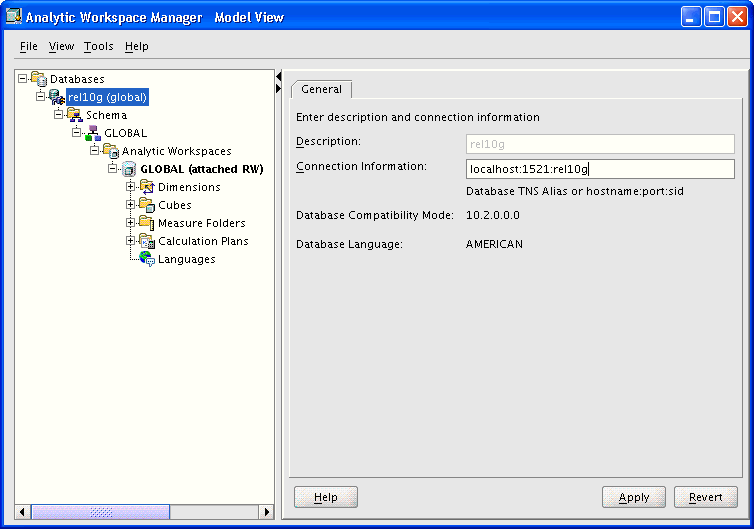
Figure 2-1 shows Analytic Workspace Manager displaying the properties of the database connection by the Global user.
Figure 2-1 Analytic Workspace Manager Connection to Oracle Database
Plug-ins extend the functionality of Analytic Workspace Manager. Any Java developer can create a plug-in. Plug-ins are distributed as JAR files. The developer should provide information about what the plug-in does and how to use it.
If you have one or more plug-ins, then you only need to identify their location to Analytic Workspace Manager.
Create a local directory for storing plug-ins for Analytic Workspace Manager.
Copy the JAR files to that directory.
Open Analytic Workspace Manager.
Choose Configuration from the Tools menu.
The Configuration dialog box opens.
Select Enable Plug-ins and identify the plug-in directory. Click OK.
Close and reopen Analytic Workspace Manager.
The new functionality provided by the plug-ins is available in the navigator.
See Also:
Developing Analytic Workspace Manager Plug-ins, which you can download from the Oracle Technology Network athttp://www.oracle.com/technetwork/database/options/olap/index.html.
|
Copyright © 2003, 2012, Oracle and/or its affiliates. All rights reserved. Legal Notices |
|